Welcome to Laser Pointer Forums - discuss green laser pointers, blue laser pointers, and all types of lasers

LPF Donation via Stripe | LPF Donation - Other Methods

Links below open in new window

ArcticMyst Security by Avery

The REAL Kryton GB round #3. Taking payments now.

Joined
Jan 7, 2007
Messages
6,309
Points
83
Kenom ---

Every housing that I get from anywhere needs a little "touch-up" on the threads. Since they are often electrical connections, now sometimes ~ 2 AMPS, a tight fit is needed. I think Pontiacg5 explained it well and a touch with a needle file can remove a burr which was not found in machining.

HMike
 
Last edited:


Kenom

0
Joined
May 4, 2007
Messages
5,629
Points
63
I have tried cleaning off the burrs and it did no good. I will try again however, I tried to get the tail section to screw into the same place and it wouldn't go either. I donno what to say other than the last batches I got from a different cnc shop worked smoothly with no issues directly from them so mikes argument that touch up needs to be done is not relevant in this case or they did the touch up before giving them to me. I would be happy to send one back to you and let you try to get it threaded. there is no physical evidence of misthreaded damage yet it won't fit on more than 1 revolution. I have even had others try and they couldn't do it themselves. I know they all arrived assembed and that's what makes it so weird. anywho, I will try to clean it up and see if that solves the problem.
also as to the de-threading when you adjust focus... the o-rings were added so that it had a nice tight fit making it so it didn't easily de-thread when focusing yet still allowing for a good electrical contact.
 
Last edited:

jayrob

0
Joined
Sep 21, 2007
Messages
9,862
Points
113
If Pontiacg5 threaded all of them on, and you cannot Ken, maybe they only fit one end of the barrel? (just hopeful thinking)

But something doesn't sound right??
 
Joined
Dec 23, 2007
Messages
2,494
Points
0
I've still got at least 20 grooves here and not a single one has this problem and I kept the ones that were the tightest or roughest looking.

The tailcap won't thread into the head side of the barrell because I made those threads tighter. The head will thread into the tailcap side but it will be loose.

I do not think relying on an o-ring to keep the head from moving is a wise idea, especially when the focus ring uses a o-ring to keep a tight fit. That is one of the reasons I made those threads so tight.

I know they all fit when I sent them and all of the remaining ones I have here still thread fine. I'm not sure what exactly you are doing to clean the threads up but I would bet that is causing the problem.
 
Joined
Jun 11, 2009
Messages
1,252
Points
63
Maybe each unit is unique, each head only goes with the body it was made from?
Could you be mixing them up?
I had a matching R,G,V set of hosts from eghmus. All were made the same, yet the tail caps would only thread to the host it was made with.
 
Joined
Feb 7, 2010
Messages
360
Points
0
The older generation Groove that I got a few months ago from Kenom wouldn't work if you tried to switch the head and the tail. The threading was slightly different so one end wouldn't go all the way on. Of course they thread nicely when the head is on the front and the tail is on the tail.
 
Joined
Aug 10, 2007
Messages
526
Points
0
I'm wondering if Pontiac's shop is warm, and Kenom's place is cold, or vice-versa?

I believe BOTH of you, and that might account for what's happening here. Close tolerances, and some thermal expansion/contraction.

Kenom, try placing a host in the fridge, or someplace warm like atop a TV, or near the stove and see what happens.

Also, aluminum/aluminum interfaces can suffer galling. That would make everything tough to turn.

Kenom, have you tried just assembling with some fine lubricant?
 
Last edited:

GMH

0
Joined
Nov 20, 2007
Messages
87
Points
0
^ I was just gonna suggest that. The barrels were manufactured near the end of summer and now Kenom you said your garage is pretty cold. Maybe its causing a tight fit. I have a old aluminum 532 pointer and it always goes severely out of focus outside in the cold which i believe is from the aluminum head contracting/expanding
 
Joined
Feb 7, 2010
Messages
360
Points
0
Good call AJ... that makes the most sense so far. I have total confidence that this will get worked out though. Both Kenom and Pontiacg5 are great guys to deal with. We just might need to state the minimum operating temperature is 90 degrees F ;) <---- yes that is a joke for those that miss the ;)
 
Joined
Jun 12, 2010
Messages
462
Points
28
Personally, I don't care if you anodize mine and ship it as-is. After mine is anodized I'll make the threads fit myself if needed. Then again, most people don't work in a CNC facility and have a lathe & mill in their basement.

Sometimes I'll get tight class 3 threads and I have to go around them with a scotcbhrite wheel to take a little material off. Sometimes a polishing wheel isn't enough.

I like the above selections though... heat the barrel and chill the head/tail to increase clearances.
 
Last edited:
Joined
Feb 7, 2010
Messages
360
Points
0
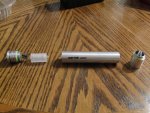
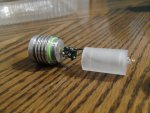
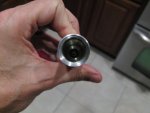
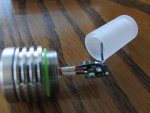
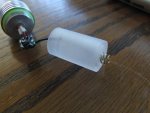
While we are all waiting I decided to get the last generation Groove built that I bought off of Kenom a few months ago (about time I finally build something with it).

I didn't like the idea of the pressure from the head spring putting pressure on the driver itself. I was also trying to figure out how to make sure the head spring does not bend and short/touch the metal part of the host. I decided to use this as an opportunity to give my new lathe a workout and find out if I am able to make anything at all on it. The spring I was using on the head is the same ones on the tail clicky which are very stiff.

I made a holder to support the head spring. I machined it out of transparent 1" acrylic rod (I didn't polish it after machining so it is just translucent). I used acrylic because I figured it would be easier to machine for my first lathe project. I got the holder for the spring idea from what I have seen Ehgemus create in the past for his hosts.
 

Attachments

  • lasermod.jpg
    lasermod.jpg
    161.1 KB · Views: 102
  • lasermodclose.jpg
    lasermodclose.jpg
    117.4 KB · Views: 98
  • lasermodclose2.jpg
    lasermodclose2.jpg
    92 KB · Views: 88
  • lasermodend.jpg
    lasermodend.jpg
    81.8 KB · Views: 112
Joined
Feb 21, 2009
Messages
231
Points
18
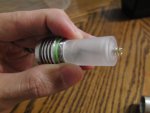
@xStatiCa In picture #2 the diode does not look like its totally pressed into the head could just be the lighting in the picture though.
 
Joined
Feb 7, 2010
Messages
360
Points
0
@xStatiCa In picture #2 the diode does not look like its totally pressed into the head could just be the lighting in the picture though.
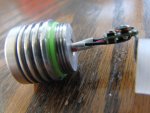
It actually wasn't. I ended up pulling the diode out yesterday and noticed that. I fried it trying to solder the driver on a second time. I tried to put the pins of the diode through the driver pin holes for better strength and ended up leaving the iron on it way too long (I don't have a solder sucker or braid to remove the old solder which was in the way of the hole). I figured I killed it and sure enough I did. The new diode is much further in now.

I decided to not mount the driver directly to the diode anymore and just use some short wires attached to the diode. This will allow me to solder and unsolder the diode if I ever need to again without subjecting the diode to as high of temperatures and soldering wire on is much easier to do for me. I like this method a lot better now after doing both methods.

I ended up frying that diode because I didn't like mounting the driver to the diode directly.
 

Attachments

  • firstlatheproject2.jpg
    firstlatheproject2.jpg
    110.5 KB · Views: 110
  • firstlatheproject1.jpg
    firstlatheproject1.jpg
    109.9 KB · Views: 107
  • diodepressed.jpg
    diodepressed.jpg
    114.9 KB · Views: 119
Last edited:
Joined
Jul 12, 2010
Messages
169
Points
0
i picked up a couple of 2 pin connectors from frys electronics,
2-Pin Connector with Header | CNMAT
gotta find the one with the right diameter but it'll fit right onto the diode pins without any mess or soldering near the diode. only problem is that it might come off with a little force i remedied that with a little electrical tape or shrink tubing.
 
Joined
Feb 7, 2010
Messages
360
Points
0
I would worry about the pins of the diode having some very small solder residue on them that made them just slighty rough so that if the connector moved and was on that spot it might make it more likely to momentarily disconnect.

I would also worry about corrosion in the connector causing the same issue. I am no electronics expert my any means though... Just DIY experience.

Interesting post in a different thread about this by Bionic-Badger. Sorry to continue off topic. We should move this discussion to the thread below or another thread.

http://laserpointerforums.com/f51/soldering-necessary-44751.html#post596808
 
Last edited:


Top