Welcome to Laser Pointer Forums - discuss green laser pointers, blue laser pointers, and all types of lasers

Buy Site Supporter Role (remove some ads) | LPF Donations

Links below open in new window

FrozenGate by Avery

The REAL Kryton GB round #3. Taking payments now.

Thanks Chip:beer:
However Ken cant find my baby blue kryton:yabbmad:

KEN if you cant find it, you said you would just anodize a new one.
My question is are you still setup for anodizing? Do you have all supplies? Or do you have to buy or setup stuff?
Maybe I should settle for something you have leftover:cryyy:

I don't think he has anymore krytons to anodize :/


I still have all the stuff I need to anodize. It's not setup as it's still back in Helena, but I'm taking the uhaul down today to get it all. It's gonna be setup by tues.

don't worry rplalalto it'll get resolved.

*Edit* NVM I found it. Was packaged up and all ready to go in my car but was hiding under my jacket. It SHOULD have gone yesterday. Oh well.. today will have to do.
 
Last edited:
Cool! Thanks for finding my baby blue kryton kenom
Man you got to get it together, get your self organized.

So just send it out when you get the chance will be waiting:)
 
it was right next to teh box I had all those boxes in that were going to ship or it fell out, however it got there, it did.. then my coat fell on top of it, and i wasn't aware taht it was there when I went into mail the packages. Once i started looking, I found it right away.
 
Seems xstatica already got his. I am sure others will get theirs soon as well.
 
WOW!
Finally got my kryton in todays mail. It only took 15 months from time of payment;)
I will say after all that time waiting, and all the drama. I'm actually very pleased with my baby blue kryton. It's exactly how I imagined it to look, when ordered all those months ago.

Kenom I sure hope you can get this GB behind you I know you still have some issues to iron out. Hope after it's all done. You can focus on your self, and get ahead in the game of life abit, before you attempt another GB.
 
Last edited:
Just a quick question on the rest of these, when?

I've been continuing to ship them out as I package them up as rpaloalto's barrel is evidence. I've not got the bits and bobs in bags and thats literally the only thing stopping me from mailing out every single remaining barrel that's done at this point. Once I find my baggies, I'll finish packing the bits and bobs. Would be a lot easier if all my stuff weren't in boxes scattered all over my new living room :)
 
I've been continuing to ship them out as I package them up as rpaloalto's barrel is evidence. I've not got the bits and bobs in bags and thats literally the only thing stopping me from mailing out every single remaining barrel that's done at this point. Once I find my baggies, I'll finish packing the bits and bobs. Would be a lot easier if all my stuff weren't in boxes scattered all over my new living room :)

Thanks for the update.
 
I recieved my barrels...

And to be honest they are more than I could have ever hoped for!!!

The wait that is over a year from the time I paid was completely worth it!

I am just glad that now I get to build 4 lasers into 4 amazing hosts :) :) :)

Quick Question: does anyone remember the page or post that has the fix for the plastic retainer rings? Or is it just cutting down the rings to half their original size.

Cause right now the plastic retainer ring pushes the switch too far into the rubber switch cover to work.
 
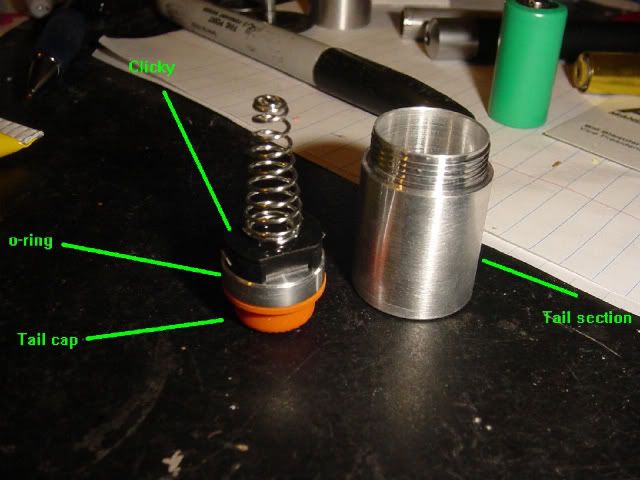
All you have to do is make it thinner by sanding it down a small bit. you don't need to take much off, maybe 1-2mm. Nothing is needed on the top section, just the bottom. The purpose of this is to provide the correct depth and to center the clickie into the rubber tailcap. See, the o-ring presses on the switch too hard and causes the switch to not want to release when it's clicked. So, by reducing the thickness by 1-2mm allows you the room you need to allow the switch to work properly.

So the order goes, rubber tailcap, o-ring, clickie, plastic washer (you make this) and then the c-clip retaining ring. NOT tailcap, clickie, o-ring, retaining ring. this is the wrong order.
DSC00058.jpg


Then put a ring above it to hold the retaining ring in place. I did mine like this. I made this from a thin plastic binder, or plastic packaging from a toy or some other thin plastic packaging. The one pictured is from a cellphone charger casing. Y'know the thing you have to cut into with a knife to get to your newly purchased thing and then toss away.

clickie%20solution.JPG

This is to hold the clickie in place with the retaining ring since the hole the retaining ring fits into goes in too deep.
 
Last edited:
That's some clean looking work there...

Hey just to chime in about the deeper theads. Another way to deal with that, is to use a very small amount of medium strength thread lock...

The final position of the focus adapter in relation to the front of the host, is determined by the lens position at focus. This gap can be adjusted by the module position inside the heatsink for most builds with an AixiZ module.

With some builds, like the Kryton, you do not have an AixiZ module to adjust the position.

So another way that would be very easy, is to thread the focus adapter deeper. That way when you thread it onto your lens, you can adjust the position of it, by how far you thread it onto your lens.

The only thing you will need to do, is use a very small amount of medium strength thread lock to set it's position on the lens.

The easiest way, is to have your lens installed into the laser with some Teflon tape on the threads so that it is 'snug'. And at normal focus.

Then, put a very small amount of medium strength thread lock onto the lens threads, and put the focus adapter onto the lens. Leaving just a minimal gap between the face of the host, and the back of the focus adapter. (a small gap is recommended in case you want to focus it in for a farther distance)

Then let it sit for 20 minutes or so, for the thread lock to cure.

Actually Jay, I've come up with a better solution for making the lens regardless of if it's a metal or plastic lens holder stay in place in the focus adapter. Take a razor blade or exacto Knife and score a channel from the depth all the way to the end one on both sides of the diameter, this in essence creates a impurity in the threads that is easy enough to over come a little when threading it in until you stop and it will seize it up to the place you want. just as a clarification, the score goes inside the focus adapter. For those wanting additional focus adapters so they can put a 405-g-1 in one and a acrylic in the other, I do have spares.

Once you've got it in the position that you want it, I then use a little silicone glue purchased from Dealextreme to hold it in place. Although it's not always necessary with the score on the threads.

Additionally, addressing the issue with the connection to the battery, the host was designed to be like a green laser, in that a spring is attached to the positive end of the driver, then extends down into the hole where the battery stops. Like so:
DSC00417.jpg

Also, there is included some screwcaps, that can be used as aperture caps. They can be additionally used as a device to center the spring so that it does not touch the sides of the host. Like So:
IMG_0157.jpg

Ignore the colored lines pointing out errors.

I made it this way on PURPOSE. There is nothing I hate more than a wire twisting up inside as you thread on the heads of these hosts. If you NEED to use a wire and a positive spring, the easiest solution is to buy a pcb from radio shack with holes in it. Cut it down so that it will fit into the diameter and throw it in the hole WITH the battery but put it in first. This will make your connection to the positive side and you can put the wire on it beforehand. A small blob of solder on the opposite side of the wire will make your positive connection.
 
Last edited:
It's probably 20 pages back in this thread somewhere, but where did you get those conical pointy springs from? Or were they just harvested out of something else?


Back
Top