Welcome to Laser Pointer Forums - discuss green laser pointers, blue laser pointers, and all types of lasers

Buy Site Supporter Role (remove some ads) | LPF Donations

Links below open in new window

FrozenGate by Avery

DTR's Laser Shop - Laser Diodes & More

The white wire is case or chassis ground, much like the green wire on most appliances. If you don't have a ground on your laser pointer, most people would probably hook up the ground to negative.

I was wondering the same thing. Im using Moh's C6 kit. So you say most would hook up both the white and black to neg. Is it better to leave white wire alone or hook it up?


I was wondering the same thing. Im using Moh's C6 kit. So you say most would hook up both the white and black to neg. Is it better to leave white wire alone or hook it up?

The white case wire is used for a driver negative input if your host does not provide a contact for ground in it. If you were able to get your unit built without it you did not need it.:beer:
 
Does your 445 1 watt blue diode have a case pin as long as the + and -?
I have ordered a diode before, and the + and - were about twice as long as the case pin.
 
Nope they are all that way. When they are put in the projector at the factory they cut the case pin the length of the spacer they use to center it in the block so unless you buy one from Nichia you are not going to find one with a long case pin.

I do offer them in modules with leads and that includes a lead for the case pin if you are having trouble soldering it.:beer:
 
Since someone else mentioned it, how would you recommend removing that plastic spacer safely so that you can solder all three wires on?

I figure that I can remove the old solder quickly off the + and - leads with some solder wick, but am not 100% sure if that plastic thing will slide off after applying some heat.
 
Last edited:
What you have to do is get a tiny needle and break the really week adhesive seal. Then just wedge it off with the needle or a thin blade :)
 
Since someone else mentioned it, how would you recommend removing that plastic spacer safely so that you can solder all three wires on?

I figure that I can remove the old solder quickly off the + and - leads with some solder wick, but am not 100% sure if that plastic thing will slide off after applying some heat.


Yep I just cut the solder blobs off the longer pins with the back part of the needle nose then just pull the spacer off with the front.:beer:
 
Last edited:
Ok thanks; so it's not like operating on an egg...probably more static sensitive than anything. I made a heat sink to put the diode in while soldering on it; so I'm all set.
 
I'm interested in a g2 lens, but I'm looking for a 445nm and the only one I see is listed as 405
 
They're labeled 405-G-2 but cover the 445nm wavelength as well. I have two of these lenses from DTR and they both work at 445.

DTR, since you answered my last question I figured I'd help you out quick in case you were busy tonight and answer this one. :)
 
I'm interested in a g2 lens, but I'm looking for a 445nm and the only one I see is listed as 405

That is the right one for 445 and 405. The lens element is just called a 405-G-2.:beer:

405-G-2
Glass Colimator Lens for Blue- Violet 405nm & Blue 445nm Laser Diodes
6.33mm dia., 4.00mm EFL, 2.40mm BFL, NA= 0.60, Multilayer "A" Coating is Standard


They're labeled 405-G-2 but cover the 445nm wavelength as well. I have two of these lenses from DTR and they both work at 445.

DTR, since you answered my last question I figured I'd help you out quick in case you were busy tonight and answer this one. :)

Beat me to it.;)
 
Last edited:
Hey DTR, wondering if I could get the Aixiz module and 445 lenses both from you, I need ten of each...
 
For what it's worth -

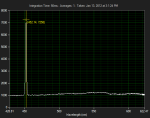
About a month ago I grabbed a bunch of diodes from DTR. Of those that I have in a built/testable state (about half a dozen diodes in total), they were all dead-on 452nm, with essentially no variance from diode to diode:

attachment.php
 

Attachments

  • DTR LPF.png
    DTR LPF.png
    18 KB · Views: 930


Back
Top