Welcome to Laser Pointer Forums - discuss green laser pointers, blue laser pointers, and all types of lasers

LPF Donation via Stripe | LPF Donation - Other Methods

Links below open in new window

ArcticMyst Security by Avery

Tutorial: Build Tips - 7 Color Laser Using The White Fusion Kit... from sightfx!

jayrob

0
Joined
Sep 21, 2007
Messages
9,862
Points
113
Re: Build Tips - 7 Color Laser Using Adjustable Sled Mount/Heatsinks

:thanks: Ryan!

It was easy with your adjustable sled mount/heatsinks...

Well, easy compared to trying to glue the modules in place like I did with my first 7 color laser. Obviously, a build like this is a fair amount of work, and not an 'easy' project. But as you know, the alignment is the hardest part, and with your mounts, the alignment is about 90% easier! (IMO)

Plus the ability to adjust, rotate, remove and replace... Just an awesome design. Looks good too! :)
Jay
 
Last edited:


jayrob

0
Joined
Sep 21, 2007
Messages
9,862
Points
113
Re: Build Tips - 7 Color Laser Using Adjustable Sled Mount/Heatsinks

JaYROB, I have a method for adjusting the power output of a green module with the stock driver.

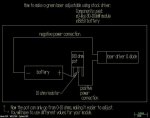
Using my 80-100mW o-like green, I put a 10 ohm pot in-between the battery and the stock driver and that gave me fully adjustment from 1mW to Full output. You may have a different resistance setting for the module you use.
Also I could not find a 10 ohm pot anywhere so I used a 100ohm pot and put a 10 ohm resistor along it making it only adjust from 0-10 ohm. This way I'm not just using the last 10% of the 100 ohm pot because thats makes adjustments too touchy.
I have also found the method work with flex drivers too, only in a different configuration. If you put a pot in between the diode and driver you can get full adjustability. With the flex drivers outputting 400mA. I used a 20 Ohm pot for the blu-ray and a 50 ohm pot for the red. That gave me adjustability from 100mA-400mA to the diodes. Again its hard to find a 20 or 50 ohm pot so I just used a 100 ohm pot and put either a 20 ohm or 50 ohm resistor across the leads to make it the correct resistance.

Hey do you mind making a quick sketch of your 100ohm/10 ohm resistor set up? I think I want to set up an o-like module like that. My 50mW one mode hops too much, and all I have on hand is a 100mW one.

I like the idea, and don't want to mess it up because I only have one more module on hand and it is a 100mW one.

I have a 100ohm pot, and a 10ohm resistor. I think I know how you have it set up, but would like to make sure...
:thanks:
Jay
 
Joined
Apr 2, 2009
Messages
356
Points
0
Re: Build Tips - 7 Color Laser Using Adjustable Sled Mount/Heatsinks

Yes I'll get you a sketch by lunch time. I used a o-like 80-100 module, and I didn't experience mode hopping. I did check current draw of the driver and it went from 640mA at full output of ~100mW and with 10ohms of resistance bewteen 18650 and the driver ~200mA I would get a consistent 1-3 mw.
In theory it should just be like giving the driver low voltage batteries so I do think it should harm anything, I ran my module for about five minutes with the output restricted and nothing got warm.
 

Attachments

  • green.JPG
    green.JPG
    50.7 KB · Views: 721
Last edited:

HIMNL9

0
Joined
May 26, 2009
Messages
5,318
Points
0
Re: Build Tips - 7 Color Laser Using Adjustable Sled Mount/Heatsinks

Other than the compliments for the ideas of the heatsinks, looking at those pics, make me think a joke question (sorry, but .....) ..... how much seconds for 0 to 100, with that 3 pistons motor ? :D
 

jayrob

0
Joined
Sep 21, 2007
Messages
9,862
Points
113
Re: Build Tips - 7 Color Laser Using Adjustable Sled Mount/Heatsinks

Hmmm... glad I asked for a drawing. Thanks MISTERWILLING!

I would have connected numbers 1 and 2 legs of the pot together, and then the number 3 leg to the driver. But I see from your sketch, that you are not using #3. Just 1 & 2 correct?


HIMNL9, I was thinking the exact same thing! Looks so cool... :cool:
Jay
 
Last edited:
Joined
Jan 23, 2009
Messages
2,113
Points
0
Re: Build Tips - 7 Color Laser Using Adjustable Sled Mount/Heatsinks

Got a little question....How much would it cost me to have someone build one of these for me???? Including the box and all? I don't have the money now, but I will be very interested in one when I do.
 

jayrob

0
Joined
Sep 21, 2007
Messages
9,862
Points
113
Re: Build Tips - 7 Color Laser Using Adjustable Sled Mount/Heatsinks

The answer to that question is becoming a real possibility with the development of these adjustable sled mounts.

I don't build complete lasers for sale, but there may be some who would consider doing this build for you.

Edit: I believe sightfx is offering options... Check with him on that.

Now that these adjustable mounts are available, I would say that the hardest part now, is the adjustment of the turning mirror. Getting it just right. Plus, it sticks up out of the sled a little.

My method to cover it, is to just use the stock sled cover, with a slot cut in it for the turning mirror to stick through. Then cut a piece of similar material from a different sled, and use a couple of pieces of double sided tape to 'bridge over' the mirror with the cut piece.

7%20color15.jpg


This is one way to protect it, which is very easy. And not a lot of work, but you must protect the mirror.

Also, the alignment is so precise, that I'm sure some 'jarring' from shipping would put the adjustable mounts out of alignment a tad. But it could be re-adjusted easily with these mounts from sightfx!
Jay
 
Last edited:
Joined
Apr 2, 2009
Messages
356
Points
0
Re: Build Tips - 7 Color Laser Using Adjustable Sled Mount/Heatsinks

Yeah I only use two of the leads on my pots, I haven't figured out why there are three pins. I just use a volt meter to find which two leads adjust the resistance then use those two and ignore the third.
Also the way to figure out which resistor to use is: take a 100 ohm pot between a battery and driver, Then turn till you get the dimmest output you want(you may want to warm up the laser too). Once you find this resistance value, then you can just put that resistor across the 100 ohm pot.
This gives you the whole pot for adjustment instead of lets say the last 10%. Just a method to make a pot of any resistance value. That's why I did anyways, hope it helps.
 
Joined
Jul 24, 2007
Messages
2,749
Points
0
Re: Build Tips - 7 Color Laser Using Adjustable Sled Mount/Heatsinks

Yeah I only use two of the leads on my pots, I haven't figured out why there are three pins. I just use a volt meter to find which two leads adjust the resistance then use those two and ignore the third.
It is good practice to connect one end of the resistor track to the wiper in case the pot breaks down for some reason (usually the wiper stops contacting the track) the driver will go to high resistance (low ma out) rather than open circuit (unknown ma out).

Regards rog8811
 
Joined
Mar 8, 2009
Messages
710
Points
0
Re: Build Tips - 7 Color Laser Using Adjustable Sled Mount/Heatsinks

There are three because sometimes you don't want just a variable resistance but a variable voltage - a voltage divider network. If you connect one end to ground, the other to let's say 6V, then by adjusting the pot you can get out a variable voltage from 0 to 6V on the middle one (you can't use this for powering an application, as this voltage source would have high internal resistance, i.e. it would sag under load - but you can use it as the input into an amplifier, for example).
 
Joined
May 12, 2009
Messages
1,403
Points
0
Re: Build Tips - 7 Color Laser Using Adjustable Sled Mount/Heatsinks

I'd be willing to do this for no less than $100, i know for a fact this build is by FAR the most difficult in sense of fine tuning.

But my offer stands :D

I'd say its a reasonable one.

I am building one of my own very soon ^_^

Dark
 

jayrob

0
Joined
Sep 21, 2007
Messages
9,862
Points
113
Re: Build Tips - 7 Color Laser Using Adjustable Sled Mount/Heatsinks

I'd say that's almost free! This build is a ton of work. It's one of those things that you put so much time and effort into making it perfect, that you don't want to part with it after you get it dialed in...


Mounting:

I went with a simple 'foot' or platform to mount the assembly onto... (this will make it easy to mount into an enclosure)

7%20color22.jpg

7%20color23.jpg

7%20color24.jpg


Note: The only thing touching the mount, is some double sided tape to the washers, which of course are connected to the sled. (and one other spot on the sled cover plate) So the adjustable heatsinks/modules, do not have any extra pressure on them except for their own weight. This is important, because the alignment is so critical...

The sled cover plate that is covering the optics, can still be removed if necessary. :D This is an easy method, and still offers some shock resistance...
Jay
 
Last edited:
Joined
May 4, 2009
Messages
470
Points
28
Re: Build Tips - 7 Color Laser Using Adjustable Sled Mount/Heatsinks

Excelent mount Jay,


That double sided tape will add some cushion to absorb any shock if droped too.


-Ryan
 
Joined
Apr 2, 2009
Messages
356
Points
0
Re: Build Tips - 7 Color Laser Using Adjustable Sled Mount/Heatsinks

Drop?!? You can't drop art, lol.
 

jayrob

0
Joined
Sep 21, 2007
Messages
9,862
Points
113
Re: Build Tips - 7 Color Laser Using Adjustable Sled Mount/Heatsinks

Excelent mount Jay,


That double sided tape will add some cushion to absorb any shock if droped too.


-Ryan

:thanks:

Simple but effective...

Had to look good too, being near your awesome adjustable sled mounts! :cool:

Drop it? Oh man, may that never happen.
Jay
 
Joined
May 4, 2009
Messages
470
Points
28
Re: Build Tips - 7 Color Laser Using Adjustable Sled Mount/Heatsinks

The Supper Sized Green will purdy that up some more I would think when you get it.

Can't wait to see it when it is all finished.

-Ryan


Top