Welcome to Laser Pointer Forums - discuss green laser pointers, blue laser pointers, and all types of lasers

LPF Donation via Stripe | LPF Donation - Other Methods

Links below open in new window

ArcticMyst Security by Avery

Blue laser 74W NUBM35 Portabl?

Borislav@87

Active member
Joined
Mar 20, 2022
Messages
355
Points
43
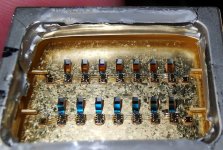
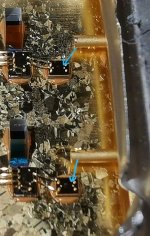
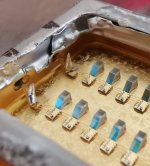
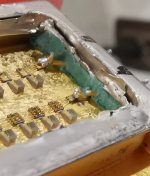
He's dead anyway. I use bare single diodes and they are not that weak. I can try to solder the poles very carefully, but I don't know if it will work. Visibly there is no dust inside. I also used a vacuum pump that is used for photo lenses. I will try to solder them tomorrow. Whatever happens, I have nothing to lose anyway. It doesn't work in this race
 

Attachments

  • Screenshot_20230108_014329_edit_1642247120044193.jpg
    Screenshot_20230108_014329_edit_1642247120044193.jpg
    615.9 KB · Views: 22


Why_you

Member
Joined
Jun 1, 2021
Messages
30
Points
18
Soldering is an EXTREMELY BAD idea, at that point you might as well use a blowtorch to attach a wire. Those chips are extremely heat sensitive, heating the die with a soldering iron is absolutely going to destroy them.
 

Giannis_TDM

Well-known member
Joined
Apr 27, 2019
Messages
895
Points
93
Not to mention that if prececiely not done complitely right the gold layer or the bonding wires depending what you solder to would literally vanish from existence.
 
Joined
Jul 10, 2015
Messages
9,897
Points
113
The larger of the switching drivers holds 3.5A powering one string of 7 diodes with only 4 cells for about 90 seconds until the drivers low battery protection kicks in and my beam expander is effective in the near field, the far field......not so much and it simply can't due to the aggressive fast axis divergence of each laser diode......maybe an anamorphic prism pair could be used to compress the 7 beam bundle before the beam expander.......yes I think that would help a lot, it will need to be a larger than usual prism pair.

SANY6772.JPG
SANY6774.JPGSANY6779.JPGSANY6791.JPGSANY6795.JPG


Looking for a larger than normal prism pair I just found this site, they have some other cool stuff at reasonable prices ( some of it ) if anyone is interested.


Last edited:
Joined
Jul 10, 2015
Messages
9,897
Points
113
I had taped all the wires to the radiator so there would be no movement. The problem with the pole pins has been there ever since I took it off the board. The next one I won't take it off, I'll cut the circuit board and it will stand for it. I will solder the wires directly onto the board's poles. I would try to open the laser array but I don't know how. I guess I have to take the lens off first. When I look at it, it is glued. It won't get any worse in this case. So I would appreciate if someone could advise how to open the array

If you buy the array already soldered to a PC board like I did, carefully cut the board away, then de-solder what ever if left on each pin.

You can drill small holes around each solder pad then cut between each hole with hand snips, then de-solder the scrap of board from the pin.

Remember to protect the lens.
 

Borislav@87

Active member
Joined
Mar 20, 2022
Messages
355
Points
43
I have already purchased a new one. I have a small soldering iron for fine things. I will try to solder the poles directly to the wires today. I will use the tip of the soldering iron. It is weak and I don't believe it will damage anything with its heat. I'm more likely to damage something. I will also need to put some kind of barrier to the crystals. Because the acid I use for contact soldering spatters slightly and will contaminate the crystals. Anyway, I'll try the diode row first and see what happens.
 

Attachments

  • Screenshot_20230108_115815_com.android.gallery3d_edit_1655682114048914.jpg
    Screenshot_20230108_115815_com.android.gallery3d_edit_1655682114048914.jpg
    841.7 KB · Views: 16

Why_you

Member
Joined
Jun 1, 2021
Messages
30
Points
18
Congratulations, but that not going to work for long. It only takes a single dust particle to land on one of those dies, as soon as it burns in the reflection goes up->more power goes into the die-> dead.
 

Borislav@87

Active member
Joined
Mar 20, 2022
Messages
355
Points
43
Now I put glue to lock the pin. Then I'll blow everything out with the lens pump and glue the lens. Then I'll seal the two ends because the lens doesn't cover them. Thus dust is impossible to enter. As long as it lasted. It's better though because it's already working. I only use bare diodes for my lasers and they have all worked fine so far. Anyway. It's important, it will work now
 

Giannis_TDM

Well-known member
Joined
Apr 27, 2019
Messages
895
Points
93
Now I put glue to lock the pin. Then I'll blow everything out with the lens pump and glue the lens. Then I'll seal the two ends because the lens doesn't cover them. Thus dust is impossible to enter. As long as it lasted. It's better though because it's already working. I only use bare diodes for my lasers and they have all worked fine so far. Anyway. It's important, it will work now
GGs, Do not use CA(superglue) though, it will deposit particles into the nearby area very easily, I'd recommend one of those "turns into rubber" things to glue the lens and epoxy for the pins(not epoxy for the lens cause you wont be able to get it out safely if you need to)
 

Borislav@87

Active member
Joined
Mar 20, 2022
Messages
355
Points
43
GGs, Do not use CA(superglue) though, it will deposit particles into the nearby area very easily, I'd recommend one of those "turns into rubber" things to glue the lens and epoxy for the pins(not epoxy for the lens cause you wont be able to get it out safely if you need to)
I already glued them. I put two-component plasticine type glue. Sticks everything. After 3 hours it becomes hard as a rock and does not come off. It's very sturdy. I filled the inside of the array and pin with it.
 

Attachments

  • Screenshot_20230108_174116_edit_1664724245556389.jpg
    Screenshot_20230108_174116_edit_1664724245556389.jpg
    586.9 KB · Views: 12

Borislav@87

Active member
Joined
Mar 20, 2022
Messages
355
Points
43
At the moment I don't have a good power source and I'm using a 12V 2A = 63V /0.4A adapter. I put the array on its board and held it in place with two heatsink screws. Since opening, the outer sheet had lifted and the lens was sitting higher and unable to focus. I fixed it with a flat press. I was more or less able to focus the beam. There is no better way
 

Attachments

  • Screenshot_20230108_214017.jpg
    Screenshot_20230108_214017.jpg
    654.1 KB · Views: 13
  • Screenshot_20230108_214027_edit_1668908274277625.jpg
    Screenshot_20230108_214027_edit_1668908274277625.jpg
    628.5 KB · Views: 13

Borislav@87

Active member
Joined
Mar 20, 2022
Messages
355
Points
43
It turned out that one row of diodes was damaged by a short circuit. It just happened yesterday. Bright but very dim. The other one works fine. Better one than nothing though. I tried this 1800w driver with it and the other one with the same 12V 3A adapter, the 1800W one puts out 31.5V at 1.1A while the other one does 31.5V 0.6A. The 1800W one is much more efficient. I fixed and glued the lens. This is what I could do. I'm waiting for the new diode. I'm going to assemble another laser with this one.
 

Attachments

  • Screenshot_20230109_000827.jpg
    Screenshot_20230109_000827.jpg
    975.6 KB · Views: 13
  • Screenshot_20230109_122107_edit_8627632611704.jpg
    Screenshot_20230109_122107_edit_8627632611704.jpg
    601.9 KB · Views: 12

Borislav@87

Active member
Joined
Mar 20, 2022
Messages
355
Points
43
While I wait for the new lazar array. I made the box today. I put in a Central switch for protection, an on/off switch, a voltmeter to see the battery level and a voltmeter + ammeter to see what is going to the laser array from the driver.
 

Attachments

  • Screenshot_20230116_184718.jpg
    Screenshot_20230116_184718.jpg
    649.8 KB · Views: 5

Borislav@87

Active member
Joined
Mar 20, 2022
Messages
355
Points
43
@RedCowboy
Hello. I plan to install a regulator before powering the laser diodes. What do you think about this one. I want after I have set 64V and 4A current going to the laser diodes, to be able to adjust the power of the laser with a potentiometer. For example, with just one turn, I can reduce his power by 50% or more.

AC 220V 2000W SCR Voltage Regulator Dimming Dimmers Motor Speed Controller Thermostat Electronic Voltage Regulator Module


Attachments

  • -1275057730-1845232721.jpg
    -1275057730-1845232721.jpg
    272.5 KB · Views: 0
Last edited:


Top