Welcome to Laser Pointer Forums - discuss green laser pointers, blue laser pointers, and all types of lasers

LPF Donation via Stripe | LPF Donation - Other Methods

Links below open in new window

ArcticMyst Security by Avery

1.4W 520nm - The Hulk - MS-SSW-II Custom Direct Green

IsaacT

0
Joined
Aug 25, 2010
Messages
5,947
Points
83
589nm and 593.5nm are not diode lasers. They are DPSS systems that are very expensive. They will need a fully custom host with an external lens of a diameter of roughly 1/2 inch spaced around 40 - 50mm from the module end. They will require a lot of work indeed. Right now you can get a 589nm module for 1300 dollars and the host will be another 100-150 dollars.


Joined
Sep 20, 2013
Messages
17,253
Points
113
Jmillerdoc, is the titanium MS host you got a press fit like the SSW-II? If so, how in the world did you press anything into titanium? The lathe it took to cut that thing must be enormous and very versatile. I guess I answered my own question. You can't press copper or aluminum into titanium. Are you concerned about heat distribution? I mean if it's held in there with a set screw it won't have the heat distribution of the press in MS-SSW-II. Just curious. It looks awesome, no doubt about it.

Jeff, never mind. I found the answer to my questions in your post. Didn't see the part about the copper core, so my mistake. :eek:
 
Last edited:

IsaacT

0
Joined
Aug 25, 2010
Messages
5,947
Points
83
The core of Jmiller's laser is copper. You can easily press something into copper. That said, Im not sure of the style of his host but most of sinner's hosts are pressfit.
 
Joined
Oct 3, 2011
Messages
899
Points
0
Yeah, copper core on the front end that screws into the titanium. The inside of the titanium host is threaded inside about 2.25" down the throat and the copper core has matching threads on one end. It slips down the throat of the host and then the last 5/8" or so screws in to bring the copper part flush with the end of the titanium host. It's pretty ingenious I think. I'm not really familiar with the heat conductivity of titanium but I bet it's similar to aluminum. Due to the threading of about 20% of the copper core length it makes good thermal contact with the host at about 1/3 ways down the host. I don't run my stuff that long but on a couple occasions I could feel the host start to warm up slightly. The copper core accepts a press fit DTR copper diode module (12mm) and it was a very tight fit. Used a vice to squeeze it in and it took some cranking to get it pressed. It's not coming out easy, that's for sure.

The new Cypreaus copper host Sinner is building is the same design I understand. Only difference is the body of the host is copper. I was just talking to him about this because I am having him build me three more copper cores for my titanium host so I can easily swap out diodes and drivers. All I will need to do to have four different color lasers in a titanium host is to screw out one and screw in another copper core with the diode and driver all pre wired inside. The inside end of the copper core has a little 13-14 mm plastic disk with spring that snaps in and the driver sits between it and the diode mount. Everything is contained so I can carry four lasers in one little gun case I have. Once they're made I will review what I will call my titanium laser 4 in 1 .

When I get the time I will try to take some pics of how it works, I think the explanation says it all but pictures say a thousand words supposedly.
 
Joined
Sep 20, 2013
Messages
17,253
Points
113
Thanks, Jeff. I was curious about how the copper threaded into the titanium. You know titanium is one of the most difficult metals to work with. I thought from your original post that the copper core was threaded all the way into the titanium host. It's interesting to know that it is threaded 1/3 of the way at the end. That must be one hell of a host! And now to know that all the electronics are inside the copper core and are interchangeable, that just makes this build even more awesome than I was led to believe. I would love to have something like that. Can't wait to see your pictures.
 
Joined
Sep 20, 2013
Messages
17,253
Points
113
Jmillerdoc, I meant to give you this information before now, but forgot about it until just now. The Thermal Conductivity of copper: 401 W x m-1 x K-1, of aluminum: 237 W x m-1
x K-1, and of titanium: 21.9 W x m-1 x K-1. So, the Thermal Conductivity of titanium is considerably inferior to either copper or aluminum. Just thought you wanted to know since you posted the question, sort of. :)
 
Joined
Jan 29, 2014
Messages
12,031
Points
113
I have a question about the duty cycle, or length of time this laser can be operated without needing to shut down to allow it to cool off and then start again for the same period of time. Cooling off enough to run again for the same period of time from a room temperature start is a key piece of information to understand it's true duty cycle at 20 C ambient.

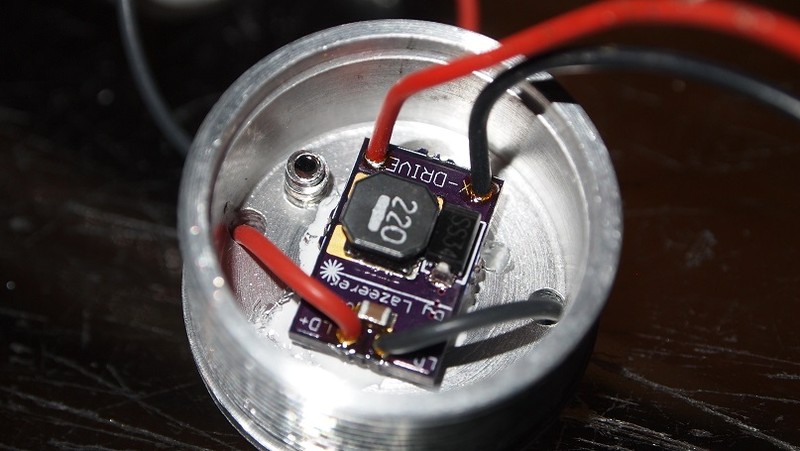
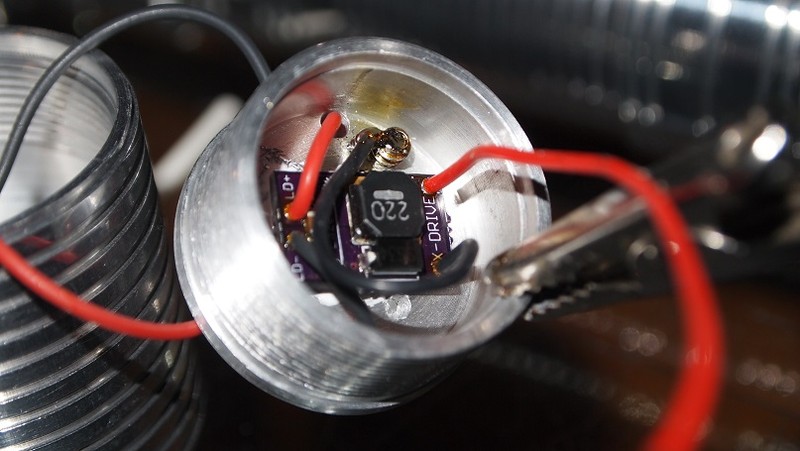
I liked the way you heat sinked your driver, but which gets too hot first to be able to continue operation, the laser diode or the driver? Maybe the heat sinking is paired up so well they are both matched for run time, in respect to heat? I want to build one of these too, but trying to decide whether to have the driver heat sinked as you did, or try to heat sink it better inside the 12mm module. I don't want the driver in mine to be the weak link for the duty cycle and so far, the only info I can find is a statement on DTR's web site the module with its internal driver can run 3 minutes, I'd like 10 minutes.

I read this thread page by page through and didn't see this info, forum searching with a few search terms didn't turn the answer up either for this specific diode and power level. When I asked DTR he referred me to the maker of the driver, and last but not least, when I did that all I received was a lonely cricket in the far distance chirping in the background :p so I'm asking here :)

Thanks, I know this question is many months later, but isn't rising the dead, not that old of a post yet, plus this thread is worth a bump for such a beautiful awesome laser build.
 
Last edited:

DTR

0
Joined
Jun 24, 2010
Messages
5,684
Points
113
The driver without being heasinked can run 90-120 seconds before it shuts down to cool. If you sink the driver you can run "the driver" continuously.

The diode is a different story. These things produce a lot of heat. Even in this massive host I would would suggest a 60 seconds on 30 off duty cycle maybe a little more if you like to push stuff. The only way I see you getting to a 10 minute duty cycle with this diode is switch from a portable to a lab unit using TEC cooling.
 
Last edited:
Joined
Jan 29, 2014
Messages
12,031
Points
113
Thanks, that's all I needed. Amazing how fast you respond to questions in the forum, I can only believe you have some kind of notification on the thread or something. I've never set my account up to do that.

TEC's sound great, but as you implied through your response, not well suited for a pointer. I built a 16X 455nm (parallel) laser on a massive heatsink with four large TEC's last year and the thing was too heavy to hold. With the amount of aluminum I was using I expected that, but when you cart the thing out to use it at night, it becomes too much of a chore. I want this project to be wieldable. Any host builders want to take on making a host from the diodes off of that one? I have like 25 of them to work with now, extras purchased to make a monster out of all of them, now that's probably insane, won't be something I can carry either :p
 
Last edited:
Joined
Mar 28, 2011
Messages
1,631
Points
63
I believe i may have run it for 8 min once ^^

This was outside when shooting a video...
 

Podo

0
Joined
Nov 7, 2013
Messages
717
Points
63
May get this powerful 520 handheld when I have so much extra money....
 
Last edited:
Joined
Jan 29, 2014
Messages
12,031
Points
113
Anyone else owning one of these high power 520nm laser diodes? I'm interested in knowing the diameter of the beam right out of the pointer for a calculation I need to perform for a home brew beam expander for one I'd like to build.
 
Last edited:

Emc2

0
Joined
Oct 16, 2007
Messages
303
Points
18
Nice.... So does this diode produce a nice round dot/Beam? If not, it would be useless to me. I like round.

Todd


1.4W 520nm - The Hulk - MS-SSW-II Custom Direct Green


6sg4.jpg


tg41.jpg


Here it is folks. The first build posted with the new 1W green diodes. This thing is a beast which I have aptly named The Hulk. It really is an angry green monster.:eek:

For more info on the new 1W green diode see this thread.

Nichia NDG7475 1W 520nm Laser Diode


Host


So here we go. A sweet custom 2X26500 MS-SSW-II aluminum host from Sinner with a head that works with a 12mm module pressed in instead of a set screw for exceptional thermal transfer.

q70t.jpg


wytm.jpg


Build Tutorial


We start with the diode, module, thermal back half and the head of the host.

4uhl.jpg


First step is to get the diode pressed into the module which I have already pressed though the host head once to make sure the threads did not warp as to keep the lens from screwing in as that would be bad to have a $700+ diode in a module that can't thread a lens in. Will show the pressing of the module a few steps down.

hk35.jpg


Once the diode is pressed we add leads to it.

m9hv.jpg


Then put some shrink tubing on over the exposed joints.

wb26.jpg


Next we put on the thermal back half. This part extracts heat from the base of the diode as well as the sides and top lip.


Now we have the module all prepared it is time to press it into the head. I found my diode press also works perfectly for this task. Turned backwards the base was the perfect size to push the module in flush.

8yvc.jpg


Now it is pressed in here it is nice and flush and a permanent resident.

e8fl.jpg


Next while we have the vice out the focus adapter which I would have preferred it just be threaded M9x0.5mm like others but this one requires a focus ring to be pressed in to hold the lens.

l060.jpg


So I got it pressed in.

3ixg.jpg


Now that the head of the unit is ready time to move on to the pill. I got a 2.4A X-drive ready, some wire and some thermal adhesive.

t5kp.jpg


I started by wiring up the X-drive.

git0.jpg


Next I mixed up some two part Arctic Alumina thermal adhesive.

doqw.jpg


I put a thin layer on the inside of the pill were the driver will be mounted.

6hw3.jpg


At this point I set the driver in place and let the adhesive harden.

l6lo.jpg


Now the driver was set I needed to address the ground contact for the driver negative input. Since these diodes don't have a case pin and this host does not provide a good place to connect a solid ground so I started by drilling a hole in the pill.

tnqx.jpg


Next I got a screw that will provide a good place to solder a ground lead to.

t189.jpg


Screwed it all the way in.

2g1k.jpg


The threads on the screw provide a good bonding point for the solder.

y7hb.jpg


Soldered the lead to the threads.

o2xl.jpg


With that done it was time to work on the positive battery contact. I got the contact board out and ran the wire though it.

1ohl.jpg


I then soldered a spring to the end of the lead.

l0k7.jpg


Then just whipped up a little more thermal adhesive and set the spring in place.

gmu4.jpg


Then I pressed the contact board in pace and screwed the pill in the host.

3hfs.jpg


Then just screwed the head on the host and that is it.:D

b4j0.jpg


Now that the build is complete I pulled out my 25500 cells as I need to get some 26550's but these work fine for now.

x5gx.jpg


Let there be light.:eg:

hgv9.jpg


Power Test


Test done with my Laserbee to get a more stabilized reading than the high peak on my Ophir since the Laserbee takes a few seconds to ramp up. Peaks 1420mW.:eg:

vfzw.jpg


Beam Shots


smun.jpg


vcda.jpg


z90l.jpg


tg41.jpg


izw1.jpg


y7av.jpg


7xzu.jpg


Conclusion


I have been sitting on this host for a while waiting for a build just like this. This Hulk is the brightest beam I have had the pleasure of and there is no doubt, this is a many times brighter than the highest power 445's I have seen. Extreme caution is certainly advised. In a dark room it is like going to daytime when you turn it on.:cool:


I do want to thank Sinner for this amazing host and I hope to see others make equally interesting builds with these new diodes. Thanks for reading my review and hope you enjoyed it.:beer:


.
 
Joined
Mar 30, 2012
Messages
22
Points
3
Hot damn! This makes me pretty GREEN also. HULK SMASH! HULK WANT. Pretty sure it's out of my price range presently. It would make a nice addition to my ~3.1W 445 nm once the price drops closer to my budget. Curious how much a build is running presently.
 
Last edited:


Top