

sightfx
0
- Joined
- May 4, 2009
- Messages
- 470
- Points
- 28
White Fusion
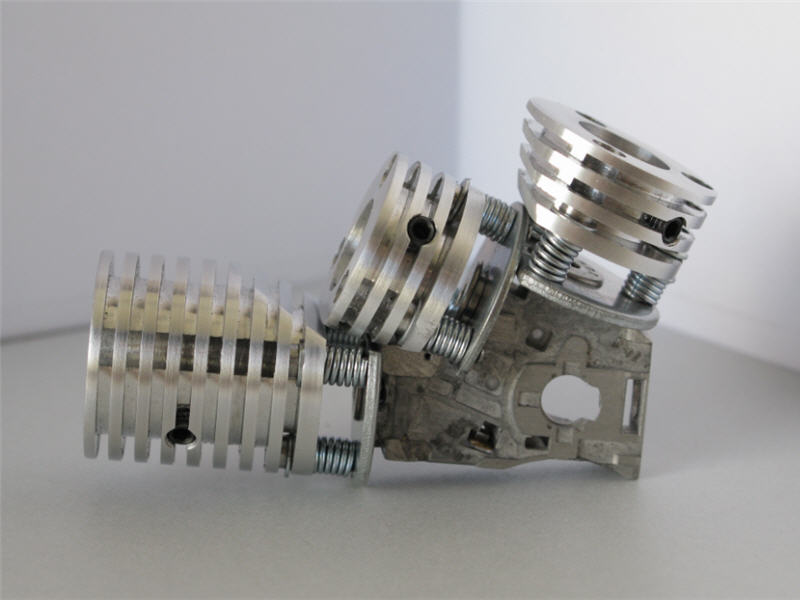
This laser kit allows you to mix your Red, Green and Blu-Ray (Violet) lasers to produce any color you like. Even white!
There are a few types of builds out there that are using this kit. 7 Color Hand Helds, Projector lasers, but the the best fit has to be the awesome driver FireMyLaser is building specifically for this kit: http://laserpointerforums.com/f64/fs-full-colour-driver-extension-white-fusion-kit-44052.html#post584403
A video of it in action can be seen here: http://laserpointerforums.com/f48/my-rgv-alive-48046.html#post653103
UPDATE: My Latest!
I am taking orders on an on going bases. White Fusion Kits can take anywhere from one day to 2 weeks depending on availability. No cash commitment required till kits are ready to ship.
A percentage of all sales will be donated to LPF.
See this kit in action:
built by LPF legend :bowdown: Jayrob: build-tips-7-color-laser-using-adjustable-sled-mount-heatsinks
firemylaser's http://laserpointerforums.com/f48/my-rgv-alive-48046.html#post653103"]http://laserpointerforums.com/f48/my-rgv-alive-48046.html#post653103[/URL]
misterwilling's http://laserpointerforums.com/f48/500mw-white-fusion-fml-driver-pics-video-46782.html#post632741
flaminpyro's http://laserpointerforums.com/f47/white-fusion-colors-48217.html#post656401
How-To
This how-to is not to replace the excellent tutorial Rog8811 originally made available HERE and to which this kit is based but rather how to prepare and put together this particular kit.
Warning: Do not attempt this build unless you understand laser safety and plan to use it in a safe, sane and legal manner. While following these instruction You Accept that you are building this laser systems at your OWN RISK and will hold the author of this how-to and Seller of the kit LEGALLY harmless from any and all LIABILITY.
Needed items not provided in this Customizable Kit:
1 Green Laser module and driver
1 Blu-Ray diode and driver
1 Red diode and driver
Batteries
Tools needed:
Safety Glasses (Laser and shop)
Jayrob’s highly sophisticated smoke in a bottle calibration tool.
Glass Glue or Epoxy
Other handy tools tools you may need for one reason or another like preparing the enclosure:
Grinder, belt sander, Files, Dremmal
Hacksaw or something similar
Vice, drill.
Setting up for success:
The Kit comes pre assembled with a stand-off post on the bottom for mounting the kit in your enclosure. I recommend mounting the kit to the lid of your enclosure so when it is open you have platform to work from. If you don’t want to do that you can finding a hard piece of thin cardboard or plastic to temporarily mount the kit too.
Having your drivers set to a low safe output to start with is also a good idea. No reason to kill your eyes when doing the alignment steps.
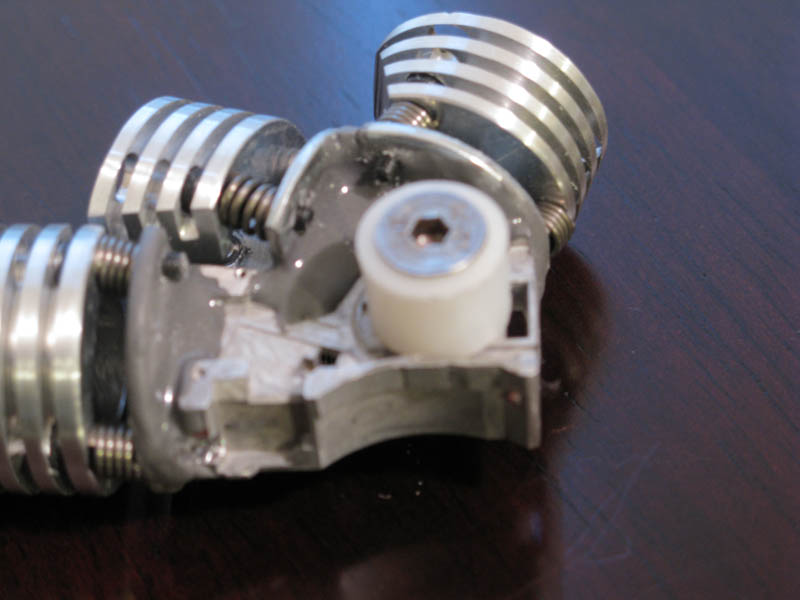
Laser Module Rotation:
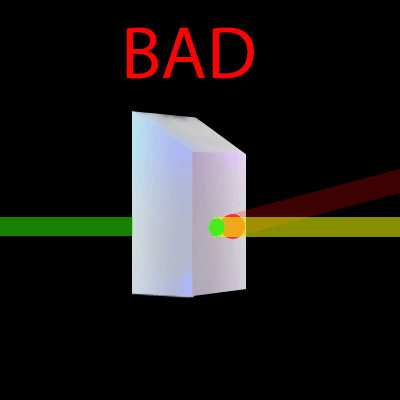
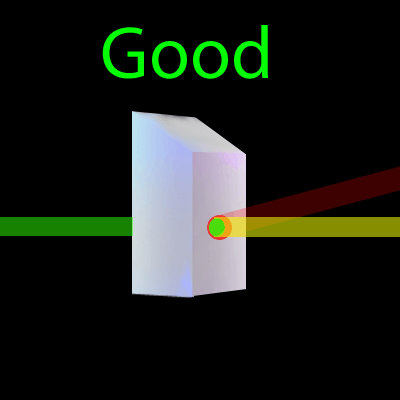
The red and blu-ray modules will be first passing through a PBS (polarized beam splitter). A PBS has a reflective surface inside that has been set at a 45 degree angle. The polarized light that comes from a laser diode will either reflect or transmit thought the reflective surface depending on the orientation of the polarization being horizontal or vertical.
We want to make sure we get the most light through the optics and out of the sled that we can. To do this we need to rotate the blu-ray module so that it reflects as much light out of the PBS as possible and rotate the red module to transmit as much light through the PBS as possible.
So far I have found that aligning the diode so that the V shaped notches of the blu-ray are horizontal to the sled and aligning the reds’ “V” notches to be perpendicular produce the best results. If you have a LPM you can tweak the rotation to be ideal once everything is together but for now you can look behind the cube and in front of the blu-ray to see how much light is being lost through the PBS. You want that light to be as dim as you can get it.
We also want to turn the heat sink adjustment so that the springs are as tight as possible without the lenses bottoming out on the Hex bolts. Make small adjustments if needed so that the red and violet lasers are entering the sled as directly as possible. Mainly we want to make sure there is plenty of tension on the heat sink adjustments so that they will stay where we put them in our final adjustments.
Green Rotation: Many green modules do not have there internal optics in perfect alignment. This causes the beam to come out at an angle. Rotate the module and adjust the heat sink adjustments so that the green beam travels on and even plain with the other beams and also at a desired angle through the sled. Taking the time to do this step well will greatly help make the next steps a success.
Dichro / Turning mirror Alignment:
Aligning the dichroic mirror so that the red+violet light and Green laser light mix well is the most crucial step tward the quality of your finished build. To do this we want to test beams alignment close to the aperture and later at a far.
To prepare for this you will need some way to see the beam. I use the highly sophisticated smoke in a bottle calibration tool brought to us by the clever jayrob.
http://laserpointerforums.com/f51/b...ng-adjustable-sled-mount-heatsinks-41942.html
Ideally you want to place the mirror where all three lasers intersect.
The differences here are subtle but can mean the difference between OK alignment and great alignment. It is hard seeing where the beams hit the mirror directly so I came up with a technique for marking where the lasers intersect.
Next I epoxy the mirror so that the reflective edge is cutting across the marked intersection. I use a clear 5min epoxy for this. At the point the epoxy is setting I adjust the angle of the mirror so that both laser beams remain aligned while exiting the sled aperture. This is where the smoke in a bottle comes into play. I use two cue tips on the upper corners to work the yaw and pitch of the mirror so that the lasers are as together in the bottle as I can get them. Once you are satisfied with the alignment of the mirror let the glue set and harden before doing anything else with the sled. Check on it every few minutes while your glue/epoxy hardens to make sure the angle didn't drift.
This is a shot of Jayrob's build after alignment. Great job Jay!

You are now ready to make your fine adjustments for distance.
To be continued.....
Something about using mirrors to maximize the room space and to be close to the dots when aligning...Credit to Jayrob again for sharing that with us....Bla bla bla") .
.
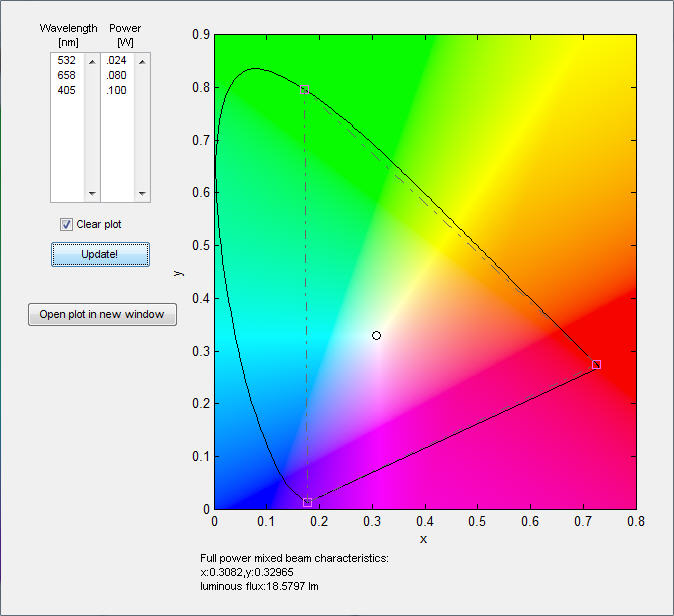
Update: I finally got Chroma to work on my PC This is a great program to figure out what powers to use when blending lasers. Here are some graphs I have made based on the commonly available Blu-Ray diodes. The plot shows a circle on on the color you would get with the wavelength and power of lasers in the field at the upper left of the app. I tweaked the values to get a well balanced white.
6x BRD
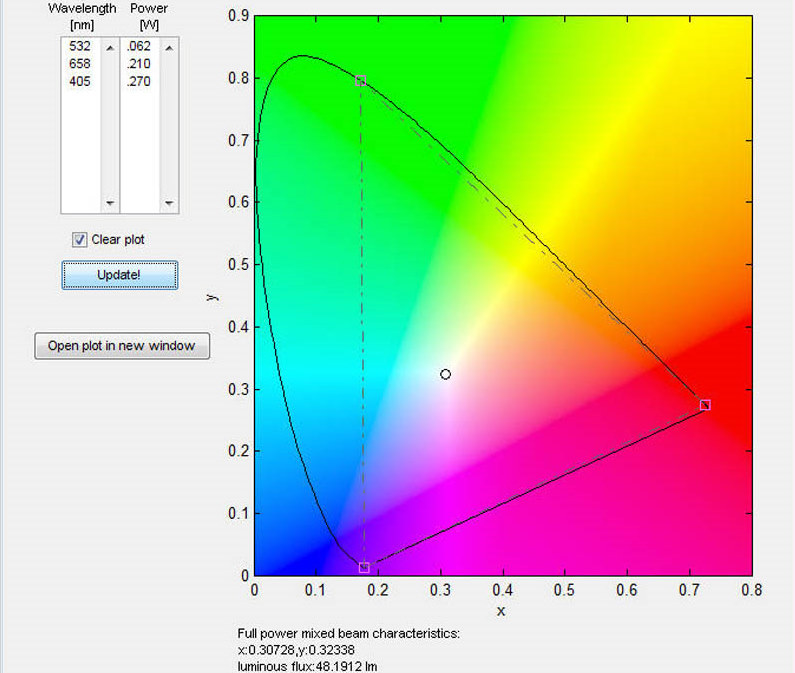
12x BRD I believe I made a safe choice for 12x output with a continuous duty cycle.
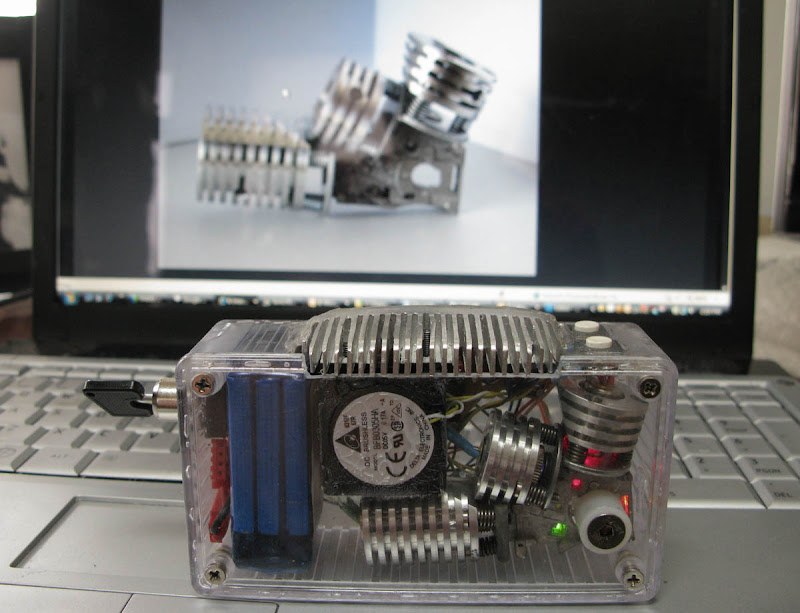
Note about Enclosures:
It is important that the kit be suspended in the enclosure so that the enclosure itself does not change the alignment of the heat sinks.
Here is a list of enclosures with dimensions commonly used for this kit:
http://search.digikey.com/scripts/DkSearch/dksus.dll?Detail&name=HM958-ND
http://search.digikey.com/scripts/DkSearch/dksus.dll?Detail&name=HM1052-ND
http://search.digikey.com/scripts/DkSearch/dksus.dll?Detail&name=HM987-ND
http://www.digikey.com/scripts/DkSearch/dksus.dll?Detail&name=HM842-ND
http://www.digikey.com/scripts/DkSearch/dksus.dll?Detail&name=377-1514-ND
http://www.digikey.com/scripts/DkSearch/dksus.dll?Detail&name=HM586-ND
http://www.digikey.com/scripts/DkSearch/dksus.dll?Detail&name=HM1181-ND
http://www.digikey.com/scripts/DkSearch/dksus.dll?Detail&name=1590WBBK-ND
I sometimes have enclosures in stock as well as other small parts used with these builds. Feel free to PM me with your requests.
This laser kit allows you to mix your Red, Green and Blu-Ray (Violet) lasers to produce any color you like. Even white!
There are a few types of builds out there that are using this kit. 7 Color Hand Helds, Projector lasers, but the the best fit has to be the awesome driver FireMyLaser is building specifically for this kit: http://laserpointerforums.com/f64/fs-full-colour-driver-extension-white-fusion-kit-44052.html#post584403
A video of it in action can be seen here: http://laserpointerforums.com/f48/my-rgv-alive-48046.html#post653103
White Fusion Hardware Package: $135 + Shipping
$121 for those who participated in the Name this Kit Contest. Limit 1 per contestant.
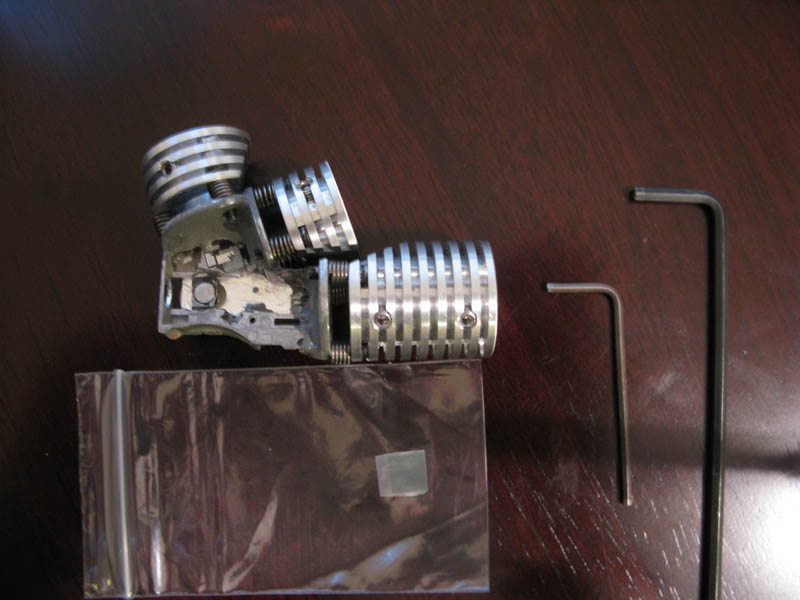
2 Adjustable heat sinks fit for Red and Blu-Ray
1 Super sized adjustable heat sinks for your green module
1 Cleaned up and ready to go PHR sled
1 Turning mirror
2 Allen Wrenches
Sled mounting standoff nut and bolt
UPDATE: My Latest!
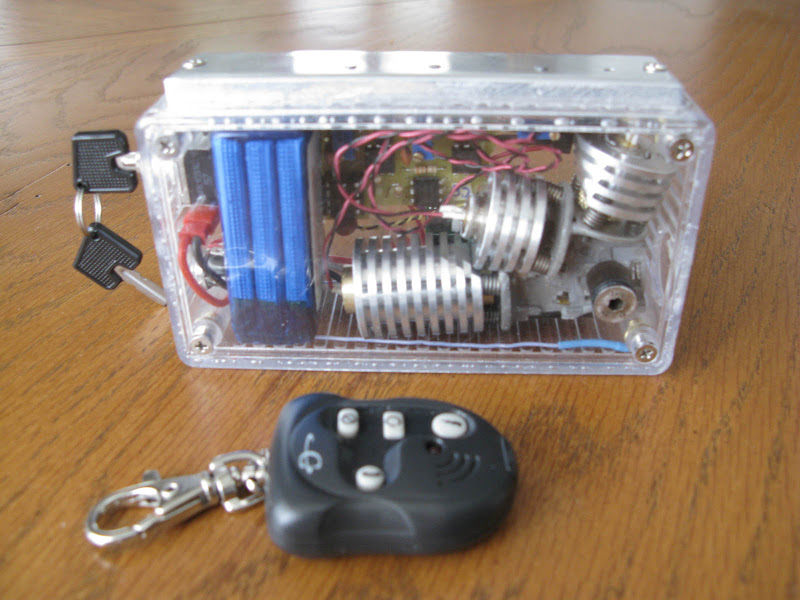
Remote Kit for the Full Colour Driver Extension $55+Shipping
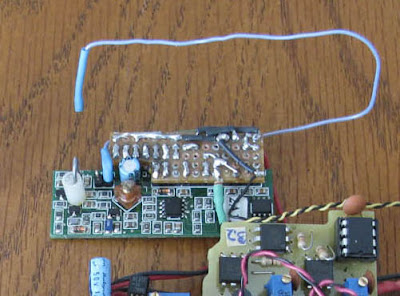
Remote receiver comes ready to hook up to your Full Colour Driver Extension. The driver designed by FireMyLaser specifically for this White Fusion Kit.
The transmitter comes with these button assignment:
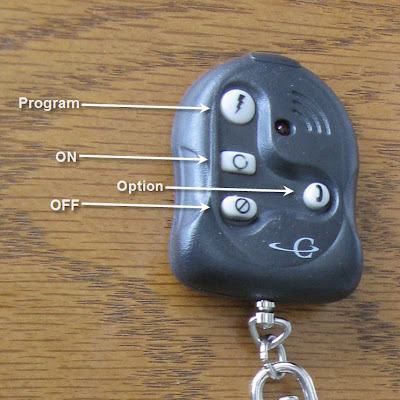
I will even Hook it up to your Full Colour Driver Extension for free if you ship it to me.
I am taking orders on an on going bases. White Fusion Kits can take anywhere from one day to 2 weeks depending on availability. No cash commitment required till kits are ready to ship.
A percentage of all sales will be donated to LPF.
See this kit in action:
built by LPF legend :bowdown: Jayrob: build-tips-7-color-laser-using-adjustable-sled-mount-heatsinks
firemylaser's http://laserpointerforums.com/f48/my-rgv-alive-48046.html#post653103"]http://laserpointerforums.com/f48/my-rgv-alive-48046.html#post653103[/URL]
misterwilling's http://laserpointerforums.com/f48/500mw-white-fusion-fml-driver-pics-video-46782.html#post632741
flaminpyro's http://laserpointerforums.com/f47/white-fusion-colors-48217.html#post656401
How-To
This how-to is not to replace the excellent tutorial Rog8811 originally made available HERE and to which this kit is based but rather how to prepare and put together this particular kit.
Warning: Do not attempt this build unless you understand laser safety and plan to use it in a safe, sane and legal manner. While following these instruction You Accept that you are building this laser systems at your OWN RISK and will hold the author of this how-to and Seller of the kit LEGALLY harmless from any and all LIABILITY.
Needed items not provided in this Customizable Kit:
1 Green Laser module and driver
1 Blu-Ray diode and driver
1 Red diode and driver
Batteries
Tools needed:
Safety Glasses (Laser and shop)
Jayrob’s highly sophisticated smoke in a bottle calibration tool.
Glass Glue or Epoxy
Other handy tools tools you may need for one reason or another like preparing the enclosure:
Grinder, belt sander, Files, Dremmal
Hacksaw or something similar
Vice, drill.
Setting up for success:
The Kit comes pre assembled with a stand-off post on the bottom for mounting the kit in your enclosure. I recommend mounting the kit to the lid of your enclosure so when it is open you have platform to work from. If you don’t want to do that you can finding a hard piece of thin cardboard or plastic to temporarily mount the kit too.
Having your drivers set to a low safe output to start with is also a good idea. No reason to kill your eyes when doing the alignment steps.
Laser Module Rotation:
The red and blu-ray modules will be first passing through a PBS (polarized beam splitter). A PBS has a reflective surface inside that has been set at a 45 degree angle. The polarized light that comes from a laser diode will either reflect or transmit thought the reflective surface depending on the orientation of the polarization being horizontal or vertical.
We want to make sure we get the most light through the optics and out of the sled that we can. To do this we need to rotate the blu-ray module so that it reflects as much light out of the PBS as possible and rotate the red module to transmit as much light through the PBS as possible.
So far I have found that aligning the diode so that the V shaped notches of the blu-ray are horizontal to the sled and aligning the reds’ “V” notches to be perpendicular produce the best results. If you have a LPM you can tweak the rotation to be ideal once everything is together but for now you can look behind the cube and in front of the blu-ray to see how much light is being lost through the PBS. You want that light to be as dim as you can get it.
We also want to turn the heat sink adjustment so that the springs are as tight as possible without the lenses bottoming out on the Hex bolts. Make small adjustments if needed so that the red and violet lasers are entering the sled as directly as possible. Mainly we want to make sure there is plenty of tension on the heat sink adjustments so that they will stay where we put them in our final adjustments.
Green Rotation: Many green modules do not have there internal optics in perfect alignment. This causes the beam to come out at an angle. Rotate the module and adjust the heat sink adjustments so that the green beam travels on and even plain with the other beams and also at a desired angle through the sled. Taking the time to do this step well will greatly help make the next steps a success.
Dichro / Turning mirror Alignment:
Aligning the dichroic mirror so that the red+violet light and Green laser light mix well is the most crucial step tward the quality of your finished build. To do this we want to test beams alignment close to the aperture and later at a far.
To prepare for this you will need some way to see the beam. I use the highly sophisticated smoke in a bottle calibration tool brought to us by the clever jayrob.
http://laserpointerforums.com/f51/b...ng-adjustable-sled-mount-heatsinks-41942.html
Ideally you want to place the mirror where all three lasers intersect.
The differences here are subtle but can mean the difference between OK alignment and great alignment. It is hard seeing where the beams hit the mirror directly so I came up with a technique for marking where the lasers intersect.
Next I epoxy the mirror so that the reflective edge is cutting across the marked intersection. I use a clear 5min epoxy for this. At the point the epoxy is setting I adjust the angle of the mirror so that both laser beams remain aligned while exiting the sled aperture. This is where the smoke in a bottle comes into play. I use two cue tips on the upper corners to work the yaw and pitch of the mirror so that the lasers are as together in the bottle as I can get them. Once you are satisfied with the alignment of the mirror let the glue set and harden before doing anything else with the sled. Check on it every few minutes while your glue/epoxy hardens to make sure the angle didn't drift.
This is a shot of Jayrob's build after alignment. Great job Jay!
You are now ready to make your fine adjustments for distance.
To be continued.....
Something about using mirrors to maximize the room space and to be close to the dots when aligning...Credit to Jayrob again for sharing that with us....Bla bla bla
.Update: I finally got Chroma to work on my PC This is a great program to figure out what powers to use when blending lasers. Here are some graphs I have made based on the commonly available Blu-Ray diodes. The plot shows a circle on on the color you would get with the wavelength and power of lasers in the field at the upper left of the app. I tweaked the values to get a well balanced white.
6x BRD
12x BRD I believe I made a safe choice for 12x output with a continuous duty cycle.
Note about Enclosures:
It is important that the kit be suspended in the enclosure so that the enclosure itself does not change the alignment of the heat sinks.
Here is a list of enclosures with dimensions commonly used for this kit:
http://search.digikey.com/scripts/DkSearch/dksus.dll?Detail&name=HM958-ND
http://search.digikey.com/scripts/DkSearch/dksus.dll?Detail&name=HM1052-ND
http://search.digikey.com/scripts/DkSearch/dksus.dll?Detail&name=HM987-ND
http://www.digikey.com/scripts/DkSearch/dksus.dll?Detail&name=HM842-ND
http://www.digikey.com/scripts/DkSearch/dksus.dll?Detail&name=377-1514-ND
http://www.digikey.com/scripts/DkSearch/dksus.dll?Detail&name=HM586-ND
http://www.digikey.com/scripts/DkSearch/dksus.dll?Detail&name=HM1181-ND
http://www.digikey.com/scripts/DkSearch/dksus.dll?Detail&name=1590WBBK-ND
I sometimes have enclosures in stock as well as other small parts used with these builds. Feel free to PM me with your requests.
Last edited:


