Welcome to Laser Pointer Forums - discuss green laser pointers, blue laser pointers, and all types of lasers

LPF Donation via Stripe | LPF Donation - Other Methods

Links below open in new window

ArcticMyst Security by Avery

Building a "everycolor" / RGB >3W Laserpointer

farbe2

Well-known member
Joined
Oct 3, 2018
Messages
303
Points
63
Hello guys!

I already have a 488nm 55mW pointer. The 488nm served me well and i always wanted a yellow one.
But yellow is so god damm expensive that i don't like the idea of buying an DPSS 5mW for a price of a old used car.
So one day im gonna build a RGB wich can do yellow and purple.

This is the day:
I am currently building a 3,3W RGB Laserpointer!

The Idea:
I don't want a 500mW Sanwu one, and building is more fun anyway.
I did choose the following diodes:
1W NDG7574 (520nm)
1,6W PLTB 450B (450nm)
700mW GH0637AA2G (638nm)

This will give me around 3,3W without overdriving the diodes too much.
I know this will not give me a good color balance, to much green/Blue. But i like the 488nm so much i think i will enjoy a powerful cyan beam.
For purpel/yellow green/blue needs to be turned down.

BUT i don't like the bad divergence that the diodes are producing. I like to use beam forming!
My optics skills don't allow me to do beam forming and i don't think that i can get it aligned right. So no beam forming?

One night while browsing the www i did find a company that offers beam corrected diodes in a pointer friendly packages.
35 long and 12mm diameter ! So i started planning.

The Start:

I am using fusion360 to model a laser head.
I like to keep thinks as small as possible.
This is what i did come up with:
Diameter: 32mm!
Length: 52mm!
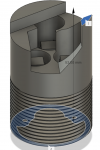
Head.png

But will this work? Gluing the mirror / dichroic filters without a way to adjust them?
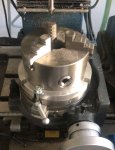
So without knowing i used a manual lathe and mill to make the laser head:
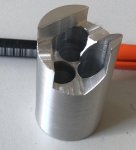
notgreatbutnotbad.jpg

My milling skills are also not up to par. However it turned out "ok".
Considering i used a chamfer tool for a cordless drill to mill the 45° it turned out great :D
mill.jpg
Did it work?
Time to glue the optics .. oh boy not an easy task.
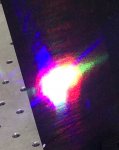
But did it work?
See for yourself:
20m.jpg
This beamshot is taken after a distance of around 20m so beam alignment is near perfect, but still room to go.
The optics are also still dirty.
Nonetheless i am happy!

done.jpg

Next the interface for controlling the Module.
I did search for drivers and did not find anything that fits.
I am thinking about a encoder typ interface with a RGB led as feedback.
Like: Pressing the encoder switches the chosen lasercolor and shows the color with the RGB Led.
Turning the encoder will adjust the brightness of the chosen color. This will give me full control about each diode.
But i am planing more, RGB color chasing modes and some other fun stuff. We will see...

However there is nothing out there that does what i want.
What to do?
DIY!
What do we need?
3x max 2A stepdown driver circuits that can be modulated in a analog fashion.
reverse polarity protection
laser diode over temperature protection
encoder readout and processing
Also the possibility to display the battery status with the RGB led
All done on a 27mm diameter PCB. 4,7mm thick!
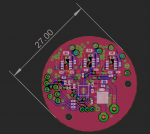
pcb.png

I use a Chinese pcb manufacturer to get the boards done. This will take 2-3 weeks.
No problem, in the meantime the battery holder and heatsink for the head needs to be made.
More time to spend on the mill and lathe.
I am updating if i get something done!

Have a nice day!


Joined
Jan 29, 2014
Messages
12,031
Points
113
Nice, I like what you are doing. I was interested in combining red and green too (well, still am), but CDBEAM 777 is telling me he had lots of trouble making yellow with a green diode for some reason, needed 532 nm with a red diode instead. Also, I'd put some adjustments on those optics or you may have nothing but trouble, am I wrong? Edit: I donno, I believe Sanwu is using only diodes in their RGB pointer, so perhaps I didn't understand what Bob was telling me.
 
Last edited:

farbe2

Well-known member
Joined
Oct 3, 2018
Messages
303
Points
63
I already have a RGB laser projector that has 450 / 520 / 638
I also have a RRGGBB laser projector, it uses 440 / 465 / 520 / 532 / 638nm / 660nm
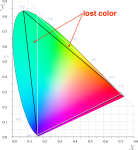
So i can tell from experience that 660nm + 532nm gets you the best yellows but look at a color diagram to see what you can expect:
cie-colored-1.png
You can see that every color that's inside the triangle that is defined by the corners (wavelengths of lasers) can be mixed.
The white triangle repesents 445nm + 638nm + 532nm.
Black one is 445nm + 638nm + 520nm.
By using 532nm and 660nm you get a little bit more "pure" yellow (less white to my eye, makes sense the mid point of the colorchart is white).
However you loose quite a lot of cyan "pureness".
Extending the red color spectrum by adding 660nm does not make a big difference. Also going with a "deeper" blue (<445nm) does not change much in the purple region.
However, using 462nm would give you much better cyan color but worse magenta.
So choose your enemy..
 
Joined
Oct 18, 2014
Messages
546
Points
63
How to the way you out all mirrow into it? I really haven't understood yet how did you do? ;)
If it is successful , It will really be the race to create rgb lasers handle super mini with lowest cost!
Thanks for your share! Nice job ! ;)
 
Joined
Jan 2, 2008
Messages
1,513
Points
83
Very nice looking so far, I'm looking forward to seeing the finished result.

Not from personal experience, but I've been told that the yellow with the 520 looks washed out. Whereas with the 532 it looks more pure yellow

Both of my laser projectors are pure diode, no dpss. But that is much better for a projector when you are demanding it provide analog colors at much higher rates. Not so much an issue with a pointer.

My Kvant clubmax uses 637, 445, and 520. The colors are awesome on yellow, but it is professionally done.

The other projector is also professional assembled with a pair each of 638, 450 and 520s but all single mode.

Both of these are able to shoot over 100' without any noticeable problem in color separation. But you pay for that.

IMO you will have the most trouble with the large array that the diodes you are using produces. Very hard to overcome that in a pointer. Up close it may look passable but at any distance it will not be good.
 

farbe2

Well-known member
Joined
Oct 3, 2018
Messages
303
Points
63
What are you meaning with "large array"?
Are you talking about beam divergence?
I am using fully corrected laser diodes e.g. with cylindrical lenses to expand the slow axis around 1:5.
I am expecting a divergence of around:
450nm: 0,5x0,9mrad
520nm: 0,5x0,9mrad
638nm: 0,5x1,5mrad
With a beam diameter of around 2,5x3,5mm at the aperture.

Red is the worst color.
But 1.5mrad should be very ok for a pointer.

Heck even the clubmax from kvant that you mentioned must be using the same diodes with prisms for expansion.
Pangolin has a picture on there website: LINK
Whoops, I can not post links so:
Search for "laser-show-projectors-explained" in google and click on the first link.

This pointer should be a little bit worse (1,5mrad vs 1mrad for the kvant) but only on the red color (kvant seems to use single mode red diodes). All other colors should be almost the same or even better. Prisms have heavy power losses at high expansions ratios. Cylindrical lenses have less power loses even at high expansions ratios.

If you are talking about the alignment of the optics... I have the fear the the pointer will not be stable e.g. it will drift over time. This would be very bad because only can adjust the colors by gluing the optics completely new.
 

farbe2

Well-known member
Joined
Oct 3, 2018
Messages
303
Points
63
Hello guys!

a littel update:
my PCBs are getting manufactured. Should be here by the end of next week.
At the same time i did make some progress for a "menu" using the encoder.
I did make a flow chart to help me program the menu.
Have a look:
flowchart.png

Should be good for controlling every color. Maybe someone has some feedback.
 

farbe2

Well-known member
Joined
Oct 3, 2018
Messages
303
Points
63
Hello Guys!

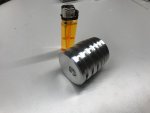
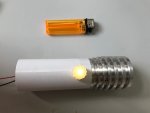
Weekend so I did manage to machine the heatsink and print the handle/battery compartment to check the fit.
All seems good.
Heatsink:
IMG_9356.jpg
Handle mockup with RGB led / encoder:
IMG_9357.jpg

The handle will hold 2x 18650 batterys side by side.
Seems like it is a little short and could be made longer to give my hand a better grip.
But this seems like a waste of space. I could also stack the batterys and make the host longer but the diameter allows for two batterys side by side. I can not make the diameter smaller because of the encoder, so side by side it is.

Next week the PCBs should arrive, then I can check the PCB for design faults and performance.
I hope the first version works like intended, especially the laser driver needs to have good current regulation. The Sharp HG0637AA2g that is used for red is pretty sensitive to current spikes if driven hard!
I like to drive each diode near its maximum for best brightness.

Have a nice weekend!
 
Joined
Jul 21, 2008
Messages
73
Points
63
Hello Guys!

Weekend so I did manage to machine the heatsink and print the handle/battery compartment to check the fit.
All seems good.
Heatsink:
View attachment 69817
Handle mockup with RGB led / encoder:
View attachment 69818

The handle will hold 2x 18650 batterys side by side.
Seems like it is a little short and could be made longer to give my hand a better grip.
But this seems like a waste of space. I could also stack the batterys and make the host longer but the diameter allows for two batterys side by side. I can not make the diameter smaller because of the encoder, so side by side it is.

Next week the PCBs should arrive, then I can check the PCB for design faults and performance.
I hope the first version works like intended, especially the laser driver needs to have good current regulation. The Sharp HG0637AA2g that is used for red is pretty sensitive to current spikes if driven hard!
I like to drive each diode near its maximum for best brightness.

Have a nice weekend!
This is looking to be great! Can you make me one??? What would you charge? :)
 

farbe2

Well-known member
Joined
Oct 3, 2018
Messages
303
Points
63
Hello Guys!

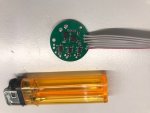
I did receive the 20 PCBs that I ordered.
I also did solder one PCBs.

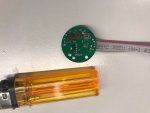
Nice and small:
IMG_9386.jpg
IMG_9387.jpg
I allready verified the basic function. Like controlling the Laser diode current sources, Led control, high temperature detection, battery voltage measurement.
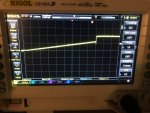
Currentsources look really nice:
IMG_9388.jpg
Slow rampup without overshoot to around 100mV above the 0,1R shunt = 1A
The step to full current after ramp to 1/2 current is expected behavior.

Also efficiency is good enough could be better but "meh" battery lifetime was my last concern. The PCB does only heat up to around 60°C with no heatsink in free air with all current sources delivering full current.

So the pcb works as expected.
Now I only need to write the firmware.

Nice evening
 
Last edited:
Joined
Oct 18, 2014
Messages
546
Points
63
Nice! Thanks so much for this project! It has made me Clear every my thoughts about it from longtime ago
 

Philipnzw

Active member
Joined
May 19, 2019
Messages
122
Points
43
Not much to say here other than: "Damn..."
I bet everyone's watching closely to see your progress on this build.

Side note: It seems like i have found the reason why my sharp GH0637AA2G died. I was driving it around 600mA with an amc7135 driver, it was a really basic driver with no capacitors.... Chances are, it was killed by the current spikes. Thanks for the great info.
 

farbe2

Well-known member
Joined
Oct 3, 2018
Messages
303
Points
63
It will take a while.
I am in the middle of a move.
So i don't have much free time.
However i do have News:

I am in the middle of programming the PWM stuff for dimming.
The uC will generate a high frequency PWM that gets smoothed to a variable analog voltage that feeds the laserdrivers.
This will give me a constant power laser output.
However i like the idea of generating rainbow lines with this pointer.
For example: One mode of the pointer will be a rainbow mode.
This will be completely different than the Sanwu pointer "colorchange mode"
This mode will adjust the brightness of each laser color very rapidly. This will give the illusion of a white beam that does not change color.
However if the pointer gets moved it will draw a rainbow colored line.
This stuff needs high speed programming and electronics.
The good news: It already works a little.
I did already implement the menu system and the PWM output.
BUT the menu systems still needs work. Right know its to complicated.

If someone is interested:
I do have 20 driver PCBs, so i could sell one or two.
Software is still pre-alpha but this will change.
Don't hesitate to write a PM.


TODO:
- Programming new menus system
- Optimizing speed of pwm generation
- Optimizing battery percentage readout (the ADC values are all over the place, maybe a programming/electrical problem)
- completing CAD design of the back housing
- completing CAD design of the battery holder
- CAD design of the back cap with key switch

I will post if i get something done!

have a nice day


Top