Welcome to Laser Pointer Forums - discuss green laser pointers, blue laser pointers, and all types of lasers

LPF Donation via Stripe | LPF Donation - Other Methods

Links below open in new window

ArcticMyst Security by Avery

NUBM08 @ 4A ElectricPlasma build

Joined
Jul 4, 2008
Messages
2,499
Points
113
For some reason when I tried to repy to your message I get

"Seoul_lasers has chosen not to receive private messages or may not be allowed to receive private messages. Therefore you may not send your message to him/her.
If you are trying to send this message to multiple recipients, remove Seoul_lasers from the recipient list and send the message again."

Anyway yes the SXD does have thermal protection and when it goes of the unit goes on and off in 1 second intervals preventing damage to the driver. It should not throttle the current or dim the diode as you mentioned. Is it possible one of the connections was shorted something came in contact with a component on the driver. The worst fear I have is that the drivers regulation was bypassed and you got a full shot from the batteries which could make the diode go from fully lit to dimming out as it overheats from over current. Anyway if you can get some more pictures of the unit when you get it out that might leave a clue or if you can shoot it over to me and let me test it out. Did something in the setup change from the first tests to the run where it did this?

I fixed that PM issue and discovered that you were not in my contact list. The PM settings changed ( I changed this) due to the recent flood of spam I got from Vietnam.

Going back to the driver issue.
The first 2 tests were 2-5seconds on. Going up to 7 seconds is where this went south. Thats the only thing that changed. Length of time. I got a dimming from full power then a pop sound. (sounded like a regulator going off)
I got a strong smell of a component overheating and hot thermal epoxy.

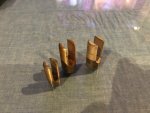
I am going to remove the module from the host and get some pictures of it. hmm...

:thinking:


@ Euphonious Nonsense

I think perhaps in your situation that the lower heatsink (with the threads) needs a better connection to the top ( head of the host.) If you measure the resistance from the head of the host and the lower heat sink (with threads for the battery compartment) what do you get as a reading on your DMM (ohms)?

The other culprit might be the actual threads of the battery compartment (/tail clicky) may need a cleaning.

Test and get back to us.
 
Last edited:


Joined
Dec 11, 2015
Messages
1,628
Points
113
My guess is the way you e-poxy the heatsink, if you cover the whole shaft that attaches to the host you will get little to no connection. I'll have to measure resistance for the tailcap clicky but I don't think that's the issue at all. Also another huge issue is the inside of the section between the heatsink and handle needs to be sanded before being epoxied/attached, this is a very important step for the e-poxy to stick to and for the connection to go through all the way, through the protective coating. If you don't do this beforehand you will get the shown error. From now on I'll definitely sand it before sending it out.
 
Joined
Oct 25, 2016
Messages
178
Points
28
My guess is the way you e-poxy the heatsink, if you cover the whole shaft that attaches to the host you will get little to no connection. I'll have to measure resistance for the tailcap clicky but I don't think that's the issue at all. Also another huge issue is the inside of the section between the heatsink and handle needs to be sanded before being epoxied/attached, this is a very important step for the e-poxy to stick to and for the connection to go through all the way, through the protective coating. If you don't do this beforehand you will get the shown error. From now on I'll definitely sand it before sending it out.

I used silver epoxy (conductive) but did not sand. Likely the issue!
 
Joined
Dec 11, 2015
Messages
1,628
Points
113
I used silver epoxy (conductive) but did not sand. Likely the issue!

Definitely. I had thought it was apparent to do so first but I should've gave a reminder or sanded it myself.

Though I can't say that was the issue for Seoul_Lasers, his overheating issue has me clueless.

I test continuity myself through the whole host before sending, but where the heatsink attaches still has the black layer. This must be removed before e-poxying. Like I said from now on I'll be removing it before sending it out, anyone who has an issue that they can't resolve with any of your hosts feel free to PM me. :beer:
 
Joined
Jul 4, 2008
Messages
2,499
Points
113
Definitely. I had thought it was apparent to do so first but I should've gave a reminder or sanded it myself.

Though I can't say that was the issue for Seoul_Lasers, his overheating issue has me clueless.

I test continuity myself through the whole host before sending, but where the heatsink attaches still has the black layer. This must be removed before e-poxying. Like I said from now on I'll be removing it before sending it out, anyone who has an issue that they can't resolve with any of your hosts feel free to PM me. :beer:

As ElectricPlasma just mentioned, these issues are entirely separate.
I am 100% confident this is a driver issue only judging by the way that everything happened.
I measured the host to make sure I would get proper contact with my Fluke DMM.
So far I haven't seen this issue with high resistance.
 
Last edited:
Joined
Jul 4, 2008
Messages
2,499
Points
113
Definitely. I had thought it was apparent to do so first but I should've gave a reminder or sanded it myself.

Though I can't say that was the issue for Seoul_Lasers, his overheating issue has me clueless.

I test continuity myself through the whole host before sending, but where the heatsink attaches still has the black layer. This must be removed before epoxying. Like I said from now on I'll be removing it before sending it out, anyone who has an issue that they can't resolve with any of your hosts feel free to PM me. :beer:


I tried removing the diode module from the host today. It will not budge. There is no way it is coming out.

This situation has gone from bad to worse. :cryyy:
 
Last edited:
Joined
Mar 5, 2015
Messages
1,336
Points
113
This is why I use thermal grease for my modules and thermal adhesive for my drivers.


Anyway if you press the solid rear of the module with the right tool as to not damage the wires, on a vice it should come out.
 

Attachments

  • 1484431003.7392.jpg
    1484431003.7392.jpg
    80.5 KB · Views: 84

BobMc

0
Joined
Apr 23, 2016
Messages
3,685
Points
113
I tried removing the diode module from the host today. It will not budge. There is no way it is coming out.

This situation has gone from bad to worse. :cryyy:
If you have another 12 mm module just use the back part as a pusher, it's a trick Pman showed me. Best wishes
 
Joined
Dec 11, 2015
Messages
1,628
Points
113
If you have another 12 mm module just use the back part as a pusher, it's a trick Pman showed me. Best wishes

That's actually a good idea. Seoul if you'd like I can machine just a basic solid 12mm rod to any length and putting that in with the heatsink in a vice might be able to press out your module. A standard 12mm module might not be long enough but if you've got an empty one it's worth a shot.
 
Joined
Jul 4, 2008
Messages
2,499
Points
113
If you want to shoot the head over to me I have couple good ways to get modules out of press fit sinks as well without causing damage or marring up the host body.:beer:

I'll take you up on that offer. I am just concerned that it will not come out at all. I have a feeling that some of the thermal epoxy made it under the rear portion of the module.

I fire it off on monday via Canada post and let you know the details.

Thanks for the kind offer.
 
Joined
Jul 4, 2008
Messages
2,499
Points
113
This is why I use thermal grease for my modules and thermal adhesive for my drivers.


Anyway if you press the solid rear of the module with the right tool as to not damage the wires, on a vice it should come out.

Which is exactly what I used.. I used Arctic MX4 for the copper module and Arctic alumina for the driver.
 
Joined
Mar 5, 2015
Messages
1,336
Points
113
I'm not sure about the arctic MX4 but the grease I linked in my reply doesn't harden so it would slide straight out, anyhow even with the thermal adhesive that sets hard if you use a razor blade u can remove the driver if you can fit the razor blade were your driver is fixed.

Also if you have a small 12mm metal bar or alloy or copper lying around just cut a slit in the end for your wires and push the module out on your vice, slowly and carefully it's very easy.


If you have a power supply you should check if your diode is still ok first, if it's not then squashing the wires on the module won't make a difference,

These work very well I have them in multiple sizes, just an idea!
 

Attachments

  • 1484486364.937.jpg
    1484486364.937.jpg
    372.8 KB · Views: 108
Last edited:
Joined
Jul 4, 2008
Messages
2,499
Points
113
The entire head is being shipped out tomorrow to DTR.
Hopefully all is fine with the module removal.

Honesty the diode module is far too buried to get any
Psu into test the diode.
However I am reasonably certainly the diode is fine.

(Due to the way the driver acted up)

@ Badboybilly what precision current regulated PSU do you use to
test a large 9mm diode like this?

I know I need a better setup than what I got.

I am all ears...
I don't have the best lighting or working conditions at the moment.
 
Last edited:


Top