Welcome to Laser Pointer Forums - discuss green laser pointers, blue laser pointers, and all types of lasers

LPF Donation via Stripe | LPF Donation - Other Methods

Links below open in new window

ArcticMyst Security by Avery

Genesis Project: my RGB White Rainbow - Proof of Concept build.

Joined
Jan 29, 2014
Messages
12,031
Points
113
I want that too :) Thank you, very nice. I love the idea of this single mode laser due to the low divergence, but I'd be happy to have a higher power multimode RGB to white too, just that I would expand the beam much further with one of those to get the divergence down to at least 1 mRad.


Joined
Feb 25, 2010
Messages
1,643
Points
113
:bowdown::bowdown: Ak, Ak, Ak....Me head is spinn'in !!! Maybe 3D printing is the way to go....but...ya cannot beat Aluminum to dissipate heat to the atmosphere.....MMmmmmm....can we print with Aluminum yet ???:eek::eek:

Wow....such a good looking built !!! The " Bar is hHgh " indeed !!!! You are leading the way...Carry on !!! Thanx !!! CDBEAM
 

CurtisOliver

0
LPF Site Supporter
Joined
Jun 12, 2015
Messages
7,610
Points
113
:bowdown::bowdown: Ak, Ak, Ak....Me head is spinn'in !!! Maybe 3D printing is the way to go....but...ya cannot beat Aluminum to dissipate heat to the atmosphere.....MMmmmmm....can we print with Aluminum yet ???:eek::eek:

Wow....such a good looking built !!! The " Bar is hHgh " indeed !!!! You are leading the way...Carry on !!! Thanx !!! CDBEAM

Yes you can but it is very expensive. It also would have a slightly reduced heat dissipation due to it being only 89.5% pure Aluminium. The rest is silicon and magnesium.

Shapeways
 
Joined
Mar 17, 2015
Messages
824
Points
63
Did he give you the STL files? We have a few members with 3d printers here. (Me included)
H9PLoywAHn6wfBNs6

https://photos.google.com/share/AF1...?key=a1lDU3l0N0JWQnFBNXV5cGdEMUYyWXlUSXFOMnJR
 
Last edited:
Joined
Feb 25, 2010
Messages
1,643
Points
113
Re: Genesis Project: my RGB Whi te Rainbow - Proof of Concept build.

Yes you can but it is very expensive. It also would have a slightly reduced heat dissipation due to it being only 89.5% pure Aluminium. The rest is silicon and magnesium.

Shapeways

OK.....Hmmmm...But....can it be...errr...Transparent Aluiminim ??

And...as to the " Genesis " build....see pic !! This is a comment from the Comptroller of Terrawatt Labs....hahahaha

Beam Out
 

Attachments

  • MrKrabs 4.jpg
    MrKrabs 4.jpg
    203.2 KB · Views: 40
Last edited:
Joined
Apr 6, 2014
Messages
2,436
Points
113
You better make that head a bit bigger so you can stuff a couple motors and FS mirrors in there !
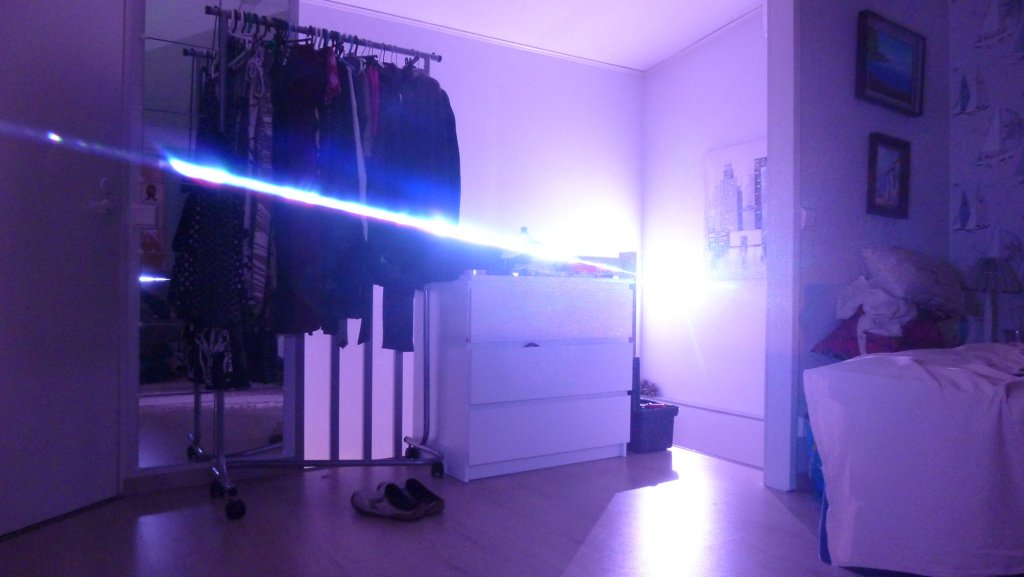
while a RGB beam is very nice to see you will be wanting to modulate that beam around into some kind of shape,
maybe something like this> http://laserpointerforums.com/f47/white-fusion-colors-48217-4.html#post656401

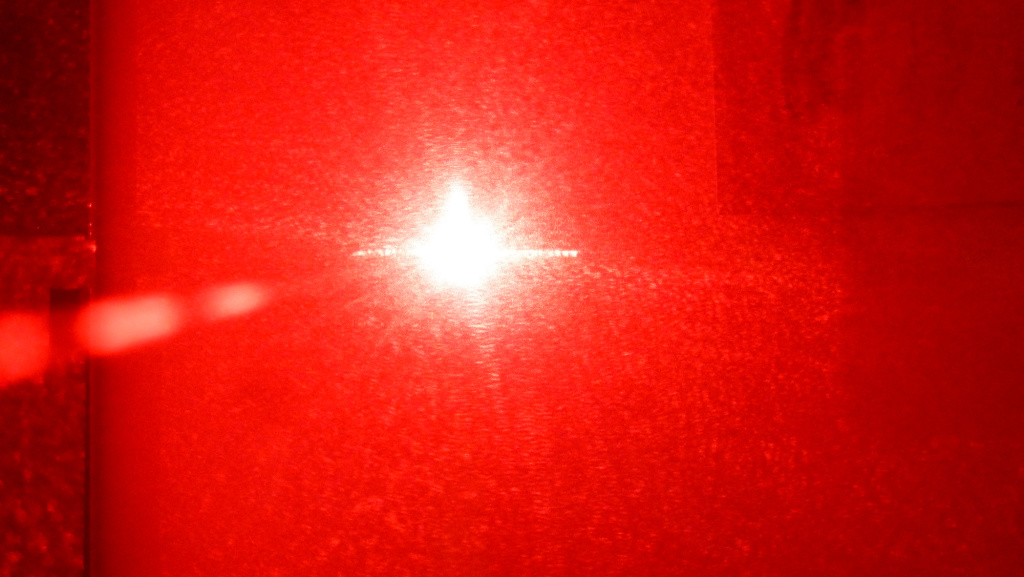
how about a white dot, now thats a pretty good white dot if I say so myself.
15e7qdg.jpg
Hi Flamin, that white dot of yours is a jaw dropper for sure.
So is the White Fusion Colours build, just amazing.
It's a bit too advanced for me to try though atm, this is only my second build.
The first was a 'Plug'n'Play' unit I bought from Rich and I just had to drop in a module.

+Rep
This is perfect!
Did he give you the STL files? We have a few members with 3d printers here. (Me included)
Hi Trend, thanks for the +rep, I'm glad the measurements were helpful.
My friend runs a 3D print business and I only know him through the astro forum I belong to (he lives in another state).
I don't think he gives out the STL files though, I have to ask him.
I'll be getting him to 3D print another few parts I need for this project so I'll let you know what he says.
This cylinder part cost me $AU30 (approx. $20USD).


This is one of the coolest laser pointer projects I've seen on LPF in a long time, the first cool white laser I saw early on was Flaminpyro's which is awesome too.

Agreed, looking forward to seeing the results of this one.

Have you seen this build? https://www.youtube.com/watch?v=vrwxUbrYNgA

Cheers Chris and diachi.
Would you believe that that video is what inspired me to build this !!!
When I saw it back in 2014 sometime, I was dreaming that it would be so cool to have one of those RGB lasers.
Never in my wildest dreams did I ever think I would build one myself.
That's where I got the idea of the sliders etc.
By chance I saw someone here ask about OPT Lasers and if they were reliable.
The consensus was that they were great to deal with.
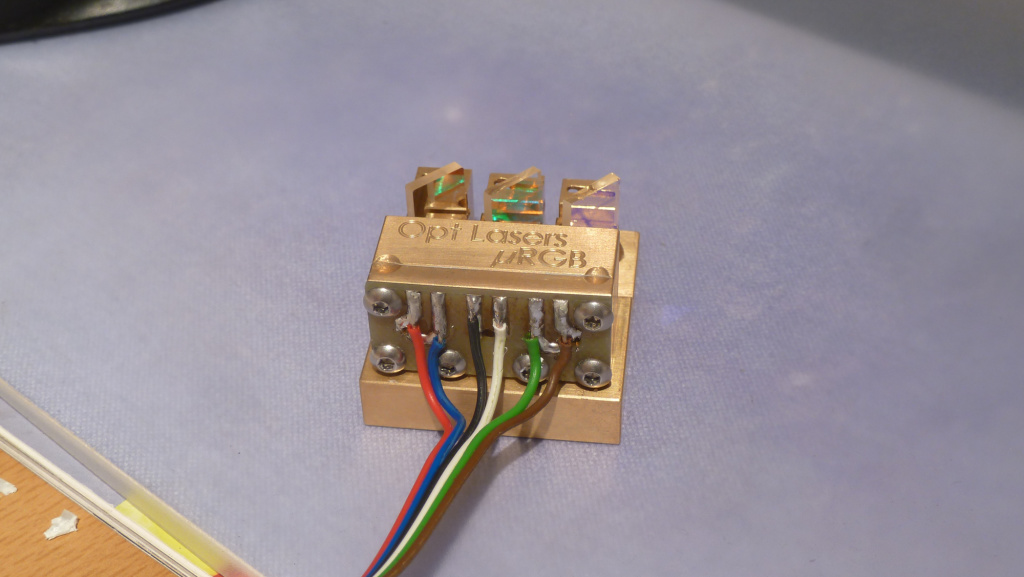
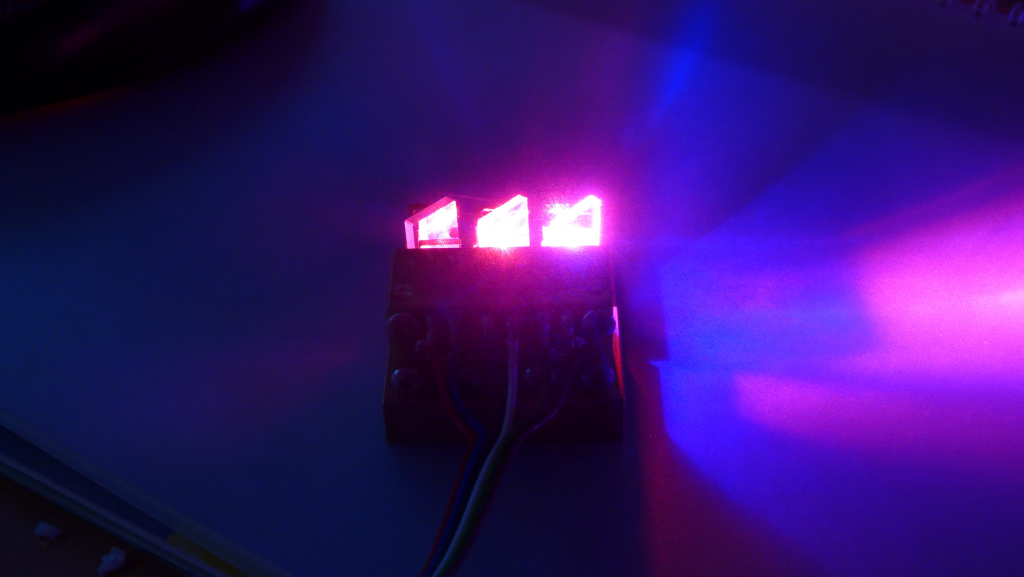
So I visited their website and lo and behold I stumbled upon their micro RGB units and now here we are.
How cool is that !! ??
:bowdown::bowdown: Ak, Ak, Ak....Me head is spinn'in !!! Maybe 3D printing is the way to go....but...ya cannot beat Aluminum to dissipate heat to the atmosphere.....MMmmmmm....can we print with Aluminum yet ???:eek::eek:

Wow....such a good looking built !!! The " Bar is hHgh " indeed !!!! You are leading the way...Carry on !!! Thanx !!! CDBEAM
Cheers CDBeam.
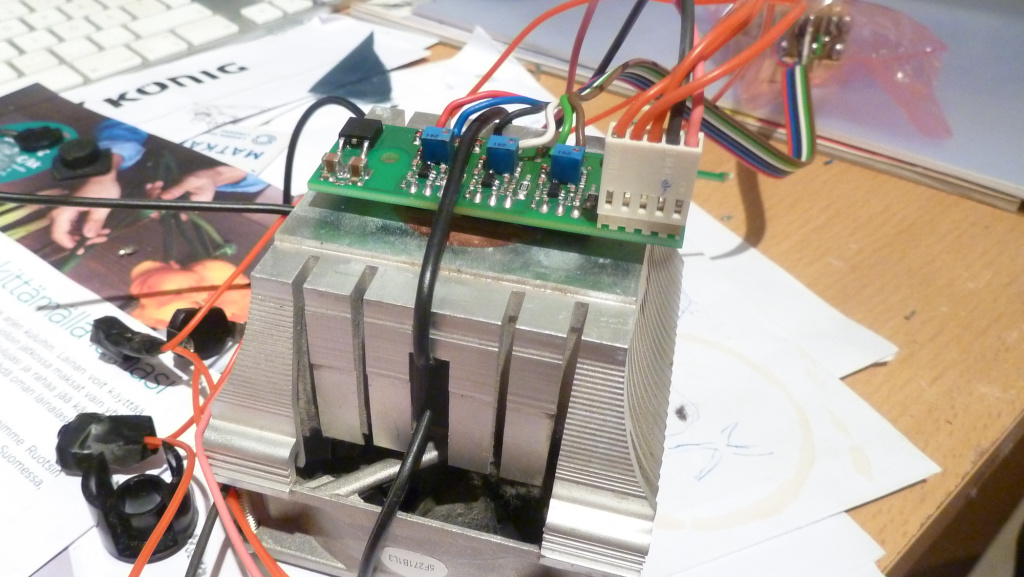
When I asked OPT Lasers, they said the duty cycle is continuous.
When I tested the unit the heatsink hardly warms up so I'm not concerned about the heat buildup, but I'll double check it.
I did consider putting a Peltier cooling pad under the unit but that doesn't solve the problem of getting rid of the heat from the underneath side of the Peltier.

So, now I'm waiting on the 5v and 12v regulators and I'll have to work out the little parts I need for 3D printing, then I can start construction.
This may take me a while as I'm also busy with work, as usual.

Thanks everyone for your support, advice and interest in this project.
It's so much fun sharing this with you all.

RB
:)
 
Joined
Jun 22, 2016
Messages
2,686
Points
113
Woohoo !!!

The 3D print of the cylinder arrived and it looks awesome.

Very nice and precise work done by my mate.

The cylinder will screw into the Flashlight head and it has a base plate to mount the RGB module onto.
I'll be drilling the aperture hole in the appropriate place on the front of the cylinder for the laser to exit.

And below is what the unit will look like once assembled and houses the 3 batteries.

And below shows where I will probably be relocating the three sliders instead of putting them in the power button cavity since I've decided to keep the original magnetic power button.
I'll probably get my friend to 3D print me a little black box to house the sliders and will fasten it to the black flat section shown below.

Sooooo, you like so far ???

RB
:yh:

Hey Andrew, what material is that print? PLA, ABS or something else?
BTW.. Optlasers guys called me yesterday, packet should leave today. Can't wait for it :san:
 
Joined
Apr 6, 2014
Messages
2,436
Points
113
Hey Andrew, what material is that print? PLA, ABS or something else?
BTW.. Optlasers guys called me yesterday, packet should leave today. Can't wait for it :san:
Black ABS and finished off in an acetone dip to make it shiny like the flashlight head.

Oh I'm so excited for you.
It's such high quality that OPT Lasers offer in this unit, very solid unit indeed.
Post some pics when you receive it and also when you have it up and running.

Cheers
Andrew
 
Joined
Apr 6, 2014
Messages
2,436
Points
113
Ok, made some progress overnight.
As mentioned before, I'm thinking of getting a 3D Printed rectangular box made to house the three RGB Sliders which will sit on the side of the host.
I've decided to also added an RGB LED to mimic the micro RGB laser unit and this will act as a 'power on' LED as well.

So my plan is to have a translucent window just above the sliders that the RGB LED will sit under (since the LED is so bright) that will approximate the laser's actual WL.
It won't be 100% accurate but rather a representation since the RGB LED has a forward voltage drop of about 1.5v to 2v to operate and my full scale deflection on the RGB sliders for the micro RGB laser inputs is from 0v to 5v.
The PCB will be cut down to size once finalised for the 3D Printed box.

Anyway I hope it doesn't sound too confusing so I made a little video demo to show you what I mean.
Please forgive the 'cheesy' background music, it's all I had so that the vid didn't sound bland since I didn't talk in the clip.
You will see me go through 0v to 5v on each RGB channel.
Each channel also outputs the equivalent 0-5v scale on each appropriately coloured wire which will connect through to the driver and drive the RGB channels of the module.
Finally towards the end I mix the RGB channels and finish up on 'White'.

{Link to my video site} - RGB Sliders LED

{Direct stream} - http://ivideostuff.com/rgbsliders/rgbled.mp4

RB

:beer:
 
Joined
Jan 29, 2014
Messages
12,031
Points
113
Thank you for loading the video, trying to download it. Resolution must be fairly high because my slow internet connection doesn't let me get much of it.
 
Joined
Feb 25, 2010
Messages
1,643
Points
113
MMMMmmmmm !!!! Slick !!!!!

Thanx !!! Video is good !!!! Perfect music !!

Lead the way !!!

CDBEAM:D
 
Last edited:
Joined
Jun 22, 2016
Messages
2,686
Points
113
Well guess what guys..
Mine arrived today. It is a way lot smaller than I thought. Just tested it for few minutes and I'm quite happy with it. Overall quality is Superb and module itself doesn't get warm but you should pay attention to attach proper heat sink to driver / Mosfet's.

- Only disappointment was that Red diode have wings :cryyy:


P1120030.jpg


P1120033.jpg


P1120045.jpg


Unfornately Red Dot have ~•~ Wings

P1120057.jpg


Mosfet Heatsink for testing RGB module
P1120063.jpg


MORE IMAGES HERE >
 
Last edited:
Joined
Apr 6, 2014
Messages
2,436
Points
113
Glad you got your module Arctic.
Very nice looking shots there.
I can't wait to see what you build with it, I'm sure it will be awesome.

Pity about the red, mine does that too but it didn't really bother me since most of my reds have wings so I was used to it and didn't really notice it.

Do you need to heatsink the MOSFETS?
I wasn't going to bother and I was just going to put it into the case host as they are.
Will I have a problem if they're not sunk?

RB

:beer:
 

jors

0
Joined
May 9, 2014
Messages
79
Points
18
Any idea of which diodes brand/ref inside this module?
 
Joined
Jun 22, 2016
Messages
2,686
Points
113
Glad you got your module Arctic.
Do you need to heatsink the MOSFETS?
I wasn't going to bother and I was just going to put it into the case host as they are.
Will I have a problem if they're not sunk?

RB

:beer:

Yes, I recommend to use heat sinking for mosfets in case you don't want burn your driver. But your host itself is aluminum, that can be used as heatsink. Only need to find some flat surface on it.

Any idea of which diodes brand/ref inside this module?

I don't have no idea Jors.
My guess is Mitsu LPC826 + Osram PLP520-B1 + Osram PLT5 450B, but I can't say for sure.
 
Last edited:


Top