Just an update on this.
For the past month its been busy in work so not had much time :/
Wasn't sure what to do about the driver as it was toast, So I've donated a new Dr Lava Flexdrive v5 , as well as a decent Sanyo 18650 to the rebuild.
Iv'e re buffed the backside of the diode mount to get rid of the scratches..
Anyway some pictures..
This is how it looked when it got to me...
The reworked head..
And here it is re worked & buffed with the diode CORRECTLY press fitted, leads soldered and heat shrunk wrapped..
Also, I didn't like the way the driver was grounded, with wires poking out "touching" the barrel..
So I took a more electrically sound route..
I drilled a 2mm hole in the internal rim
And chose a suitably short screw which doesn't poke through to the other side and attached the silicone wire..
Now THATS a solid connection.
I'll get it assembled early next week when the Arctic Silver has dried on the FlexDrive heatsink.
Thanks for reading.
------------------------------------------------------
UPDATE
Hi guys, well the laser is now completed and on its way back to its rightful owner.
Continuing on from the earlier post this is the work that was carried out, not including what was done in the previous post.
After supplying & fitting an X-Boost blank that was gifted to me..
I mounted the MicroFlexDrive V5 was soldered to the lead's and a piece of copper was arctic silvere'd to the main IC.
I cut a piece of copper to the shape of the Kryton barrel and arctic silver'd that to the inside wall. 24 hrs later I glued the flexdrive in place..
Connected it all up and even with the correct resistors soldered and the pot maxed out, I was getting around 600mW ?? , obviously dissatisfied with
this , and having glued it all in place, it all had to come out again, that'll teach me not to power test
before mounting the heatsink! .
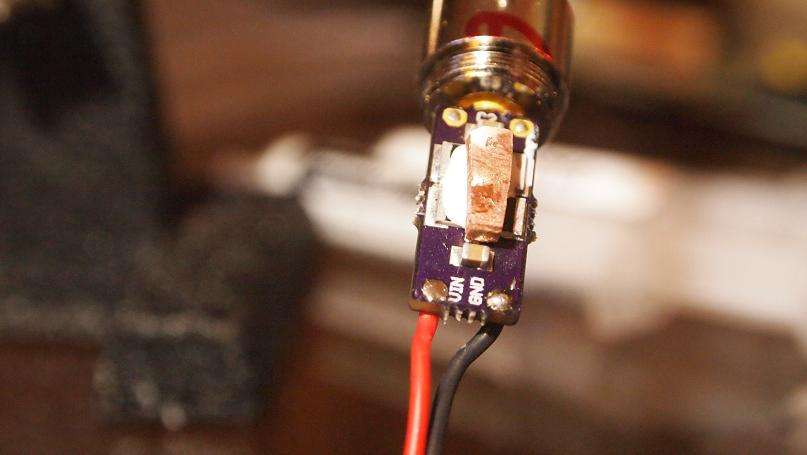
So I used my last, treasured X-Boost mini V7 which I've been saving for a special occasion , and helping a member in distress is such an
occasion, so, in it went..
The Driver..
Soldered in place for TESTING , before being mounted & glued!

It peaked at 1.7W then settled down to 1.6W and stayed solid.
Mounted..
And that's the buisness end taken care of..now.. a few things bugged me so in an OCD fuelled state, I
had to sort them out..
First the focus issue, then lens was too far away from the diode so I cut a spacer and fitted it in front of the lens. There is a plasic
part to it as well which is just out of shot..
And, in the focus head..
After the usual teflon tape, it now focus's like a boss.
Then onto the tailswitch..the circlip was too small and slack and causing intermittent operation..
Soon sorted that out
And that's that.
Now, it's been crazy busy in work so I had to fit this project around my work life, as such, I neglected to get pictures of the completed
laser, however, I'm sure ya'll know what a Kryton looks like
.
And just for the hell of it I supplied a few extra's for its proud owner.
Happy lasing MidnightTattoo.
Ped


")
")


