rhd
0
- Joined
- Dec 7, 2010
- Messages
- 8,469
- Points
- 0
First and foremost, I need to do a shout-out to thank Jib77, for turning me on to the 1085 IC, and Coherent Light and Kenom for helping me with ideas on how to get this silver finish. Also, a should-out to Moh for (unknowingly) selling me the heatsink for this build. Go hotlights, they fit everything 
This is running a custom 1085 DIY driver. That's a low dropout regulator with 3A current handling ability and it's running here at ~1,500mA with a 3W current setting resistor and 2x 16340s.
Just in case anyone from the outside world is watching/reading this - I want to be crystal clear on one point.
You can't see it, but I'm wearing PROTECTIVE GLASSES in the video, and you should absolutely NOT experiment or use powerful lasers without them. Period. It's the reason I missed the balloon a few times, but it's also the reason I don't have reflections from the balloon's surface (or anything else reflective) making holes in my eyes. This youtube video is unlisted, so my understanding is that anyone who views it, will have to have been viewing it here, and see this warning.
If my "Blue Ninja" didn't betray this fact, I really like momentary clickies. Which is fantastic, because I had other plans for this guy's tailcap.


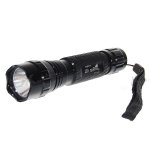
But there were much more humble beginnings. This guy started as a regular old WF501B:

And after a bit of work (and lots of chemicals) he become this:

And I wanted locks...

It turns out you can invert a tailcap, cut a hole in it, and it becomes a perfect sleeve for $5 electronic key locks.

Knowing that I would have to fit a momentary switch in the laser's head, I wanted to clear out as much of the driver electronics as possible. So I put the input cap and revers polarity diode right above the battery contact (a bit away
I like this guy a lot, he was fun to build.
This is running a custom 1085 DIY driver. That's a low dropout regulator with 3A current handling ability and it's running here at ~1,500mA with a 3W current setting resistor and 2x 16340s.
Just in case anyone from the outside world is watching/reading this - I want to be crystal clear on one point.
You can't see it, but I'm wearing PROTECTIVE GLASSES in the video, and you should absolutely NOT experiment or use powerful lasers without them. Period. It's the reason I missed the balloon a few times, but it's also the reason I don't have reflections from the balloon's surface (or anything else reflective) making holes in my eyes. This youtube video is unlisted, so my understanding is that anyone who views it, will have to have been viewing it here, and see this warning.
If my "Blue Ninja" didn't betray this fact, I really like momentary clickies. Which is fantastic, because I had other plans for this guy's tailcap.
But there were much more humble beginnings. This guy started as a regular old WF501B:
And after a bit of work (and lots of chemicals) he become this:
And I wanted locks...
It turns out you can invert a tailcap, cut a hole in it, and it becomes a perfect sleeve for $5 electronic key locks.
Knowing that I would have to fit a momentary switch in the laser's head, I wanted to clear out as much of the driver electronics as possible. So I put the input cap and revers polarity diode right above the battery contact (a bit away
from where the driver would ultimately end up). Note - I ended up having room, and putting a reverse polarity diode on the driver output (as usual in a DDL circuit) too. I can't think of any good reason why... other than habbit and fear 

Now, I'd love to pretend that I got this right the first time, but I didn't. I had only low current tactile click buttons to use initially. After stressing (and failing) to get a reliable NPN transistor setup so that I could use my $0.25 tactile push buttons, I just decided to simplify, and ordered 3A SPST momentary push buttons from digikey.

Now, I'd love to pretend that I got this right the first time, but I didn't. I had only low current tactile click buttons to use initially. After stressing (and failing) to get a reliable NPN transistor setup so that I could use my $0.25 tactile push buttons, I just decided to simplify, and ordered 3A SPST momentary push buttons from digikey.
I like this guy a lot, he was fun to build.
Attachments
-
 00 - it starts.jpg48.2 KB · Views: 830
 -
 01 everything clean.jpg126.3 KB · Views: 616
 -
 02 pill with input caps.jpg122.3 KB · Views: 721
 -
 03 locks apart.jpg118.4 KB · Views: 692
 -
 04 lock together.jpg118.4 KB · Views: 750
 -
 05 momentary.jpg105.1 KB · Views: 642
 -
 06 final front.jpg130 KB · Views: 671
 -
 07 final back.jpg126.9 KB · Views: 705
Last edited:


