Welcome to Laser Pointer Forums - discuss green laser pointers, blue laser pointers, and all types of lasers

Buy Site Supporter Role (remove some ads) | LPF Donations

Links below open in new window

FrozenGate by Avery

2W SAIK SA-305 26650 Host W/Massive Mohrenberg Heatsink

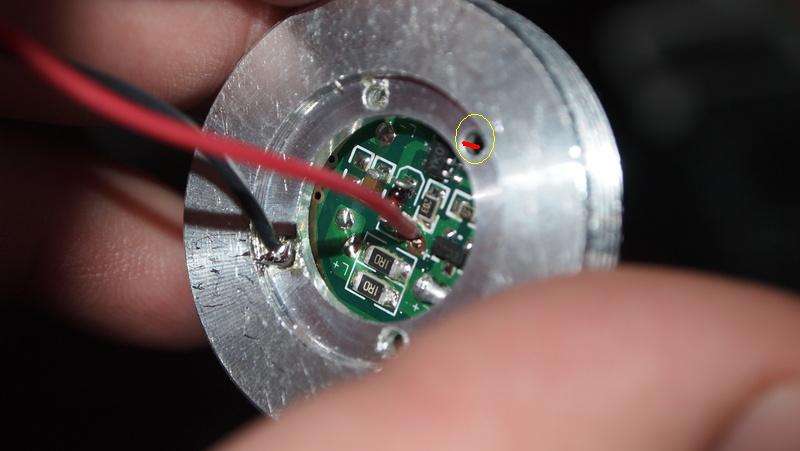
It is hard to see but it is actually connected to the thick unshielded negative wire that used to come up through that hole. I did cut it a little short and next time I will leave it sticking out a little. It would pop right off aluminum if I tried to solder to it. I will always prefer to get the negative feed from the host so it has less distance to travel but some hosts make this difficult.

The current draw is actually over 3A from the battery.:eg:
Uhh wait a minute, I don't get it now how exactly did you connect that wire to the host?

Also, distance the current travels matters if it's meters we're talking about... but centimeters? :undecided:

I prefer the secure and permanent connection via case pin of the diode, after all that's what it was meant to do anyway.

Your wire would pop right off because solder did not "wet" the surface of the aluminum, to get it to do that, you need to heat up the surface you're soldering to the soldering temperature. Since it's made of aluminium, it means you have to heat ALL of it up to the solder temperature.
And that's one more reason to use the case pin.

Just a heads up.

Great build, by the way. You have a thing for 2-pound heatsinks.

Make one huge-a$$ monstruosity like that with a copper heatsink! Hah! It'll replace the gym completely!


I prefer the secure and permanent connection via case pin of the diode, after all that's what it was meant to do anyway.

Your wire would pop right off because solder did not "wet" the surface of the aluminum, to get it to do that, you need to heat up the surface you're soldering to the soldering temperature. Since it's made of aluminium, it means you have to heat ALL of it up to the solder temperature.
And that's one more reason to use the case pin.

It is a very secure connection. As I said it is not soldered to the aluminum. You can not solder effectively to aluminum. It is soldered to a wire that protrudes through the hole that you can no longer see because the solder blob is in the way. It is a wire to wire connection. It is the wire that fed the old driver it's negative power.:beer:


Here maybe this will help. The yellow circle is what it looked like before making the connection and the red line represents a thick unshielded grounded wire that sticks up through that hole. That is what I soldered the wire to. Not the aluminum of the pill. Also when you have more wires soldered to the diode you can end up with more stress on the pins when manipulating the setup. Plus you have to solder another time to your diode. But with that said I do use the case pin on a lot of my builds.:D


48303288.jpg


I would love to do a polished to a mirror copper heatsink in one of these monster builds. That would be pretty sick.:eg:


.
 
Last edited:
Oooh my bad, sorry , I misunderstood you there, I though you said you secured the connection somehow to the aluminium. Sorry again :)

Cheers for nice build :beer:
 
  • Like
Reactions: DTR
Oooh my bad, sorry , I misunderstood you there, I though you said you secured the connection somehow to the aluminium. Sorry again :)

Cheers for nice build :beer:

It is all good. Thanks.

You are right and it is good to point out to anybody that might misunderstand what the wire is actually connected to. If you do try to solder to aluminum it will be an extreme of what you would call a cold solder joint and it will just pull right off. I actually do plan if I do another host to not clip that wire so short so that it is a little easier to solder. +1 for pointing out something that could confuse.:beer:
 
Wish I could rep you in each laser assembly thread you make. I like the idea of sticking the flexdrives on the heatsink. Since it's too big, it can easily handle them along with the heat produced by the laser.
 
I think it took me much longer than a week. I had to order the aluminum for this heat sink and we ended up waiting forever for it to arrive. Surprisingly DTR never contacted me once wanted to know what the hell was taking so long (I certainly would have!)

This is the biggest heat sink i've made, and the 1-7/8" stock wouldn't even fit onto my mini lathe. I had to use the other set of chuck teeth that grip it from the outside to hold onto it.
Having only the head of the host, I was expecting to see something similar to a 3d mag lite. I can't believe how small this host is for such a massive heat sink..

It really was not that long especially since you had to order the stock and you did a great job as always. It is a super chunk of aluminum. I am not an impatient person plus I always have so many balls in the air at once there is always something to preoccupy my attention.:beer: Just wait and see some of the new stuff I have around the corner.:eg:
 
Holy hell that's an awesome build. I hope he kept the dimensions of that head because I suspect there's going to be some requests coming in.

It really was not that long especially since you had to ] Just wait and see some of the new stuff I have around the corner.:eg:

Tease. :p
 
I hope he kept the dimensions of that head because I suspect there's going to be some requests coming in.

Yea keeping the dimensions would have been a good idea.:rolleyes::whistle:
 
Last edited:
Very nice job! Your builds were the inspiration behind my High powered build and the confidence to push the envelope with these lasers. Question: Do you notice much of a difference in the brightness of the beam between say a 1.4watt and 1.9watt ?
 
Yea keeping the dimensions would have been a good idea.:rolleyes::whistle:

lol.

Nope, i didn't keep the dimensions. At the time of making it my thought process was as follows: I'm getting ready for my "break" so i won't be making much of anything in the near future. On top of that, if i do make something i'm gonna want the host with me so make sure it fits....
I also HATE making things from measurements alone. It like to have the piece in my hand to verify everything is okay.

Sorry guys :whistle:

It's all good. You can make sure you have a perfect fit with the host in hand.:D
 
Excellent build. Probably the big heatsink is what it takes to maintain such a stable output. :)


Back
Top