Welcome to Laser Pointer Forums - discuss green laser pointers, blue laser pointers, and all types of lasers

LPF Donation via Stripe | LPF Donation - Other Methods

Links below open in new window

ArcticMyst Security by Avery

NUBM44 problems. Please help.

Joined
Dec 15, 2014
Messages
6,775
Points
113
Hi,
Please pull the diode out and PSU the poor thing it may be only the driver check everything . If the window is that bad de-can it then on the PSU.

Rich:)


Joined
Jan 29, 2014
Messages
12,031
Points
113
I had a driver which acted that way when poorly heat sinked, it would automatically back the current off until the diode quit putting out light when too hot.
 
Joined
Mar 30, 2016
Messages
376
Points
0
Lifetime/Alaskan - As far as heatsinked driver, see pics. I'm sure it once was properly heatsinked but upon taking laser apart to send to DTR, I noticed that the driver moved upon removal, only to find what looks like dried up thermal compound and air gaps all over the place.

Unfortunately it looks like I have a bigger battle on my hands than just a simple decanning. Any tips are helpful as I want to rebuild this thing ASAP! Thank you all
 

Attachments

  • IMG_20160827_090919.jpg
    IMG_20160827_090919.jpg
    198.7 KB · Views: 118
  • IMG_20160827_090939.jpg
    IMG_20160827_090939.jpg
    124.9 KB · Views: 128
  • IMG_20160827_090955.jpg
    IMG_20160827_090955.jpg
    134 KB · Views: 113
  • IMG_20160827_091412.jpg
    IMG_20160827_091412.jpg
    150.4 KB · Views: 119
  • IMG_20160827_091940.jpg
    IMG_20160827_091940.jpg
    136.9 KB · Views: 90
  • IMG_20160827_091352.jpg
    IMG_20160827_091352.jpg
    160.7 KB · Views: 74
Last edited:
Joined
Jan 29, 2014
Messages
12,031
Points
113
Try to make the thermal compound as thin as possible, it is only supposed to fill very small irregularities between the chip and the heat sink surface, having far more compound than needed is worse than none at all.
 

94Z28

2
Joined
Jul 1, 2016
Messages
539
Points
43
Looks like he has a lot more issues than just to much/poor driver heatsink.. the diode pins look to have a glue instead of shrink wrap? And are they going to the can flat? It looks burnt as well.

I would use a thermal paste for a driver to pill connection instead of a compound.. make it stay put.
 
Joined
Mar 25, 2016
Messages
475
Points
0
Lifetime/Alaskan - As far as heatsinked driver, see pics. I'm sure it once was properly heatsinked but upon taking laser apart to send to DTR, I noticed that the driver moved upon removal, only to find what looks like dried up thermal compound and air gaps all over the place.

Unfortunately it looks like I have a bigger battle on my hands than just a simple decanning. Any tips are helpful as I want to rebuild this thing ASAP! Thank you all

are those wires hot glued to the diode? That looks very messy to me, try desoldering the entire thing and resoldering it or ask DTR if he would do it for a fair price. Here's a sneak peak of my next laser and what it looked like after I soldered it together.

VCyp5Pn.jpg
 
Last edited:
Joined
Dec 15, 2014
Messages
6,775
Points
113
Hi,
Don't panic the driver can be cleaned off and reset the right way.. As for the diode clean up the anode and cathode and put it in a 12m m module if it isn't already in one slap it in a PSU and test the diode. One step at a time theres only a few things that can be wrong. Tear it apart and start new and take it from there. clean all the crap off the driver and the diode carefully take your time at . And if the window is bad de-can it and rebuild it. I really don't want to say anything about the build but but but , ok i said enough. just my .02 $

Rich:)
 
Last edited:
Joined
Jan 29, 2014
Messages
12,031
Points
113
First build a bit ghetto, but it will work if you can solve the driver heat problem, if that is all it is (edit: other than the window problem which needs removal).
 
Last edited:

Pman

0
Joined
Nov 28, 2012
Messages
4,447
Points
113
I would say send it to ma and I'll make it all better but I don't have a de-canning tool. I would be willing to buy one though. It needs a complete rebuild period.
I read through the thread and I really think that ANYTHING on the window of a diode with this output is going to end up with this issue. Find it stage that I've never heard anyone suggest when you must remove the lens just hold the module or laser upside down. I am always VERY careful about letting anything touch a diode window or lens. I would NEVER use Teflon tape on anything that isn't meant to be tightened down and left alone. I may not be the most technical person but I do know how to build a laser and although I have made some really stupid errors by losing focus for a moment like everyone else not once have I had any diode window issues. I believe DTR is right in what he said. I've built too many lasers to not have a diode window issue but I am also a bit paranoid about making sure nothinges gets on or between the lens and diode.
As far as the other issue unless those batteries are fakes or your charger isn't working right it shouldn't be a battery issue unless they are not making good contact between them or either end to the contact board or switch end. Battery sag will absolutely cause the weird drop off you are seeing. The diode needs to be tested on a power supply.
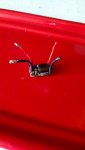
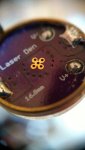
Crappy switches can be a real pain in the butt as some will either lock on or off or act weird without the proper tension agains them. The little spring or springs inside can burn, break and overheat not to mention sometimes the way the switch contacts the case is really bad.
What life was saying about the driver is true. I may not know how to build one of those fancy drivers but I have certainly seen some odd things happen anywhere from how it's sinked to how it responds to various voltages. Of course the driver or contact board must be making a stable proper electrical connection to the host if it's supposed to and that can be tricky if the iron isn't hot enough or there are dissimilar metals and gaps between them.
Honestly, I could go on and on but it's sounding harsh and like I'm a know it all and it's not supposed to. I'm a bit edgy from all the repairs I've done on sci-fi units that have disgusted me so much. Just sent out 3 repairs this last week. I'll have to copy/past what I had to do to the arcane 2.0 that the guy got back back yesterday as an example but one of the 3 I sent back the guy couldnt even tell me difinitively that he put the batteries in the correct way again. UGH!!!!

Here's the example of a sci build that I sent back this week. This is the message I sent the owner uncut:


"I'm not sure how to answer your question about it burning out. A laser diode and driver are consumables and heat is the enemy. The diodes are pushed hard way over their nominal setting and there's no way of knowing just how long any of them are going to last. The diode and driver used were normal parts used so unless the unit is abused I would expect it to last as long as any other now that it is built properly.
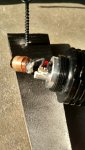
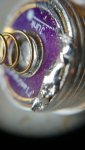
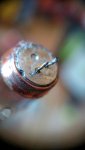
What looks like went wrong is because the rear section wasn't screwed into the steel module that the diode was pressed into it and spun instead of just the lens spinning when it was adjusted so much that the pins on the diode twisted along with the wires from it that are soldered to the driver and what was VERY lucky was somehow the wires broke instead of the diode pins. The diode pins were also seperate by Teflon tape which is absolutely ridiculous. The switch also had an issue in that it could be pressed away from the hole when batteries were installed which made it not always actuate. The threads on the rear battery end were really bad and I had to do what I could to clean them up so they wouldn't stick so much as once you get aluminum threads locked up good luck getting them apart.
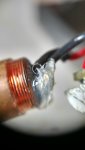
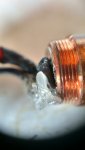
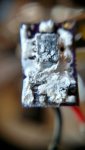
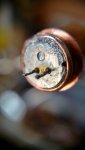
What I did was press the diode out of the steel module and press it into an all copper one, fix the pins on the diode and solder high quality wire onto the pins and them heat shrink over them. Next I screwed on a solid copper back half to the module for a lot more heatsinking to spread the diode heat better when it is pressed into the large screw in copper sink. Before pressing it in I coat it with thermal grease so there's no gaps between the module and the main sink.
Press the sink in and then after testing the driver and gluing a copper heatsink onto the driver I soldered the wires from the front of the diode to the driver. Oh yeah, it was a pain to remove the driver and boy did he do a terrible job trying to get the outside of the contact board to make electrical contact with the sink. Anyways, fixed all that.
Found out that when the whole front assembly is screwed into the host the switch doesn't have anything holding it in place and keeping it from sliding forward which really messes up the switch position when you install batteries so I added a large rubber grommet between the heat sink and the switch to keep it in place.
I also managed to make you a much tighter spring so the focus adapter doesn't wiggle around so much. Can't stand when they are wobbly.
Tested it and it works fine. If you use a single 18650 for less output make sure you use one with a button top as a flat top will likely not touch both the spring inside and the back bump on the screw in tail cap. With this unit you need to be careful not to overtighten the tail cap as you sure don't need too. Depending upon what batteries you use they may stick out farther and you don't need much tension for good contact.

All that to say I fixed it. Spent at least 3 hours on it.

I would say total cost is about $20 for the copper module, copper back half, solder, paste, thermal grease, artic alumina epoxy, wire, heat shrink tubing, copper driver heatsink, deoxit and spring plus whatever it costs to ship back. I'll give you the total when it's shipped plus the tracking number. It's possible you could get it Saturday.

Oh yeah, with an actual G2 lens it will output about 3.1W.

As far as a 532nm Laser goes with significant output you really need to buy one. It's very difficult to even find an actual 532nm module that outputs at least 150mW. I can recommend some if you want.

Got to go to bed."
 
Last edited:
  • Like
Reactions: GSS
Joined
Mar 30, 2016
Messages
376
Points
0
I really appreciate everyones input. I started taking things apart late last night to see where I was at. And I'll have to be a little honest, after seeing all the extra work involved to rebuild this correct, my motivation for this particular build has gone down hill a little bit. But I'm still hanging on and I can still see the blue light at the end!!

I will update here shortly with some pictures. The diode pins were bent pretty bad, but after taking a little time and finesse I was able to get them up and away from each other. This build before had the aluminum heatsink which IMO don't think is enough, but also created a sizing issue where all the components literally had to be squeezed in to fit. I've heard some say that the extended and tapered heatsinks are even too small for this diode but I do have a CU extended and tapered that I will pull from another project and thus will give me that much more room to work with inside the S4X.

Hydro- I don't know if it was intended but yes the wires were glue down to the diode housing, took some time to get it all cleaned up. I'm still debating at this point but I might just end up buying a new diode all pressed and ready to go from DTR.

Pman- at the start of me reading this forum (didn't join till 6+months later), I used all sorts of mix matched batteries in my electronic devices, never really thought it was an issue or even could be an issue. After reading the horror stories and seeing the dangers of Li-ion batteries, such as mixing brands, mixing different mah ratings etc, I did a clean out on all my rechargeables and made sure that from the that point on I use matching authentic cells that review very well among avid Li-ion users. Especially with the $ that we spend on some of these builds, why mess around with cheap batteries. As far as my chargers, I only use nitecore.

Lifetime- how would one go about cleaning off the driver? That stuff is all over the bottom of the driver, in between all the components. Ughhhh!!

Once again thank you all for helping me out!!

EDIT: added some pictures of where I'm at, cleaned off the hot glue cleaned up the PCB resoldered to the brass ring.
 

Attachments

  • IMG_20160828_094405.jpg
    IMG_20160828_094405.jpg
    151.4 KB · Views: 96
  • IMG_20160828_094348.jpg
    IMG_20160828_094348.jpg
    126.9 KB · Views: 109
  • IMG_20160828_094316.jpg
    IMG_20160828_094316.jpg
    147.6 KB · Views: 129
  • IMG_20160828_094302.jpg
    IMG_20160828_094302.jpg
    147.8 KB · Views: 92
  • IMG_20160828_094330.jpg
    IMG_20160828_094330.jpg
    151.3 KB · Views: 72
Last edited:
Joined
Dec 15, 2014
Messages
6,775
Points
113
Hi CK,
Is that hot glue or epoxy on the driver ?? The pins on the diode are fine it just needs to be tested correctly . read my PM's Lets get this over with i see your frustrated relax take a break pal. what kind of host is it in ??

Ok i read it's a SL S4X awesome host that Gary sells lets get this build right ..

Rich:)
 
Last edited:
Joined
Mar 30, 2016
Messages
376
Points
0
Hi CK,
Is that hot glue or epoxy on the driver ?? The pins on the diode are fine it just needs to be tested correctly . read my PM's Lets get this over with i see your frustrated relax take a break pal. what kind of host is it in ??

Ok i read it's a SL S4X awesome host that Gary sells lets get this build right ..

Rich:)

I believe it's dried up thermal paste. :confused: checking my PM :beer:
 
Joined
Dec 15, 2014
Messages
6,775
Points
113
Hi,
The pics of the driver with the epoxy looks like the two parts weren't mixed correctly.Usually it is a smooth look after drying, this might be why the driver fell off anyway there are some possibilities you never know till you try..

Rich:)
 
Joined
Jun 26, 2015
Messages
177
Points
28
EDIT: it almost looks like the melting started from inside the can. Has anyone heard of an issue like this?

After recently building my ndb7875 with a three elements glass lens, I noticed a piece of dust on the side of the lens closest to the diode. It was between the lens and diode, which was hard to explain. This was strange because it was not apparent until a few days after use.
 

DTR

0
Joined
Jun 24, 2010
Messages
5,684
Points
113
I am pretty thrown by that picture of the driver. Does not look like two part thermal adhesive. Looks like it is crumbling and breaking up.


Top