Welcome to Laser Pointer Forums - discuss green laser pointers, blue laser pointers, and all types of lasers

Buy Site Supporter Role (remove some ads) | LPF Donations

Links below open in new window

FrozenGate by Avery

TEC cooled Diode testing station, suggestions?

Yes, mV1 and mV2 are millivoltmeters, like the ones that you can find on ebay or electronic shops ..... the one used for the LD voltage must be set for at least 10 mV, (being usually them 3 digits 200mV units, more easily 19,9V), and the other left as is, if the current is under 199 mA (here you have a direct reading in current, each mV that you read is 1mA) ..... but if you want to test new diodes, i suggest you to get a 4 digits one, for this, or at least a 3 1/2 digits one ..... this way, you can set it for, like, 1,999V FS, and have a reading til almost 2A, that still include an 1mA resolution .....

Then, if the analog inputs are high impedance, you can hook them directly in parallel to the instruments, for the data logging function (if they are low impedance, a pair of op-amps wired as followers take care of this) ..... if you use these 10 bits inputs, you can have readings til 1024 points, if i recall correctly ..... in steps of 1 mA, still until more than 1A ..... where instead, for the voltage, you need to sacrificate the single millivolt reading (also if, probably, in this case is not too much important to know if the VF is as example, 5,345 instead 5,34 V ..... ;))


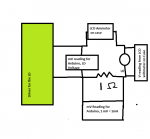
For the LCD on the device I have an actual ammeter, I can just hook that in series with the LD.

For the Arduino I will have your setup, and have mV input from across the diode, and mA reading using the mV measurement across the 1 Ohm resistor.

attachment.php


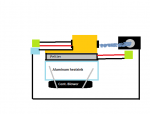
Then this is what the peltier setup would look like

attachment.php


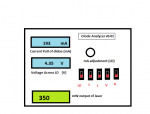
And finally what I am envisioning for the panel:
Separate switches for (from right to left): LCD Ammeter, LCD Volt meter, LPM, TEC, LD.

attachment.php


Arduino? (needs work)
attachment.php
 

Attachments

  • Readings.png
    Readings.png
    18.4 KB · Views: 1,278
  • panel.png
    panel.png
    12.7 KB · Views: 3,018
  • peltier.png
    peltier.png
    10.2 KB · Views: 1,837
  • Arduino.png
    Arduino.png
    7.5 KB · Views: 1,057
Last edited:
If you want USB datalogging to computer, I think the Kenometer uses a very similar scheme. It should in theory be as simple as read ADC, if connected write to port, update LCD, loop. RS232 is easier but USB is also possible. I'd personally have the LCD run from the Arduino, and the only voltage/current measurements taken via the chip - avoids any discrepancies between what the two readings may be, and means you only have one place to calibrate if it is necessary. It does add a bit of complexity though.
 
If you want USB datalogging to computer, I think the Kenometer uses a very similar scheme. It should in theory be as simple as read ADC, if connected write to port, update LCD, loop. RS232 is easier but USB is also possible. I'd personally have the LCD run from the Arduino, and the only voltage/current measurements taken via the chip - avoids any discrepancies between what the two readings may be, and means you only have one place to calibrate if it is necessary. It does add a bit of complexity though.

that would in fact be ideal, but I have already bought the ammeter and volt meter LCD's, so yea... lol


I was intending on using the panel LCD's as just a reference point, so I know what is going on with the diode, and what I am doing with it.

The real data will be whatever the arduino spits out.

I do need help with programming the micro controller and fixing up the arduino parts though, never worked with one before.

The only major obstacles that remain are:

What to house this all in...
Where to put the TEC getup....
Setting up the arduino for realtime export to StampPlot and analysis
Getting Arduino-experts to help me with the coding of the microcontroller itself
and finally What to call this thing...

Regards,

amk
 
The Kenometers do use a very similar method, which is what I am basing this project on. Before the Kenometer had it's own program developed, we tested it on Stamp plot pro :)
 
Connecting the two analog inputs for data logging, just remember to program it for subtract the resistor voltage from the total voltage that you read from the driver.

I mean, when you read the voltage at the output from the driver with the Arduino (or any other board you want to use), you are reading both the voltage drops, from the LD AND from the resistor ..... so, for each cycle of reading, you have to :

read the LD "current", as mV, and store it
read the voltage output from the module
subtract the "current" value in mV from the voltage of the module
store the result as VF of the LD

Unfortunately there's not too much to do about this ..... but with a programmable board, is probably much more easy to do this, than to build analogic insulation transfer circuits .....
 
For your temperature controller, use the Espresso temperature controller I linked you above (here it is for convenience). It's really well documented and the only difference is that it uses the peltier to cool the apparatus rather than heat it.

What I'd suggest for the panel, and this is just me, is to have the Arduino do all the data acquisition (as HIMNL9 outlined), and then just have it write out all the information to a single LCD or screen. You can even use your computer to output the graph directly (check this out), so you don't even need the LCDs unless you need it portable, and you can use the graph/Processing system for interpreting the output of your logging if you use it.

Wow that graph code looks viable... but can it be modified to set the xpos as like analog input 1, and ypos as analog input 2, etc? That way It can graph i.e. mW vs. mA

I'm not too familiar with the graph/Processing system of the arduino though... stampplot looks like it's a lot more flexible in regards to post test analysis and graph exportation.

I think the espresso machine code would also be extremely useful after some modifications...

Thanks for the help badger,

amk.


Also, HIMNL for the heads up.
 
Wow that graph code looks viable... but can it be modified to set the xpos as like analog input 1, and ypos as analog input 2, etc? That way It can graph i.e. mW vs. mA

Yup, it's just line drawing. It takes the data from the serial output and writes it to the screen. I used it for plotting the temperature of the sensor I linked you, which worked pretty nice. In your case, you could have it connect the dots between points too.

I'm not too familiar with the graph/Processing system of the arduino though... stampplot looks like it's a lot more flexible in regards to post test analysis and graph exportation.

Yeah, Stampplot can be used too; though, all it does it take the data and make it look nice. You'll still need to have the Arduino board spit out the data (I think it's comma-delimited data on rows) so it can output the data; remember to use the correct serial port settings. Other programs like Matlab or Excel can be used with the raw data output and make graphs from it as well.
 
amk, you should use some kind of thermal regulator for TEC to keep the temperature stable, like this: Craig's Thermostat Circuits
and a thermometer: Digital Thermometer Temperature LCD Module Gauge °C/°F - eBay (item 200412462482 end time Jun-28-10 10:40:08 PDT)

btw what about the name like this: AMKDiodeDeath? :D
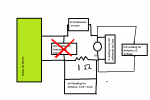
btw 2: you can make the connection (and the logging SW) little simplier, like so
attachment.php


and also have a look at this: http://laserpointerforums.com/f39/f...le-diode-controller-tec-controller-51098.html
 

Attachments

  • Readings.png
    Readings.png
    21.6 KB · Views: 1,208
Last edited:
@ 3zuli: Sorry, not if the ADC have all a common ground ..... if they have a common ground and you connect it in that way, you short circuit the 1 ohm rsistor and the current reading input .....

Is for this reason, that i told about program the board for subtract the current value in mV from the voltage, before store it .....
 
Wow thanks for all of this help guys :beer: !!

So This looks cool, but then it would defeat the whole purpose of the DIY project. Thanks so much for the link though!!

Some of the wonderful members on here are gonna help me program the arduino to do the TEC control, and as you can see they are already helping a lot :)

Also, I thought about it, and saw some of the boards on sparkfun support writing to flash memory... Instead of having to keep a laptop near the Tester, is it possible to get it to spit out the values to an LCD, then just have it dump a text file with all the values to an SD card or something... that way I can overlook the graph as I'm testing, and take data to the computer for analysis/posting.

I feel like I'm making this really complicated lol... and the way it's looking I'm prolly gonna have to beseech one of the members on here to actually just write the arduino code, with a payment and/or credit of course.

regards,

amk
 
Yeah, with the Arduino, you an attach "shields" to them, for example this SD-card shield. I haven't used it myself, but there are links to a FAT file-system memory writing library for it, necessary for writing computer-readable files.

Edit: According to the comments, the board I linked to above is kind of iffy, so some other choices may be better.

Edit 2: They've updated the bad board with a new revision that supposedly fixes the voltage level problems. Not sure about card compatibility, etc.
 
Last edited:


Back
Top