- Joined
- Jan 8, 2009
- Messages
- 3,145
- Points
- 83
Dutch, how will you retain that huge sink in the host with no lip to grab the bezel ring?


I would call it a pocket. A slot is a narrow, shallow, and long feature
What is a diameter of your Al block? Looks like ~30-40 mm.
")
")
Dutch, how will you retain that huge sink in the host with no lip to grab the bezel ring?
But you know that.
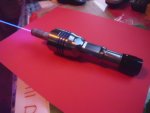
Diameter is slightly over 49mm
And thanks for improving my English a little bit
I've cut the diameter of the heatsink just a little bit larger then the inner diameter of the flashlight.
I'm gonna press it together with a machine vise.
Once it is pressed it is pretty much impossible to remove unless of course, you use a press or vise.
This method is also one of the best possible ways for heat to transfer to the flashlight body. For this reason I also 'press-fitted' the copper module into the heatsink instead of using a oversized boring hole and set it with a screw which will always leave a small gap on one side of the copper module. You can try to fill the narrow gap with thermal compound but thermal compound does not work very well that way. But probably better then keeping an air space.
It requires a little more effort yes, but hey, everything to move heat away from the laser diode right?
except a solid copper heatsink because that is too expensive :crackup:
Edit:
50x100mm Hmmm not that bad 37.69 + 12.5 euro shipping ...tempting...
Kupfer Rundstange Länge wählbar Rundstab E-Cu 57 CW 004 A Stab ziehhart CU-ETP | eBay
Just kidding, the one I have is plenty and heavy enough
ow, and I cut the inner diameter of the bezel ring also a little larger so that the heatsink can fit through.
So how do you access the driver in case of future repairs or other things like maintenance? I do not disagree with the press fit, however I've been able to fine sand the diameter of the sink to be able to firmly press the module in while using thermal paste as a lube this has always been one of my focus points during a build.

No offence takenI think you find it better to machine a lip so that the ring can tighten down (snugly) a much simple and better solution I'm not bashing just trying to help out here. Given the size of that sink the attention to flooding the host itself with heat after the sink has been saturated to be kinda extreme for all that trouble and perhaps scuffing the host one way or the other.
Just turn down a lip and polish the top portion. Your build will be fine what ever scenario you choose.:beer:
How many times did you disassemble your lasers?
Maybe you did and you had to re-align some mirror or clean something. I see you have some nice builds
I have a few lasers and never opened one because mine are very simple, maintenance free and it is no effort to remove my lens as you can see.
I like your driver mounting, it should be ok from what I see others do, I heat sink both sides of mine as well.
What lens are you going to use? G9 with cylindrical correction?
If you are not going to use any correction then the 3 element is more useful.
one can see that the inductor is not 'heat sinked' very well and yes, it is getting hot fast. is that a problem?
I have been getting away with it for a long time
Do NOT heat sink your inductors! Proximity to conductors changes the inductor's value, and can cause all kinds of problems in your circuit - one of which is overheating.
If the inductor is too hot, it means you've chosen the wrong inductor.
Thanks, I'll take a look at it@ DutchLaser WOW I just put in a G9.....at .5 meters yes it's still strong but at 7 meters the tightest line is 2 times as wide and 2 times as long as with the 3 element.
Ok this will help, read post 192-200 page 13 I think. Also read about p73 correction.
Cylindrical Lens Pair to Suit Mitsubishi Red Diodes 445nm and 520nm Diodes | eBay

Do NOT heat sink your inductors! Proximity to conductors changes the inductor's value, and can cause all kinds of problems in your circuit - one of which is overheating.
If the inductor is too hot, it means you've chosen the wrong inductor.
Thanks, I'll take a look at it
Thank you for your response, I appreciate it
So you say I should get rid of the little piece aluminium that holds the driver in place and make one out of plastic?
I did not choose my inductor. Lazeerer did I think. His name is written on the PCB. Are you online Lazeerer?
I think this is the first diode that is letting the SXD driver run @ 4.5Amps so maybe some heat is expected and acceptable?
)