millirad
0
- Joined
- Apr 28, 2009
- Messages
- 2,416
- Points
- 63
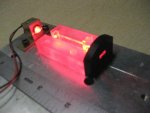
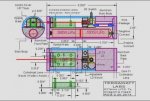
Re: Optically Corrected P73 HH Design -1W and NO LINE
Well thought out and fun to follow your progress. :beer:
Well thought out and fun to follow your progress. :beer:


Follow along with the video below to see how to install our site as a web app on your home screen.
Note: This feature may not be available in some browsers.


Well thought out and fun to follow your progress. :beer:
A big YES...IIRC....not easy to do !!! A single mode fibre with 2um is what would be needed to minimize the divergence !!!!! Double Yikes !!!
I can see some very fine threads on a multi-axis translation stage, like the threads on the
tiny stepper motor inside the GGW-H20L or maybe even finer. Mount the fiber to that
temporarily. Then smack down a dab of some type of glue that doesn't change size as it
sets and back everything out. Not exactly rocket science, but with the right tools I would
elect that over brain surgery any day of the week :thinking:


Sweeeet! Looks awesome
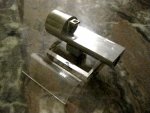
Just curious, how much did the lens set cost you?
")

Fantastic work! Thanks for sharing! :beer: