Welcome to Laser Pointer Forums - discuss green laser pointers, blue laser pointers, and all types of lasers

Buy Site Supporter Role (remove some ads) | LPF Donations

Links below open in new window

FrozenGate by Avery

New 445nm laser doesn't work

Hi,
Wait a minute i just looked at you pic of the bottom of the driver contact area and it looks like the solder blog is off center just noticed that. Make sure also the cells are in touch with the solder blob. If not apply very little heat from the iron just to spread it to center. Don't toast the driver. Just another thought ...

Rich:)


Got you covered.
First you want to check if your diode and driver is still working.
How you want to do it is,
1. get your diode and driver (No host needed) and set it somewhere still
2. Get your 2x 18650 or 8-12V power supply and hook the polarity up(more info)
Red(+) with the Contact Board of your pill
Black(-) with the pill, Just make them contact and touch, use electrical tape if needed

SO wire goes like this,

[Diode]<--[Driver/ PILL CONTACT BOARD (holding the driver)]<-- [Red(+)Wire]<-- [Battery Pos(+) Input]

For Black(-) wire

[Diode]<--[Driver/PILL]<--[Black(-)Wire]<--[Battery Neg(-) Input]

When it's all connected, it should light up INSTANTLY, and be careful not to look at the diode while doing that, lol. If all works it should look like this.

Mind these pics are NOT exactly like yours but it works the SAME way. For example, That red wire on the pics connected to the battery is the SAME as your SL Driver board. Just connect a little to the board and little to your battery (+ side). Use electrical tape if needed to hold together.

Also the black wire, connect that to the back of the battery (- side) and that you just need to make that touch the PILL, the driver holder (screw-into host) part. Make connect with it, ex. Tape it to it for contact.

Last pic, also mind the 4 batterys, that is for of you DONT have 3.7V batteries which you have so No worry on that one. It's basically like the drawing I drew, but connect that to the pill instead of the module, rest is all the same idea, Thanks.

PS. if it doesn't lite up, take a pic and shoot it in my PM I'll help you see if it's dead or alive, then focus on your host problems. Like I always said, diode first, the money is all on the diode :)


Last edited:
S4X, you didn't say or show what batteries you are using, are they button top? Or are they flat top? This could be the problem if they are flat top.

Alan
 
I don't have wire right now to connect the negative pole from the batteries with the pill, does it work with solder? If so, it's not working.
I connected the two batteries with the driver contact area and the negative pole from the second batterie with the copper module using solder. I even made that the batterie touch the solder blob on the driver contact area.
 
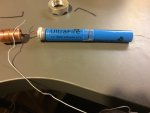
This is how I "tried" to connect it
 

Attachments

  • IMG_5086.JPG
    IMG_5086.JPG
    158 KB · Views: 54
I see, you are using ultrafire batteries, these might not be quality enough to power your laser. And no solder won't work, because from what I think the contact with your hands stops the current from going so best try using some spare wires you can find.
 
Hi ,
S4X,
Those cells are fine just make sure there charged. Your only using them to test the build.
You can use any kind on insulated wire for contact. Your way that you connected it is correct .
Rich
 
Last edited:
I got it!!!!! I still don't know the problem but I put a small amount of soldering between the driver contact area and the two batteries and it works :wave:
Thanks everyone!
 
I got it!!!!! I still don't know the problem but I put a small amount of soldering between the driver contact area and the two batteries and it works :wave:
Thanks everyone!


Congrats! Enjoy, and be safe! :)
 
Good success story, good job to everyone!
 
Last edited:
I got it!!!!! I still don't know the problem but I put a small amount of soldering between the driver contact area and the two batteries and it works :wave:
Thanks everyone!

HI,
i thought so when i looked at the pics the solder blob looked off center. so you add a little more solder to spread it towards the center and it worked . i'm glad your happy and now your build is a success . All it is process of elimination step by step slowly. Good man

Rich:)
 
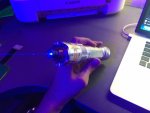
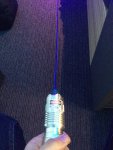
It works perfectly fine and it has the most beautiful beam I've ever seen.

Thanks again everyone, here are 2 pictures for you to enjoy it with me :thanks:
 

Attachments

  • IMG_5092.JPG
    IMG_5092.JPG
    132.9 KB · Views: 42
  • IMG_5093.JPG
    IMG_5093.JPG
    142.7 KB · Views: 54
Wow, I was really expecting this to turn out bad. It's not easy to talk someone through how to check certain things without the person trying things they shouldn't and blowing something. Congrats to all involved.
 
It works perfectly fine and it has the most beautiful beam I've ever seen.

Thanks again everyone, here are 2 pictures for you to enjoy it with me :thanks:

Hi,
Wow nice beam shot awesome i had to modify the white isolating spacer in my tail cap by sanding it down to make contact. And yours was a solder blob problem. When i use a solder blob on any of my contact boards i put a little on at first, after it cools a bit i keep adding to it to raise is up . once it's high enough i take a file and file a flat spot on the top . Then it will work with button tops or flat top cells..

Rich:)
 
Hi guys, there's a short... :(
I switched it on and heard a hiss, after I took off the tailcap I was quite shocked. The spring in the tailcap got so hot that it contracted a lot and even branded into the white plastic ring, the diode itself or the batteries didn't get hot.


Back
Top