- Joined
- Mar 1, 2011
- Messages
- 610
- Points
- 0
OK. For my first review, to finally report on my "cheap" projector.
It was listed by DinoDirect as :
300mw 650nm RedLaser & 80 mw 532nm Green laser & 300mw 450nm Blue/RGB Full Color Laser Light/DJ Equipment (Auto & Sound & DMX & ILDA PC)RGB-500
It does not have any sort of ILDA interface or capability. When I contacted DD about the possibility of this error before they shipped it they didn't respond but rushed the shipment out the door. But that's another matter.
The item arrived packed well. The actual unit inside another box with extra packing. (I had it delivered to me at work so it sits on a pallet in the shipping dept. in the picture.)
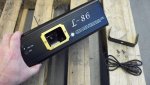
The manual inside is a photocopy( of a photocopy) of a "Chinglish" manual. (see picture) It clearly indicates (somewhat) that this unit is a L-86 "Ruby" Laser Display System.
Inside it lists some of the "Features" as :
Power Supply: AC220/240V, 50/60Hz
Rating Power: 40W
Control: MCU
Motor: N1.8 high precision step motor
Control Mode: Sound active/Auto Run/DMX512
Laser diode: Diode pumped solid state(DPSS), air cooled
It goes on to include some confusing "instructions" and "Warnings" then lists the DMX codes. I don't have any DMX controllers or experience so I am unsure of the accuracy of the listings.
Quote : "When the 10th code is ON, the function of 1-9 codes is the following
The other code is off----Sound control mode
The 9th and 1th code is ON ---- Auto mode"
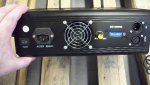
When plugged in to the North American standard 110 V.A.C. (not the 220/240 as listed) the fan comes on with the power switch. Nothing else happens.
Having DIP switches 1 and 9 "ON" does nothing.
If you move the 10th DIP switch to the indicated "ON" position while all others remain in the "OFF" position the unit goes through a preprogrammed demonstration routine of all sorts of graphic images and shape combinations.(-video provided Full Length Run.mov - YouTube ) A pretty good basic beamshow considering that it comes from 1.8 degree stepper motors.
Having 1,9 & 10 "ON" results in the same preprogrammed routine.
By the way, changing the control on the back from "Min" to "Max" has no effect on the output. This control is not labeled as a volume or sensetivity control NOR is it some sort of output adjustment as far as I can tell.
Switching any single DIP switch "ON" makes no difference except for that last 10th one.
So then I tried each one WITH the 10th one in the "ON" position going through the demo. No changes except for one.
Number 8 "ON" causes the beam to go static at 0 degrees by 0 degrees (relative.see comments later.) in whatever color was being used when it is switched "ON" This effectively freezes everything and could allow for a LPM test of each beam and combination of beams for accurate output measurement. (But I don't have an LPM.)
I tried a multitude of other combinations but they all had no effect on the output. I didn't get close to all 1024 combinations but then I shouldn't need to.
So I guess a DMX controller is really what is required unless I can get and hack in an ILDA interface. (I think confirming exactly HOW to do it will be a lot harder than physically doing it.)
After plugging it in the second time at work the main power cord came apart. Now I wasn't being agressive or pulling on it in any sort of hard way. I had a long heavy-duty extension cord to bring power to where I wanted it so there wasn't any sort of stress on the cable during usage. It simply failed at a crucial point. (see picture.) BUT as it is a standard type of device cord and as I have about a dozen others from computers and the likes from the years I was able to replace it with a much more robust and better quality connector.
At this time I will mention that the output from this projector comes out at about 45 degrees to the front face of the unit. That is to say that if you stand directly in front of the output window at 90 degrees to the unit that the beams all exit and project off to your right. To get the beams to go forward the entire unit needs to be placed at 45 degrees to the direction you want. I'm sure that some tweaking of the mirror assemblies placements can fix this but it is inconvenient to have to go through drilling and tapping new mounting holes in the base to correct this obvious problem.
While the preprogrammed routine runs and you watch the images "drawn" you can see that some of the images are being drawn too large for the system limits. Some of the shapes and lines have the corners or ends "fold" back into the field of view. (Think like having the corner of a page folding back.) As there are very few of these and as the primary function of this unit for me is for projecting beamshows this poses no significant issue. I like to think of it as a bit of an indication that the unit can perform slightly better than is being done by the included show despite the usage of stepper motors.
Artifacts in the videos of the lines/graphics out of sync are purely from the camera and the conflicting speeds between the electronic devices. The visible image has no artifacts or obvious problems. (other than the one listed previously.)
The noise under operation is fairly quiet too. Comfortable music levels almost completely hide the sounds, even when ticking through the more laborious renderings. The constant fan noise isn't much louder than a typical home computer but definitely wouldn't be comfortable for long in a silent environment. (video Inside Under Operation.mov - YouTube )
On to the insides of this little power house.
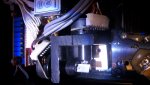
Nothing fancy or outragious here. A fair bit of room for lots of airflow and most everything glued down with that hard white epoxy. (see blurry picture. Sorry.) I haven't tried removing anything yet so how easy it is to remove has yet to be determined.
The red and green laser heads are labelled but there isn't anything on the blue. (see pictures.)
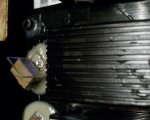
Nothing fancy about the mounting for the mirror assemblies either but a picture none the less.
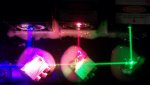
Beam characteristics are pretty much typical for each type from all that I've read here at LPF. The green and red are pretty tight and solid with the blue being about twice the size all around as can be seen in the picture.
One of the surprises to me was the ammount of spill light that went directly up out of the unit when the top was removed. Most of it was that fat blue beam but some of the other colors was lost too. (-see video. Light SPILL From Inside.mov - YouTube )
This calls the total output power from the front opening into serious question. How much of the 300+80+300=680mw total is actually coming out is anyone's guess at this time.
To sum it up I would say that it is a pretty good bang for the buck. For a first time projector it is a great deal. The component parts could be sold individually for about twice what the unit cost. The projections are surprisingly flicker free and good for being stepper motors. With DMX control it should prove to be very effective and even an ideal candidate as a support projector(s) with a more capable main unit.
Too bad DD tries so hard to slip it by as something that it isn't. It does stand up as it is by itself.
Attachments
-
 01 Box in a box.JPG350.4 KB · Views: 328
 -
 02 North Amer power.JPG324.8 KB · Views: 333
 -
 03 Operation manual.JPG281.2 KB · Views: 301
 -
 04 Inside packing.JPG332.9 KB · Views: 402
 -
 05 Front of unit.JPG372.1 KB · Views: 498
 -
 06 Back of unit.JPG366.9 KB · Views: 462
 -
 07 Defective power cord.JPG21.2 KB · Views: 405
 -
 08 Insides of unit -blurry.JPG318.5 KB · Views: 2,652