- Joined
- Dec 21, 2008
- Messages
- 1,223
- Points
- 0
"Jaynom" Kryton-Groovy & SusieQ-532 *Review
Hola mi gente!
Now that I'm on my 3 1/2 review I'm starting to feel "at home" here on LPF")
Krytons Rule
Moving along, I'm pleased to present what I think of as a great collaboration of a few VIP DIY members as well as a upcoming & rather dependable source for good quality, competitively-priced laser products from mainland CN!
First up, we have Kenom's venerable Kryton host. Yes, it is a work of beauty. Not only on an aesthetic level, but also due to it's unbelievably fine build quality and extremely high build tolerances. I've bought no less than half a dozen LED flashlights from DX, namely Romisen and Ultrafire hosts. As good as those hosts look, their build tolerances pale in comparison to Kenom's Kryton!
Last but certainly not least, it feels good knowing that you have a unique and non-generic host housing one of your favorite diodes / modules
Mean Jay Green
The only thing you could possibly say against the Kryton is that it don't do DPSS… . Shame that, seeing as I'm attracted to green. Unless it's on a woman, in which case red, black,... works too") But what's this, I hear??? JayRob's been working day & night, tucked away in his dungeon, working on a modded Kryton… some hours (/days/weeks/months) later and behold, as JayRob breathes new life into the Kryton and brings forth the Kryton Groovy Green!!! Yes, this is what we've all been waiting for...
But what's this, I hear??? JayRob's been working day & night, tucked away in his dungeon, working on a modded Kryton… some hours (/days/weeks/months) later and behold, as JayRob breathes new life into the Kryton and brings forth the Kryton Groovy Green!!! Yes, this is what we've all been waiting for...
"one Kryton to rule them all, one Kryton to host them, one Kryton to bring them all and in the darkness, light them…"
Not only has JayRob modded the venerable Kryton to host DPSS modules, but he's done it in a way that preserves the Kryton's original diode-module setup So this means the host will accept red & BR diode setups as well as DPSS* Greens!
*Maybe even blues & yellows - I've never seen one so I can't be sure those modules have the same diameter…
Of course modding a very high-tolerance Kryton takes either skill or a big pair or maybe even both. Well I don't know JayRob personally but be it skill and/or balls, he's managed to keep the same high tolerances that make a Kryton a Kryton. The extra heatsink fits over the module like a glove and in turn, slides into the Kryton with micrometers to spare (no, I didn't measure this, just eyeballed it...) As if that wasn't already worth the admission price, JayRob generously tosses in a couple of clicky covers (blk & GITD) as well as a couple of dust covers. That and instructions - in color - too
Assembling the Kryton Groovy Green is child's play - assuming you've had some DIY experience in any number of fields (hobbies). This is mainly because you've already got the few necessary tools on hand, like say, an ultra-micro hex key & appropriate sized snap-ring pliers. Oh and above-average soldering skills help… . All of which I pretty much don't have, seeing as this is [almost] my first DIY venture, ever.
Most of you here @LPF already fit the DIYer classification - be it jr. or veteran, but let me just say for the record that if you don't have said tools and minimal DIY skills this build is still doable, but it's not, I repeat, not a snap-together project (like ah, those toys that come in a McDonald's kid's menu… )
)
**** DIYers (even jr. DIYers), please skip to the next section. DIY-total-noobs (like yours truly), read on. ****
Noob Jack City
So my first shock came when I realized that the tip of my $15 soldering iron was bigger than the switch, let alone, the soldering points *notes real DIYers squirming in the background*. Not only that, I really had to relax just to "see" what I was soldering… and that was even with the help of a magnifying glass… *makes note to self - make appointment with Optometrist asap* lol.
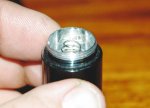
Next up, hey-wow, it's my first clicky. Ever. Ah… what's the assembly order… *Pats himself on back for placing at least the clicky-cover in the right place*… next piece is the ah… *writes Emergency-PM TO JAYROB* "JayRob help me I'm apparently incapable of assembling even a rudimentary clicky…" like a whole 2~3mins goes by... - JayRob to the rescue: "RTFM". Well hey, there's a novel idea... . Turns out that "a picture tells a thousand words" after all, as JayRob's cleverly aligned the clicky-parts for the photo-shoot in the appropriate assembly order…
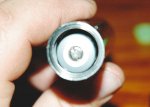
So I've snapped the clicky-core into place and I have this ring-washer-fastener-thingy *notes real DIYers squirming in the background* later identified as a "snap ring". Well I'll be damned, I always wondered what those funny pliers were for… except that the funny pliers (later identified as snap-ring pliers...) are a tad too large… . The ring pops in - well almost in, pops half way out, in, out… and then finally, success! And just in the nick of time 'cause I've almost stripped the Kryton's snap-ring "rail"… *sees Ken going for his hammer lookin' to hammer some sense into me*… . It's quite amazing how malleable Al can be, huh...
"Are we done with the pillaging yet", you ask… "no", I answer, "not quite". The clicky's spring is a little to long, as predicted by JayRob himself. So out come my cutters (pliers) and I pick a spot on the spring and then squeeze, 'til I can't squeeze no more until finally the spring gives, the one piece headed for my face [ ], the other separating itself from the clicky… *lets out a gasp of despair*. Well anyways, I manage to get the spring back onto the clicky's hooks but I know that the contact quality went from $1.99 to pretty much worthless. But OMG, it works (see below). *Makes note to self - ask JayRob for DX part #, order new clicky. Order correct snap-ring tool(s). Order course in soldering. Get that eye checkup, stat…*
**** End of [the Comics] section ***
All Systems Go
Battery - CR123A 3.0V [as well as 3.6V] - check!
Fingers crossed… check!
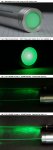
Cla-click - ooohhh wooow, that them there sure is purty… and pretty damned bright, tew!!! And talk about a nice spot, too!!! What, with all my time recently staring at the world's fugliest dots made by he-man 250mW reds and 200mW 6Xs, this O-Like 120-150mW 532nm DPSS module was a sight for sore eyes, indeed! And we are talking TEM00 throughout the entire duty cycle! Although we are dealing with Kryton-cooling power here, I've opted to follow Susie's* advice and maintain the typical LP duty cycle of 60secs. At least until the warranty expires...
No, seriously, it's really a clean & powerful beam + dot (for lack of a better term). Took it outside… "Darth Vader, here I come!!!" Finally, I measured** the divergence to 2.0 mRads which is quite a bit more than my <50mW LP which measured 1.2mRad, but still within reason (imho).
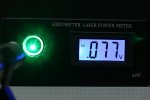
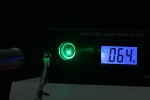
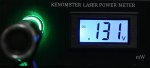
Alas, measuring the actual output power level is a no-can-do for now. I've got my name down for a very nice, even coveted custom-made LPM, but it's designer is sort of ah, AWOL at the moment… *makes a Brad-Pitt-in-pain grimace*. To my astonishment though, I couldn't "see" any difference between this 120-150mW module and my very-very nice Bluesky <50mW all-black Leadlight host LP... Now, this in no way implies that Susie's module is under-powered; it can very well be the case that the Bluesky LP is over-powered (luck of the draw, etc.) and / or that the eye cannot distinguish between brightness at those levels. I'll leave this point open but I will get back to it asap (read: as soon as my dealer's no longer AWOL or I give up and hook myself up with a LaserBee ).
*Susie's CEO, COO, CFO, CIO, CRO, Business Relationship Manager, Webmaster, Procurement, CPA, Accounts Payable / Receivables and head of R&D over at O-Like.
** By measuring the diameter of the dot projected on white wall 5M way, as seen with safety goggles. 1mm to 10mm over a 5M distance.
Conclusion *hears sighs of relief*
There are several reasons why this host-kit-module is a winning team. First, you'll be holding some of LPF's finest in the palm of your hand with no less than two top veterans having contributed to it's ingenuity. Secondly, you'll have a beautifully-clean, relatively tight & not to mention very bright 532nm beam in said palm.
All that for a lot less than what you have to pay the boys over at LaserGlow or Nova and you'll probably get more bang for your *cough*AIG shares*cough* than what you'd be getting over at Wicked's or Dragon's or Warn or Think or High or Spy or tech or etc. & let's not forget good ol' "Bob"… *eye twitches uncontrollably* And last, but certainly not least, if you're a total DIY-noob *looks up at ceiling & whistles nonchalantly* then I can't think of an easier DIY project (...barring of course, those McDonald's kiddy meals!)
So here's to the three of you, making this a much better place, one laser at a time!
Att: But of course, some eye-candy too! As always, the originals (1280x853) can be found on my Flickr page (see sig.)
Hola mi gente!
Now that I'm on my 3 1/2 review I'm starting to feel "at home" here on LPF
Krytons Rule
Moving along, I'm pleased to present what I think of as a great collaboration of a few VIP DIY members as well as a upcoming & rather dependable source for good quality, competitively-priced laser products from mainland CN!
First up, we have Kenom's venerable Kryton host. Yes, it is a work of beauty. Not only on an aesthetic level, but also due to it's unbelievably fine build quality and extremely high build tolerances. I've bought no less than half a dozen LED flashlights from DX, namely Romisen and Ultrafire hosts. As good as those hosts look, their build tolerances pale in comparison to Kenom's Kryton!
Last but certainly not least, it feels good knowing that you have a unique and non-generic host housing one of your favorite diodes / modules
Mean Jay Green
The only thing you could possibly say against the Kryton is that it don't do DPSS… . Shame that, seeing as I'm attracted to green. Unless it's on a woman, in which case red, black,... works too
But what's this, I hear??? JayRob's been working day & night, tucked away in his dungeon, working on a modded Kryton… some hours (/days/weeks/months) later and behold, as JayRob breathes new life into the Kryton and brings forth the Kryton Groovy Green!!! Yes, this is what we've all been waiting for..."one Kryton to rule them all, one Kryton to host them, one Kryton to bring them all and in the darkness, light them…"
Not only has JayRob modded the venerable Kryton to host DPSS modules, but he's done it in a way that preserves the Kryton's original diode-module setup So this means the host will accept red & BR diode setups as well as DPSS* Greens!
*Maybe even blues & yellows - I've never seen one so I can't be sure those modules have the same diameter…
Of course modding a very high-tolerance Kryton takes either skill or a big pair or maybe even both. Well I don't know JayRob personally but be it skill and/or balls, he's managed to keep the same high tolerances that make a Kryton a Kryton. The extra heatsink fits over the module like a glove and in turn, slides into the Kryton with micrometers to spare (no, I didn't measure this, just eyeballed it...) As if that wasn't already worth the admission price, JayRob generously tosses in a couple of clicky covers (blk & GITD) as well as a couple of dust covers. That and instructions - in color - too
Assembling the Kryton Groovy Green is child's play - assuming you've had some DIY experience in any number of fields (hobbies). This is mainly because you've already got the few necessary tools on hand, like say, an ultra-micro hex key & appropriate sized snap-ring pliers. Oh and above-average soldering skills help… . All of which I pretty much don't have, seeing as this is [almost] my first DIY venture, ever.
Most of you here @LPF already fit the DIYer classification - be it jr. or veteran, but let me just say for the record that if you don't have said tools and minimal DIY skills this build is still doable, but it's not, I repeat, not a snap-together project (like ah, those toys that come in a McDonald's kid's menu…
)**** DIYers (even jr. DIYers), please skip to the next section. DIY-total-noobs (like yours truly), read on. ****
Noob Jack City
So my first shock came when I realized that the tip of my $15 soldering iron was bigger than the switch, let alone, the soldering points *notes real DIYers squirming in the background*. Not only that, I really had to relax just to "see" what I was soldering… and that was even with the help of a magnifying glass… *makes note to self - make appointment with Optometrist asap* lol.
Next up, hey-wow, it's my first clicky. Ever. Ah… what's the assembly order…
*Pats himself on back for placing at least the clicky-cover in the right place*… next piece is the ah… *writes Emergency-PM TO JAYROB* "JayRob help me I'm apparently incapable of assembling even a rudimentary clicky…" like a whole 2~3mins goes by... - JayRob to the rescue: "RTFM". Well hey, there's a novel idea... . Turns out that "a picture tells a thousand words" after all, as JayRob's cleverly aligned the clicky-parts for the photo-shoot in the appropriate assembly order… So I've snapped the clicky-core into place and I have this ring-washer-fastener-thingy *notes real DIYers squirming in the background* later identified as a "snap ring". Well I'll be damned, I always wondered what those funny pliers were for… except that the funny pliers (later identified as snap-ring pliers...) are a tad too large… . The ring pops in - well almost in, pops half way out, in, out… and then finally, success! And just in the nick of time 'cause I've almost stripped the Kryton's snap-ring "rail"… *sees Ken going for his hammer lookin' to hammer some sense into me*… . It's quite amazing how malleable Al can be, huh...
"Are we done with the pillaging yet", you ask… "no", I answer, "not quite". The clicky's spring is a little to long, as predicted by JayRob himself. So out come my cutters (pliers) and I pick a spot on the spring and then squeeze, 'til I can't squeeze no more until finally the spring gives, the one piece headed for my face [
], the other separating itself from the clicky… *lets out a gasp of despair*. Well anyways, I manage to get the spring back onto the clicky's hooks but I know that the contact quality went from $1.99 to pretty much worthless. But OMG, it works (see below). *Makes note to self - ask JayRob for DX part #, order new clicky. Order correct snap-ring tool(s). Order course in soldering. Get that eye checkup, stat…***** End of [the Comics] section ***
All Systems Go
Battery - CR123A 3.0V [as well as 3.6V] - check!
Fingers crossed… check!
Cla-click - ooohhh wooow, that them there sure is purty… and pretty damned bright, tew!!! And talk about a nice spot, too!!! What, with all my time recently staring at the world's fugliest dots made by he-man 250mW reds and 200mW 6Xs, this O-Like 120-150mW 532nm DPSS module was a sight for sore eyes, indeed! And we are talking TEM00 throughout the entire duty cycle! Although we are dealing with Kryton-cooling power here, I've opted to follow Susie's* advice and maintain the typical LP duty cycle of 60secs. At least until the warranty expires...
No, seriously, it's really a clean & powerful beam + dot (for lack of a better term). Took it outside… "Darth Vader, here I come!!!" Finally, I measured** the divergence to 2.0 mRads which is quite a bit more than my <50mW LP which measured 1.2mRad, but still within reason (imho).
Alas, measuring the actual output power level is a no-can-do for now. I've got my name down for a very nice, even coveted custom-made LPM, but it's designer is sort of ah, AWOL at the moment… *makes a Brad-Pitt-in-pain grimace*. To my astonishment though, I couldn't "see" any difference between this 120-150mW module and my very-very nice Bluesky <50mW all-black Leadlight host LP...
Now, this in no way implies that Susie's module is under-powered; it can very well be the case that the Bluesky LP is over-powered (luck of the draw, etc.) and / or that the eye cannot distinguish between brightness at those levels. I'll leave this point open but I will get back to it asap (read: as soon as my dealer's no longer AWOL or I give up and hook myself up with a LaserBee ).*Susie's CEO, COO, CFO, CIO, CRO, Business Relationship Manager, Webmaster, Procurement, CPA, Accounts Payable / Receivables and head of R&D over at O-Like.
** By measuring the diameter of the dot projected on white wall 5M way, as seen with safety goggles. 1mm to 10mm over a 5M distance.
Conclusion *hears sighs of relief*
There are several reasons why this host-kit-module is a winning team. First, you'll be holding some of LPF's finest in the palm of your hand with no less than two top veterans having contributed to it's ingenuity. Secondly, you'll have a beautifully-clean, relatively tight & not to mention very bright 532nm beam in said palm.
All that for a lot less than what you have to pay the boys over at LaserGlow or Nova and you'll probably get more bang for your *cough*AIG shares*cough* than what you'd be getting over at Wicked's or Dragon's or Warn or Think or High or Spy or tech or etc. & let's not forget good ol' "Bob"… *eye twitches uncontrollably* And last, but certainly not least, if you're a total DIY-noob *looks up at ceiling & whistles nonchalantly* then I can't think of an easier DIY project (...barring of course, those McDonald's kiddy meals!)
So here's to the three of you, making this a much better place, one laser at a time!
Att: But of course, some eye-candy too! As always, the originals (1280x853) can be found on my Flickr page (see sig.)
Attachments
Last edited: