Welcome to Laser Pointer Forums - discuss green laser pointers, blue laser pointers, and all types of lasers

Buy Site Supporter Role (remove some ads) | LPF Donations

Links below open in new window

FrozenGate by Avery

good coating for a beam dump?

Joined
Feb 23, 2008
Messages
2,832
Points
48
what kind of coating would make for a good beam dump for a laser <5W? im thinking of trying to get some made as cheap as possible for hobbyists b/c the professional beam dumps are usually made for 50+W and cost anywhere from 150-500$ anodizing, powder coat, composite coating? whats your ideas?


I am trying right now to make a beam dump, and have been trying some things out.

I sandblasted some aluminum very coarse, then anodized it. after that I mixed a 50/50 mix with thermal resistant epoxy and graphite powder and applied a thin coat.

Seems to work very nicely for 2W @ 445nm (as thats what I tested it with). I think it can handle 5W, but I didnt test that and can't confirm it.

I applied this mix by brush. later on this month I will machine a proper beamdump and apply the coating while its spinning on a lathe.
This is what I will stick to when I coat the next one, but also the shape of the beamdump is something to consider, allowing the beam to waste itself as heat with minimal light escaping. I think the enclosed "cone" design I see so often with pro-dumps is the best way to go.
Hope that gave you some idea what to do.
 
Last edited:
thanks for the input

i saw the cone design while looking around for ideas and will probably go with that but from what the wiki article on beam dumps said most are just anodized black. its the ribs on the inside of the "cannister" that actually absorb the light. im not sure if the sand blasting would matter much since the cone is supposed to reflect the beam into the ribs but i could be mistaken.
 
Well,
My thinking behind it was that the rough and uneven surface of aluminum with the graphite would absorve and randomly scatter as much of the beam as possible, rather then reflecting most of it.

I agree though, as many ribs and surfaces to dump the light on, the better it will perform.
Main reason im bothering with this, is that at the end of my efforts I want to be able to take beamshots without the splatter of the dot causing interferance (trying to bring out the beam as much as possible without the use of smoke)

This coating style feels like 300grit sandpaper if you run your fingers across it.
 
i think it will depend on the price of having the ribs machined as opposed to the price of having them coated. the ribs may be cheaper machined than to have a coating put on them(other than anodizing). my first thoughts were some kind of carbon/graphite coating but id have to look for someone that could do it as i dont think there are any local shops that could.
 
Do you personally have access to the tools and chemicals required?
(or know how to use them?)
such as a lathe, a work area to mix chemicals and apply/dry them, etc.

Doing this yourself is very cheap. I estimate my beamdump to cost less then 15$. and that is for the thermal epoxy and the aluminum. (Keep in mind I have this stuff on hand and the tools needed) If you need to buy everything off hand.. then I think you should prepare to invest far more then just 15$. Im not sure, but I belive it would vary on where you live, and what stores you are getting your supplies from.

If you cannot find from your local shops, then an idea is to look online and buy some decent quantaties.
Im sure there are stores online, but I personally bought mine locally.
Coating wise, for a simple coat like my one for testing, it didn't take much setup or effort. simply mixing the epoxy and the graphite and brushing it onto the dump.
Anodizing can also be done at home, but its a bit messy IMO.

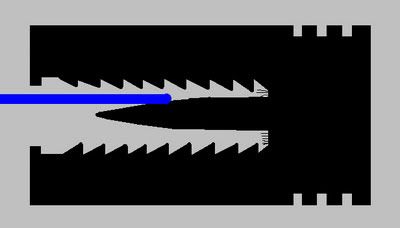
Also, for the cone/ribbing design, I was thinking something like a sawtooth pattern, with the flat ends facing towards the laser's impact point.
That way so incomming scatter around the dot itself, would be reflected sideways, while backsplash from the impact point, would just be reflected backwards into the beam dump (although some will escape through the apperture, although I dont think you can do much about that, as thats where your laser is entering in the first place.)

EDIT:

To give a better idea what im trying to say, this is how I will machine my final one next month to use as a propper beamdump.
it will look something like this:
ripperdumpbmp.jpg


This is not very proportional, but gives accuracy to the concept of the design. It will be coated with what I said earlier in the thread.
 
Last edited:
I nice target I use is a plastic container on its side, which I fill with steel wool that I soaked in thermal flat black paint for mufflers and grills. If the steel wool sample is not too dense, and is soaked well, the sample can handle 5W+... assuming its not focused.
 
And if it can't handle 5 watts that will be fun too :crackup:


I nice target I use is a plastic container on its side, which I fill with steel wool that I soaked in thermal flat black paint for mufflers and grills. If the steel wool sample is not too dense, and is soaked well, the sample can handle 5W+... assuming its not focused.
 
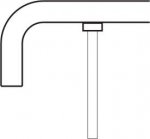
I can recommend the following easy design: take a standard copper tube, length about 15-20 cm. Solder an endcap on one side, and probably a nut on the outside to connect a stand. Then bend the tube by 90 degree and blacken the inside with a candle.
With this simple design, the laser will be absorbed in the tube, and the reflected part will be reflected further inside to the closed end and there absorbed. The good heat transfer of copper allows to use this dump with quite high powers. I used this design very often in our university lab with different lasers, more than 5W cw. Worked very well!
 

Attachments

  • Beamdump.jpg
    Beamdump.jpg
    4.8 KB · Views: 339
one of the guys over at PL said that hes used a high temp grill paint and exposed it to 5+W of yag and the thing didnt break a sweat.. i think for costeffectiveness i may just have to go with the paint if i can find a good one. that would probably be cheaper than having them anodized too.
 
^ not totally sure, cause, you know, paints don't sticks good on aluminium ..... if you use aluminiujm, you need first to give a layer of "epoxy primer", then a layer of a paint that bind with the primer, then your paint ..... otherwise, the paint "peel away" from aluminium surfaces after some days or weeks.

Anyway, this depend from how much costs these paints in your country, compared with anodization process, and if you made them for yourself or as mass products for resell them, i suppose.
 
Just poppin' in... I liked that copper tubing design! Cheap, and I can make it all from home (besides the copper tubing, I will just go to Home Depot for that). How did you bend the tubing though? Just stick it in a vice and then bend it with pliers? And how thick tubing did you use, diameter wise?
 
Just poppin' in... I liked that copper tubing design! Cheap, and I can make it all from home (besides the copper tubing, I will just go to Home Depot for that). How did you bend the tubing though? Just stick it in a vice and then bend it with pliers? And how thick tubing did you use, diameter wise?

Short pieces of tubing are a pain to bend, buy a 90' "Ell" and a "end cap" and solder it. The solder is mainly structural.

Steve
 
Oh, alright. I will just buy it bent then. Sounds good! Will have to build that this weekend or something. Haven't been able to tinker with laser-related things for a while now!
 
Bending a tube, especially a copper tube, and keep it in tube shape, it's hard to do, without the right tool ..... anyway, a hardware store may do it for you, probably.

Otherwise, you have an alternative, to buy a piece of straight tube and a "curve joint" from the ones that do gas pipes (not gasoline, cooking gas, domestic plants) ..... here, at least, they have a lot of measures and diameters with pre-curved joints ..... it can be a solution, if you don't find a store with a bending machine.
 
Could I not just buy a pre-curved pipe? I am sure they have L-shaped pipes at my local Home Depot.


Back
Top