jayrob
0
- Joined
- Sep 21, 2007
- Messages
- 9,862
- Points
- 113
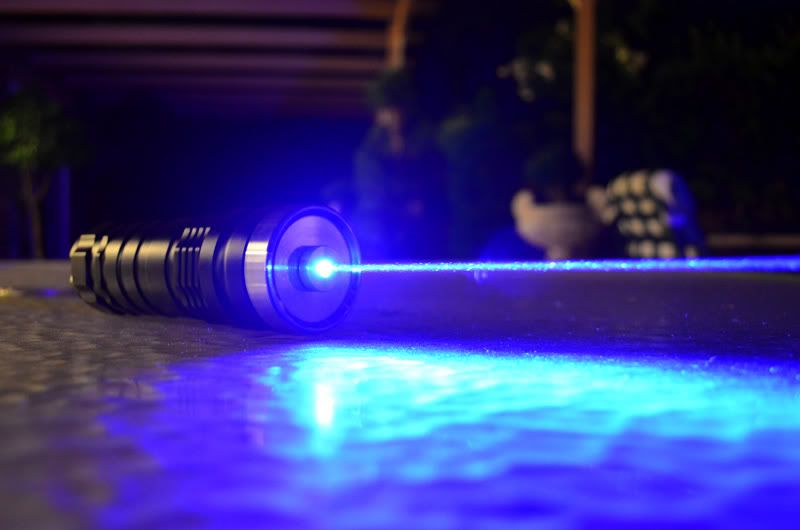
Great host for the new 3.5 Watt diodes using the FlexModP3 4 Amp driver! :beer:
This host is not cheap, but it is a unique, very good quality, solid build. I really like the thick stainless steel bezel... (holster is optional and does not come from every supplier)

DTR first set this host up with a FlexModP3 driver shown here:
http://laserpointerforums.com/f52/2w-445-dtr-frankenstein-ultrafire-rl-2088-handheld-host-56255.html
For a 445 build, you can get your diode pre-installed into an AixiZ module with lead wires soldered on from daguin or DTR.
In that case, you will just connect your diode leads, to my driver leads... ('Hot' option kit)
Note:
This host is also great with the very efficient X-Drive buck driver.
I have the X-Drive buck drivers on hand. I have 1.8 Amps, as well as 2.1, 2.4, and 3.4 Amps.
I can set up an X-Drive 'Hot' option thermal glued to the pill with lead wires, ready for your diode connection...
(after I machine the top of the pill flat, it can just be thermal glued there)")
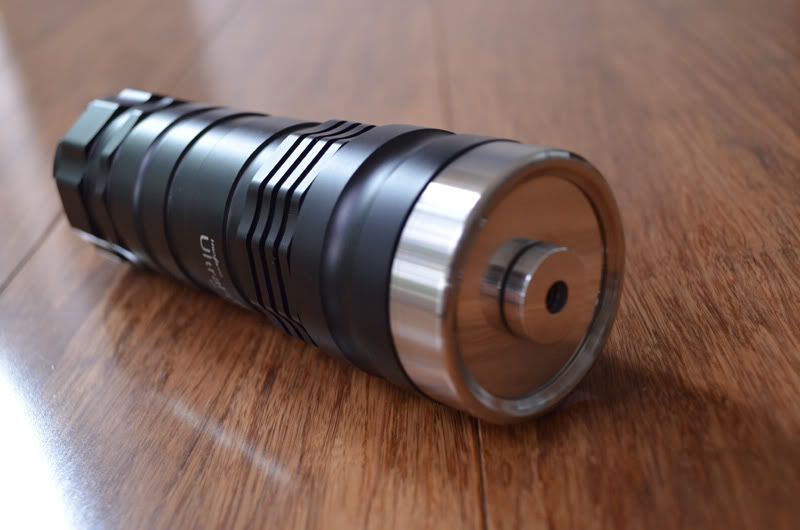
(FlexModP3 no longer available - use X-Drive mentioned above) I have since designed a 'drop in module' type of build for the FlexModP3 driver using this RL-2088 'Frankenstein' host...
See here for another review of this kit!

The FlexModP3 drop in design, makes for a very easy assembly to install your diode...
You can get a 445 diode pre-installed into an AixiZ module with lead wires soldered on from daguin or DTR
Note: You will not be using the back 'barrel' part of the AixiZ module. Just the front 'business end'.
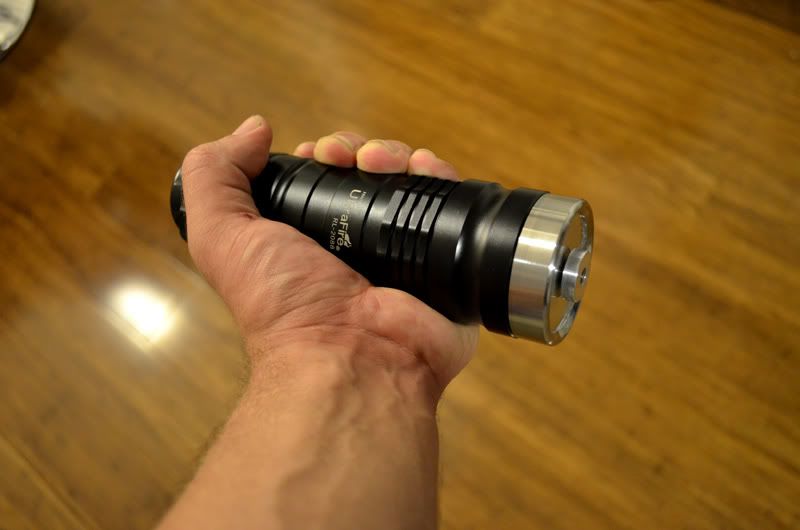
This set up will use 3 X 18650 Li-Ion batteries in series using the stock battery holder that comes with the host. High quality AW batteries are recommended. I recommend using these:
AW 18650 Protected 3100 mAh Rechargeable Lithium Battery
Here's one source for the host that I have purchased from: (it came with the protective holster shown in the first picture of this thread)
Wholesale Ultrafire RL2088 SST 50 LED 3 Mode 900Lumens Flashlight
I see that this site also includes the holster for about $92 bucks: (but they will charge a lot for shipping)
UltraFire RL-2088 Luminus SST-50 LED 3X18650 High Power Flashlight wholesale source: UltraFire RL-2088 Luminus SST-50 LED 3X18650 High Power Flashlight [3052]
'Hot' option:
This design is using the diode case pin for the negative supply to the driver as shown below...


I want to mention that the negative contact points on the FlexModP3 (both input and output), are continuous. So if you wanted to, you could just connect the diode case pin to the negative pin (blu-ray or 445), and just connect to the negative output of the driver just like you can also do with a V5 FlexDrive if you wanted to...
But as the picture shows, I went ahead and just ran an extra wire direct to the negative input side of the driver.
The 445 diode case pin has plenty of length left for soldering an isolated wire to. Just remove the pink triangle piece from the pins. And you can solder to the case pin...


RL-2088 'Frankenstein' Kit pricing and options:
Note: I have seen a couple of different head designs on the inside of these RL-2088 hosts. Some do not need extra machine work inside the head, and some need the extra machine work. If there is extra machine work needed for yours, then there will be some extra cost. But I'm thinking that the newer ones will not need the extra machine work inside the head...
You can either send me your host, or I can order it for you... ($130)
(If you buy the kit, and also a 405-G-1 glass lens together, I will polish the face of the heatsink for free if desired)
* Heatsink - $39
* Polish the face of the heatsink - $10 Not perfect like a piece of mirror - will be very nice and shiny (but you can still make out some very fine machine or sand marks if you look close enough)
* (no longer available) FlexModP3 'Hot' option including driver, with fiberglass mount and battery contact end piece - $95 (current set to your specification)
* X-Drive buck driver 'Hot' option thermal glued to pill with lead wires ready for your diode - $58 (specify 1.8, 2.1, 2.4, or 3.4 Amps)
* AixiZ module - $5
* AixiZ 445 lens - $11
* 405-G-1 glass lens - $55
* 650-G-1 glass lens - $52
* Shipping will be 3% of total plus postage (PayPal fees plus postage) PM for total...
* Shipping Policy
The only parts missing from the list of options, are the diode and the batteries...
Gnarly!
This host is not cheap, but it is a unique, very good quality, solid build. I really like the thick stainless steel bezel... (holster is optional and does not come from every supplier)
DTR first set this host up with a FlexModP3 driver shown here:
http://laserpointerforums.com/f52/2w-445-dtr-frankenstein-ultrafire-rl-2088-handheld-host-56255.html
For a 445 build, you can get your diode pre-installed into an AixiZ module with lead wires soldered on from daguin or DTR.
In that case, you will just connect your diode leads, to my driver leads... ('Hot' option kit)
Note:
This host is also great with the very efficient X-Drive buck driver.
I have the X-Drive buck drivers on hand. I have 1.8 Amps, as well as 2.1, 2.4, and 3.4 Amps.
I can set up an X-Drive 'Hot' option thermal glued to the pill with lead wires, ready for your diode connection...
(after I machine the top of the pill flat, it can just be thermal glued there)
(FlexModP3 no longer available - use X-Drive mentioned above) I have since designed a 'drop in module' type of build for the FlexModP3 driver using this RL-2088 'Frankenstein' host...
See here for another review of this kit!
The FlexModP3 drop in design, makes for a very easy assembly to install your diode...
You can get a 445 diode pre-installed into an AixiZ module with lead wires soldered on from daguin or DTR
Note: You will not be using the back 'barrel' part of the AixiZ module. Just the front 'business end'.
This set up will use 3 X 18650 Li-Ion batteries in series using the stock battery holder that comes with the host. High quality AW batteries are recommended. I recommend using these:
AW 18650 Protected 3100 mAh Rechargeable Lithium Battery
Here's one source for the host that I have purchased from: (it came with the protective holster shown in the first picture of this thread)
Wholesale Ultrafire RL2088 SST 50 LED 3 Mode 900Lumens Flashlight
I see that this site also includes the holster for about $92 bucks: (but they will charge a lot for shipping)
UltraFire RL-2088 Luminus SST-50 LED 3X18650 High Power Flashlight wholesale source: UltraFire RL-2088 Luminus SST-50 LED 3X18650 High Power Flashlight [3052]
'Hot' option:
This design is using the diode case pin for the negative supply to the driver as shown below...
I want to mention that the negative contact points on the FlexModP3 (both input and output), are continuous. So if you wanted to, you could just connect the diode case pin to the negative pin (blu-ray or 445), and just connect to the negative output of the driver just like you can also do with a V5 FlexDrive if you wanted to...
But as the picture shows, I went ahead and just ran an extra wire direct to the negative input side of the driver.
The 445 diode case pin has plenty of length left for soldering an isolated wire to. Just remove the pink triangle piece from the pins. And you can solder to the case pin...
RL-2088 'Frankenstein' Kit pricing and options:
Note: I have seen a couple of different head designs on the inside of these RL-2088 hosts. Some do not need extra machine work inside the head, and some need the extra machine work. If there is extra machine work needed for yours, then there will be some extra cost. But I'm thinking that the newer ones will not need the extra machine work inside the head...
You can either send me your host, or I can order it for you... ($130)
(If you buy the kit, and also a 405-G-1 glass lens together, I will polish the face of the heatsink for free if desired)
* Heatsink - $39
* Polish the face of the heatsink - $10 Not perfect like a piece of mirror - will be very nice and shiny (but you can still make out some very fine machine or sand marks if you look close enough)
* (no longer available) FlexModP3 'Hot' option including driver, with fiberglass mount and battery contact end piece - $95 (current set to your specification)
* X-Drive buck driver 'Hot' option thermal glued to pill with lead wires ready for your diode - $58 (specify 1.8, 2.1, 2.4, or 3.4 Amps)
* AixiZ module - $5
* AixiZ 445 lens - $11
* 405-G-1 glass lens - $55
* 650-G-1 glass lens - $52
* Shipping will be 3% of total plus postage (PayPal fees plus postage) PM for total...
* Shipping Policy
The only parts missing from the list of options, are the diode and the batteries...
Gnarly!
Last edited: