
Welcome to Laser Pointer Forums - discuss green laser pointers, blue laser pointers, and all types of lasers
How to Register on LPF | LPF Donations

Navigation
Install the app
How to install the app on iOS
Follow along with the video below to see how to install our site as a web app on your home screen.
Note: This feature may not be available in some browsers.
More options
You are using an out of date browser. It may not display this or other websites correctly.
You should upgrade or use an alternative browser.
You should upgrade or use an alternative browser.
DIY Laser Cutter Project
- Thread starter Things
- Start date


Re: My holiday project 
I assembled the Y carriage using tape to see what it'll look like. This is where I'm up to at the moment.

Any suggestions on how to mount that angle aluminium to the flat stuff underneath it?
Project is on hold for a little while until I can get some more funds")
Cheers,
Dan
I assembled the Y carriage using tape to see what it'll look like. This is where I'm up to at the moment.
Any suggestions on how to mount that angle aluminium to the flat stuff underneath it?
Project is on hold for a little while until I can get some more funds
Cheers,
Dan
- Joined
- Jun 19, 2009
- Messages
- 2,710
- Points
- 0
Re: My holiday project
Krazy Glue.Things said:Any suggestions on how to mount that angle aluminium to the flat stuff underneath it?
Re: My holiday project
Alright well, was eagerly looking out my window all day, then I see the post man walking up
If I had of known how well it was packed, I wouldn't have been concerned at all.

Packing materials include about 10 metres of foam, about 20 metres of bubble wrap, some PVC pipe and a lot of tape.
And it survived

I temporarily rigged it right up to my NST (No diodes) and filled the tube with water, and it works perfectly
I can only run it for a few seconds at a time, as the water is not circulating, and the NST is slightly too powerful for the tube, but it'll keep me entertained until I get the real PSU
I'll upload some video's a bit later.
Another update on the project, I just bought a ZnSe focusing lens.
Cheers,
Dan
Alright well, was eagerly looking out my window all day, then I see the post man walking up
If I had of known how well it was packed, I wouldn't have been concerned at all.
Packing materials include about 10 metres of foam, about 20 metres of bubble wrap, some PVC pipe and a lot of tape.
And it survived
I temporarily rigged it right up to my NST (No diodes) and filled the tube with water, and it works perfectly
I can only run it for a few seconds at a time, as the water is not circulating, and the NST is slightly too powerful for the tube, but it'll keep me entertained until I get the real PSU
I'll upload some video's a bit later.
Another update on the project, I just bought a ZnSe focusing lens.
Cheers,
Dan
Gryphon
0
- Joined
- May 4, 2009
- Messages
- 2,331
- Points
- 113
Re: My holiday project
Glad to see you tube made it safe and sound, i've heard too many horror stories about recieving shrapnel instead of a laser
Glad to see you tube made it safe and sound, i've heard too many horror stories about recieving shrapnel instead of a laser
Re: My holiday project
Just put up a video:
Yeah, I'm extremely happy it made it in 1 piece, also very pleased with their packaging
Since that video, I've added some basic water cooling. Can run it for a few minutes now.
EDIT: Some more pics:


Just put up a video:
Yeah, I'm extremely happy it made it in 1 piece, also very pleased with their packaging
Since that video, I've added some basic water cooling. Can run it for a few minutes now.
EDIT: Some more pics:
Last edited:
Rafa
0
- Joined
- Feb 4, 2010
- Messages
- 437
- Points
- 0
Re: My holiday project
Does it have the pump built in?
Does it have the pump built in?
bobhaha
0
- Joined
- May 31, 2009
- Messages
- 3,239
- Points
- 63
Re: My holiday project
No, looks like his got the water resting inside the tube for this run. No circulation yet
No, looks like his got the water resting inside the tube for this run. No circulation yet
Misellus
0
- Joined
- Oct 1, 2010
- Messages
- 37
- Points
- 0
Re: My holiday project
Must...not...click..."Buy It Now"
I really want one of those now
I wonder if I have anything I could sell...anyone need a kidney? Only had 3 stones, kinda worn, used everyday
M-
Must...not...click..."Buy It Now"
I really want one of those now
I wonder if I have anything I could sell...anyone need a kidney? Only had 3 stones, kinda worn, used everyday
M-
Re: My holiday project
Paid for the CO2 PSU today
Now all that remains is a few more V groove bearings, some steppers, a PSU for them and maybe some CO2 mirrors, though I dont think I'll need special mirrors, almost any polished metal works apparently.
Misellus, have you got any pics/website of your machine?
I've had a look through your g-code code, I'll need to figure out how to modify it to control the laser power in place of the Z axis.
Appears wood doesn't make such a good beamstop

Took a while to burn through it, though I didnt notice until I got closer and saw it burnt a little mark on my garage door!
Cheers,
Dan
Paid for the CO2 PSU today
Now all that remains is a few more V groove bearings, some steppers, a PSU for them and maybe some CO2 mirrors, though I dont think I'll need special mirrors, almost any polished metal works apparently.
Misellus, have you got any pics/website of your machine?
I've had a look through your g-code code, I'll need to figure out how to modify it to control the laser power in place of the Z axis.
Appears wood doesn't make such a good beamstop
Took a while to burn through it, though I didnt notice until I got closer and saw it burnt a little mark on my garage door!
Cheers,
Dan
Last edited:
HIMNL9
0
- Joined
- May 26, 2009
- Messages
- 5,318
- Points
- 0
Re: My holiday project
Seen this right now ..... if i can give you a suggestion, about the endless screw block .....

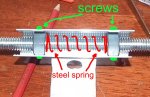
The spring keep the bolts "pressed" on the threads, reducing a lot the "wobble", and the screws placed this way, are usually better than glue, for keep them in place (and those bolts looks big enough for have the possibility to drill them an M3 threaded hole through them, and using M3 screws shortert than the thickness of the bolt side + aluminium, the internal thread must not be ruined ..... it require a bit of precision (and maybe to pass again a threading tool inside the bolts, after they are fixed on the carriage), but will give you a lot more of precision, i think")
Also, better you don't use plastic gears on a machine like this ..... dented belts are better, if metal gears are not available .....
Anyway, keep in mind that these threaded bars are not designed for continuous use (tender metal, not hardened steel) ..... they can become ruined, after some months of work .....
Seen this right now ..... if i can give you a suggestion, about the endless screw block .....
The spring keep the bolts "pressed" on the threads, reducing a lot the "wobble", and the screws placed this way, are usually better than glue, for keep them in place (and those bolts looks big enough for have the possibility to drill them an M3 threaded hole through them, and using M3 screws shortert than the thickness of the bolt side + aluminium, the internal thread must not be ruined ..... it require a bit of precision (and maybe to pass again a threading tool inside the bolts, after they are fixed on the carriage), but will give you a lot more of precision, i think
Also, better you don't use plastic gears on a machine like this ..... dented belts are better, if metal gears are not available .....
Anyway, keep in mind that these threaded bars are not designed for continuous use (tender metal, not hardened steel) ..... they can become ruined, after some months of work .....
Attachments
Last edited:
Re: My holiday project
Thanks HIMNL9
I used 2 nuts in the screw block, which sort of keeps them pressed against the threads already. I have seen those anti-backlash nuts, though I will see how this goes first.
EDIT: Just saw your picture, thats a nice simple idea. I'll pick some springs up next time I'm at the hardware store.
I don't intend on using any gears, I think I will just connect the stepper shaft directly to the screw
Cheers,
Dan
Thanks HIMNL9
I used 2 nuts in the screw block, which sort of keeps them pressed against the threads already. I have seen those anti-backlash nuts, though I will see how this goes first
.EDIT: Just saw your picture, thats a nice simple idea. I'll pick some springs up next time I'm at the hardware store.
I don't intend on using any gears, I think I will just connect the stepper shaft directly to the screw
Cheers,
Dan
Last edited:
Misellus
0
- Joined
- Oct 1, 2010
- Messages
- 37
- Points
- 0
Re: My holiday project
Misellus, have you got any pics/website of your machine?
I've had a look through your g-code code, I'll need to figure out how to modify it to control the laser power in place of the Z axis.[\quote]
I'll take some this afternoon.
2 ideas for laser control...
First, set up a safety switch. Set arduino pin to monitor a switch as an input. Use a normally closed pushbutton switch inline with a toggle switch on the control console that sends a signal to the arduino, an arduino output pin controls a transistor and relay across the power wire to the laser PSU (if the PSU has TTL, no relay needed), the arduino activates the transistor/relay and the laser gets power and fires. Toggle acts as main power, push button acts as emergency/momentary off. Laser cannot fire unless there is power to the arduino and the toggle switch is on.
In the do_step function set up the arduino code so that <=0 for zaxis sets the output pin to HIGH and the laser is on and >0 sets pin to LOW and the laser is off. Then you can just include gcode lines to turn laser on and off when needed by setting z to 1 or 0. In the software you are using to create gcode from your drawings, tell it your travel height is 1 and it should add them automatically. Also, the control software I've seen usually has a manual jog, so you could turn it on/off from the computer screen by pressing the jog up or down buttons.
TL;DR gcode sets z to 0, arduino powers transistor/relay and laser turns on until gcode line sets z back to 1.
Then if you want, add a normally open push button to the console which also tells the laser to fire as long as the button is pressed.
I hope this is understandable, I know what I'm thinking but suck at writing.
Misellus
HIMNL9
0
- Joined
- May 26, 2009
- Messages
- 5,318
- Points
- 0
Re: My holiday project
^ Ehm ..... Misellus, sorry, not trying to bash you, but, as basical safety rule, NEVER pass safety switches only through a processor, or any other similar circuitry ..... NEVER, on dangerous machines.
You can, ofcourse, use a safety switch for check that the cover of the machine (if you place a cover on it) is closed, before to fire the laser with a signal from the MCU, but the main safety system MUST be independent from it, and able to switch off the beam also if the controller fry and put all the outputs to 1 (and you know, this can always happens) .....
When i was working on machines building, this was basically done in 2 ways ..... one signal for say to the machine controller that the safety devices was all ok, and the second for close a big relais (we call them "teleruttori", and opposite to common relais, they have positively opened contacts, this mean, the spring force the contacts to open also if they get "glued" or stucked from some overload or spark) on the main power line ..... and if the electronic require to work also with the safety switches opened, the power lines was always double, with independent actuators for the controller and the power/motors section .....
So, if you plan to put a safety cover over the operation zone (always suggested, with CO2), then i suggest you to have a safety switch also that control a 2 contacts relais, and this relais that open both the power wires for the CO2 PSU ..... so, also if the MCU fails, there's no way for turn on the beam with the cover opened (and the hands in the path  ) ..... being very paranoid, the same power line can also be used for the motors power PSU, for avoid accidents, but i think that the beam is the priority .....
^ Ehm ..... Misellus, sorry, not trying to bash you, but, as basical safety rule, NEVER pass safety switches only through a processor, or any other similar circuitry ..... NEVER, on dangerous machines.
You can, ofcourse, use a safety switch for check that the cover of the machine (if you place a cover on it) is closed, before to fire the laser with a signal from the MCU, but the main safety system MUST be independent from it, and able to switch off the beam also if the controller fry and put all the outputs to 1 (and you know, this can always happens) .....
When i was working on machines building, this was basically done in 2 ways ..... one signal for say to the machine controller that the safety devices was all ok, and the second for close a big relais (we call them "teleruttori", and opposite to common relais, they have positively opened contacts, this mean, the spring force the contacts to open also if they get "glued" or stucked from some overload or spark) on the main power line ..... and if the electronic require to work also with the safety switches opened, the power lines was always double, with independent actuators for the controller and the power/motors section .....
So, if you plan to put a safety cover over the operation zone (always suggested, with CO2
), then i suggest you to have a safety switch also that control a 2 contacts relais, and this relais that open both the power wires for the CO2 PSU ..... so, also if the MCU fails, there's no way for turn on the beam with the cover opened (and the hands in the path ) ..... being very paranoid, the same power line can also be used for the motors power PSU, for avoid accidents, but i think that the beam is the priority .....Misellus
0
- Joined
- Oct 1, 2010
- Messages
- 37
- Points
- 0
Re: My holiday project
Good point, I stand corrected
able to switch off the beam also if the controller fry and put all the outputs to 1 (and you know, this can always happens) .....
Good point, I stand corrected