Welcome to Laser Pointer Forums - discuss green laser pointers, blue laser pointers, and all types of lasers

Buy Site Supporter Role (remove some ads) | LPF Donations

Links below open in new window

FrozenGate by Avery

CLOSED - COLLECTING $ Dorcy Jnr GB - $15.00 Shipped- 07/12/09

I like the snap ring idea. It would look nicer than having an exterior set screw IMO. Also, it helps for people who already got their host, so they don't have to ship them all to D_H, they can instead have the snap ring and heat sink shipped to them.

Just FYI -- No one that bought a heat sink from DH during the GB has their Dorcy. ALL of those packages are still here. If you paid for a heat sink and want the host sent separately, please PM me. I am simply trying to save us all postage costs.

If you did not order a heat sink, your Dorcy is either on its way or you already have it.

Peace,
dave

Right, but what I meant was that many who ordered these already had heat sinks for them, or won them in the raffle, and their current heat sinks won't work either.
 
That's a good point Dave, it would require a set screw to hold the module in place and that would be pointless, because we could just drill a set screw in the host to hold a new, simpler heatsink in place.

I was hesitant at first to break the window and stuff on my host in case we weren't going a head with this, but I can't wait any longer so I'm gonna break it up and see what the head looks like inside :)

Btw, bryce the exterior heatsink wouldn't require the host being shipped off, the heatsink would just be sent because it would be screwed on replacing the current head with a small set screw on the outside holding the module in place. Just like the current full body heatsinks have.

DO NOT BREAK IT UP! Use my "smack it" method above. The plastic lens is simply pressed past the lip (and the lip is VERY thin). Place the head face down on a solid surface. Place a socket/rod/tube/bar of the right diameter into the rear of the head onto the edge of the emitter. Smack the tool with a hammer. The lens will pop out and the reflector and emitter will then just slide out.

Peace,
dave
 
Last edited:
Yea I just realised that :p Owell I lost the glass panel but the rest is all good :)
 
I used a small stack of narrow coins and a vice, the lens deforms, and can be pulled out easily. The reflector and LED follow nicely after that, and it doesn't seem to have left any marks on the metal. As for the heatsink, I've had an idea which we might be able to do, and avoids the circlip or glueing. It's more of a modification on the full-body design, though, and requires more complex machining, because it friction-fits into the handle section. I'll put together a CAD sketch if possible, and see what people think.
 
Well I've been playing around with my full body heatsink which was made for the old design and the purple anodizing and dorcy look so nice together, shame it doesn't fit :(

I'm out of ideas now, apart from maybe making a heatsink that can be pressfit into the head of the host past the initial lip at the front, Don't know if this would work but if the heatsink was the same diameter as the inner part, once it was pushed past that lip it would be enough to hold it in. But that's only if you can get aluminium to go past it.

Charlie's idea sounds interesting :)
 
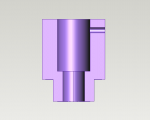
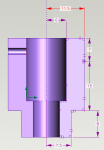
Here's the first rendering - dimensions on 2nd pic. The sticking-out bit at the bottom replaces the black plastic "collar/guide" in the handle of the torch (and possibly the contact board too), and is purposefully a very tight fit into the casing (friction-fit, should use thermally AND electrically conductive paste). Set screw is shown. If possible, the drilled-out central section of the "sticky-out bit" should only be the width of the Dorcy's default spring, but this presumes we can insulate the section electrically - any shorts there would kill the battery. In this initial design it is wider, so we could use insulating tape wrapped around a spring/contact.

On another note, I have 2x full-body v2 heatsinks and 1x full-body v1 heatsink, and only 2 "old style" dorcies. If there's anyone who doesn't have any heatsinks already to hand and the old-style, I'd be happy to trade with you and cover shipping costs both ways.

EDIT: All dimensions in mm, the dotted line is the centre so "horizontal" lengths are radii not circumference. All done by eye and an awful pair of calipers. Can send to anyone in VRML, ATB, STEP, or ProDesktop 8 native/supported formats.
 

Attachments

  • new-dorcy-heatsink.PNG
    new-dorcy-heatsink.PNG
    14.7 KB · Views: 59
  • dorcy-dimensions.PNG
    dorcy-dimensions.PNG
    16.9 KB · Views: 60
Last edited:
I do product design at A level for school, and we have to use prodesktop :p (I think that's what your using) evil program :D It's so frustrating.

As for your idea, It looks good, but won't that mean that we have to get a set screw drilled into the hosts? I think that was one of the issues because no-one wanted to have to resend their hosts off.

Also if we are using a set screw, would it just be easier to get a set diameter heatsink, drop it down the head and just set screw it in?

There is one method I thought off, but it would probably effect the heatsinking. The full body heatsink actually fit's very snugly into the black plastic case thing in the head, as a very simple method we could just hot glue that black plastic to the inside of the head, and just hot glue the heatsink to that.

I don't think it would be very structurally integral though, and the heatsink could just drop off.
 
Last edited:
I agree, pro-desktop is pure pain rolled up into an educationally-friendly bundle, but it's quick and easy at least, and (hopefully) gets the point across. Because the heatsink friction-fits into the body (tightly!) and not the head section, it actually has no need for the head section at all, which is only there for aesthetic reasons. It also takes a bit of strain off the head-section threads, not that it's an issue currently. I'll model the actual torch in and show how it fits.

(O/T) I'm also doing design tech, currently in GCSE year, but I'm sitting the theory paper for AS-level this summer. I'll probably do most of the AS-level coursework over the summer and do the A2 course off-timetable next year.
 
ah that's awesome :)

I love graphics/product design, I did it for GCSE as well. All the fun of art but with less drawing and also involves more thinking.

GCSE was nice because they let us do what ever we wanted, I did a modern house design pain, painstakingly hand made from 8 sheets of A3 paper, there's also some cool little light LED's which go up the acrylic poles:

housevm.jpg


excuse the watermark, its the only pictures i had from my project lying around.

For AS level there is a set course, apart from the concept project part. A level we will be free to do what ever again :)

It's nice to meet someone else who enjoys the subject :)

/Sorry for the thread jack lol
 
Last edited:
I agree, pro-desktop is pure pain rolled up into an educationally-friendly bundle, but it's quick and easy at least, and (hopefully) gets the point across. Because the heatsink friction-fits into the body (tightly!) and not the head section, it actually has no need for the head section at all, which is only there for aesthetic reasons. It also takes a bit of strain off the head-section threads, not that it's an issue currently. I'll model the actual torch in and show how it fits.

(O/T) I'm also doing design tech, currently in GCSE year, but I'm sitting the theory paper for AS-level this summer. I'll probably do most of the AS-level coursework over the summer and do the A2 course off-timetable next year.

Y'all need to keep in mind that the unit must be assembled (and probably disassembled) at some point. Stuff has to "screw" together somewhere ;)

Peace,
dave
 
If my design is right, then unscrewing the head section will slowly but steadily pull the heatsink from its resting-place in the handle section. From there the process would be as simple as unscrewing the set screw holding the module in place, pulling it out and replacing whatever needs to be replaced.

My GCSE coursework is essentially a Kryton-esque barrel, but heavily modified to accept an LED instead of laser diode, and with a couple of my own attachments, and using my own regulator instead of driver. Pics will follow when complete, of course, and I spoke to Kenom before basing my design on his (though it's a one-off project, and is reasonably different to his original design) :)
 
Last edited:
I was seriously considering designing the "perfect host" which would give me an opportunity to go on the metal lathe with a good excuse, and use the schools supply of aluminium lol :)

I hope when I get a bit more time I can start using the one in school. And I got the idea of your design now Charlie, it would kind of be press fitted like a diode into the host.


Back
Top