

sinner
0
- Joined
- Oct 27, 2011
- Messages
- 2,564
- Points
- 83
Finally got some time to post this up, been wanting to do it earlier but couldnt find so much time, This is one helluva LPM so it's worth the share..
To put it in a short succinct statement , It is the most simplicistically advanced LPM setup in the hobby grade category. Everything is beyond describe how easier it makes the whole Ophir based LPM with just this ARGMeter for Ophir Add-On.
Now for those who don't know what it does:
Ophir head requires a complex power input, a +9|GND|-9V in order to power on.. Also needs a voltmeter or Multimeter hooked to the Sensor which gives a reading in mV. The sensors are precalibrated to 1mV=1mW.. If you are using a volmeter panel you will have to use another 6V supply to the voltmeter panel readout! It auto-adjusts the +/-mW (idle) on Ophir so no modifications or coarse adjustments are needed..
- Eliminates the need of two(2x) 9V Batteries +9V|GND|-9V.
- Powers on all the components incl. ophir sensor with just One(1x) 9V battery..
- Adds data-logging to your Ophir head via USB (Arduino).
- Auto-Zeroing.
- LCD Readout with resolution of 0.1mW - Max/Peak Value and Current Value.
- Brightness adjustment levels.
Price for the Add-On: $85.00
You may build your own, Since ARG was generous enough to make his whole project open source.
Here's the link if you want to get one..
http://laserpointerforums.com/f70/argmeter-open-source-laser-power-meter-80606.html
Lets start from the box/packaging:
ARG did a great job in packaging although i asked for the super cheap snail-mail shipping since i had a very limited budget and couldnt spend $30.00 additional to the Add-On price for faster shipping..

As you can see, It is secured with tape on all sides..

Opened up the Box, with some scissors and cuttin pliers as fast as i could :eg:

So a lots of bubblewrap stuffed inside , Very neat and secure!

Contents of the Package:
- USB Cable for DataLogging
- 9V Power Input Cable
- ARGMeter

The ARGMeter comes in Anti-Static bags to prevent from any ESD damage that could happen during the transit , So you dont need to worry about Customs a-holes ruining it since the instructions are clearly written, So no worries there!
FRONT VIEW:

SIDE VIEW:

BACK VIEW:

Now I gathered all the necessary info on Wiring it..
From LEFT to RIGHT
- Black
- Red
- Brown
- Orange
Pretty self explainatory, The best thing about the board is the quality of the components is top-notch. And i simply love the wire connections. Pretty Darn Solid if you ask me, Just the way i wanted it to be!
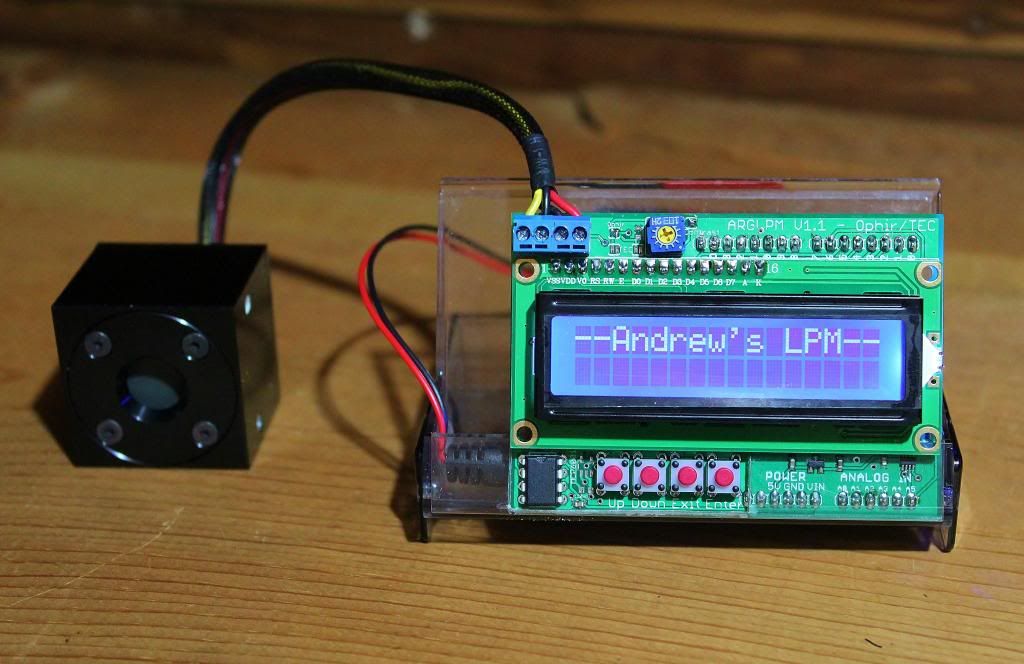
Now, To Power it on for the First Time:
Got my new 9V Battery, Connected the 9V Input lead that was included in the package.

Finally, It is ON..

Mine come's with Auto-zeroing, That solved the major problem i had which was +4.0mW idle, It wasn't really a problem but now i wont have to subtract that from every reading! Also i can manually Re-Zero with On-board button. Still playing with those to familiarize even further..
The Screen is Liquid Crystal Display (LCD 2.5") has adjustable brigtness levels.
LPM Datalogging - Peregrine Interface:
Just installed the Arduino drivers and downloaded Peregrine, It is connected on COM3 , Figuring out how to make a graph now.. Will upload some LPM Tests soon.
Updates:
Ok, So i finally configured Peregrine - Universal Datalogging interface on my computer! Straight out of the box, Very simple and lightweight but robust I must say, Great work by Trevor..

To put it in a short succinct statement , It is the most simplicistically advanced LPM setup in the hobby grade category. Everything is beyond describe how easier it makes the whole Ophir based LPM with just this ARGMeter for Ophir Add-On.
Now for those who don't know what it does:
Ophir head requires a complex power input, a +9|GND|-9V in order to power on.. Also needs a voltmeter or Multimeter hooked to the Sensor which gives a reading in mV. The sensors are precalibrated to 1mV=1mW.. If you are using a volmeter panel you will have to use another 6V supply to the voltmeter panel readout! It auto-adjusts the +/-mW (idle) on Ophir so no modifications or coarse adjustments are needed..
- Eliminates the need of two(2x) 9V Batteries +9V|GND|-9V.
- Powers on all the components incl. ophir sensor with just One(1x) 9V battery..
- Adds data-logging to your Ophir head via USB (Arduino).
- Auto-Zeroing.
- LCD Readout with resolution of 0.1mW - Max/Peak Value and Current Value.
- Brightness adjustment levels.
Price for the Add-On: $85.00
You may build your own, Since ARG was generous enough to make his whole project open source.
Here's the link if you want to get one..
http://laserpointerforums.com/f70/argmeter-open-source-laser-power-meter-80606.html
Lets start from the box/packaging:
ARG did a great job in packaging although i asked for the super cheap snail-mail shipping since i had a very limited budget and couldnt spend $30.00 additional to the Add-On price for faster shipping..
As you can see, It is secured with tape on all sides..
Opened up the Box, with some scissors and cuttin pliers as fast as i could :eg:
So a lots of bubblewrap stuffed inside , Very neat and secure!
Contents of the Package:
- USB Cable for DataLogging
- 9V Power Input Cable
- ARGMeter
The ARGMeter comes in Anti-Static bags to prevent from any ESD damage that could happen during the transit , So you dont need to worry about Customs a-holes ruining it since the instructions are clearly written, So no worries there!
FRONT VIEW:
SIDE VIEW:
BACK VIEW:
Now I gathered all the necessary info on Wiring it..
From LEFT to RIGHT
- Black
- Red
- Brown
- Orange
Pretty self explainatory, The best thing about the board is the quality of the components is top-notch. And i simply love the wire connections. Pretty Darn Solid if you ask me, Just the way i wanted it to be!
Now, To Power it on for the First Time:
Got my new 9V Battery, Connected the 9V Input lead that was included in the package.
Finally, It is ON..
Mine come's with Auto-zeroing, That solved the major problem i had which was +4.0mW idle, It wasn't really a problem but now i wont have to subtract that from every reading! Also i can manually Re-Zero with On-board button. Still playing with those to familiarize even further..
The Screen is Liquid Crystal Display (LCD 2.5") has adjustable brigtness levels.
LPM Datalogging - Peregrine Interface:
Just installed the Arduino drivers and downloaded Peregrine, It is connected on COM3 , Figuring out how to make a graph now.. Will upload some LPM Tests soon.
Updates:
Ok, So i finally configured Peregrine - Universal Datalogging interface on my computer! Straight out of the box, Very simple and lightweight but robust I must say, Great work by Trevor..
Last edited:


")