

- Joined
- Oct 16, 2009
- Messages
- 221
- Points
- 0
Just thought I'd throw this info out there in case someone's struggling with taking a nighttime photo of their laser and not happy with the results. This is more of a reference manual that you can come back to if you're having trouble. So, there is no need to retain it all in the first sitting. This a living document! I have asked other members to chime in with their expertise so, keep checking back as time goes on.
Update---> I decided to make a video tutorial that'll explain everything and will include a bunch side by side comparisons of images. I work in the video production business (no, not porn) and have everything I need to create a tutorial that will be very easy to understand and follow. I want this to be a collaborative effort as I am not only one with knowledge on the topic. I would love ideas from other photo junkies as well so if anybody would like to offer up their expertise during the creation, please PM me letting me know you're interested and I will send quicktimes at different stages of the video build for you to review. You will get a video credit in the final video. More to come soon.
Attached is a picture I took earlier in the year when I had one of Jack's Opto 150mW green pointers. I did it under a moonless sky, far away from any city lights and the neighborhood could not even be seen in the live-view LCD on my Nikon D90 camera. So trust me, it was dark.
The following information is more for people interested in getting near accurate results of the beam. If you just want to play around a get the beam as bright as possible, there still is some info in here that'll help you get a more rock solid shot.
Camera
Any still camera with a long exposure option will do. Problem is, most point-n-click cameras don't have a long enough shutter setting to produce the type of image we are looking at here. "Aperture" and "ISO" if available on your model both play a vital role with the shutter. If your situation has more ambient light, your camera may be able to take the shot. Pretty much any DSLR camera these days is capable of producing a properly exposed image even in the darkest of nights.
Tripod
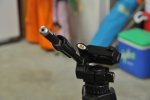
A TRIPOD IS A MUST. In my case, I used two tripods. One for the camera and the other for the laser which I pre-aimed for the shot. That way, the moment I turned the laser on, the dot would hit the exact spot I was aiming for. A hand held attempt on an exposed shot would cause unwanted "beam blur". The tripod I used for the laser was homemade in that I used the hollow handle on it to hold the laser in (added a picture of the laser tripod). If you can't find something that'll give you the ability to tweak the position of the laser while holding it rock steady, I know companies like o-like sell mini tripods just for lasers and are dirt cheap.
The Idea:
Use the long exposure setting on the camera along with aperture and ISO to "expose" the area or scene and the object you're hitting. Then fire off the laser at the last moment (duration varies depending on camera settings and scene) to accurately represent (or as close as humanly possible") ) the brightness of the beam.
) the brightness of the beam.
CAMERA SETTINGS:
If camera settings scare you, don't worry, we are here to help. Once you get the fundamentals down you'll have a ton of fun experimenting with your images.
Exposure
The amount of light reaching the sensor is known as "the exposure". There are two mechanical parts of a camera that control exposure; shutter and aperture. ISO (a.k.a. gain) is the 3rd function of the camera that is used to electronically amplify light. All are explained below.
Shutter
A door that opens and closes to control the length of time light is exposed to the sensor. Every camera has one and while most are adjustable, some (basic point-n-clicks) only have this as an automatic option. As simple as I can explain it and for our purposes, adjusting shutter speed allows you to control how much light hits the sensor. The lower the number, the longer the door stays open which lets in more light. We're looking for speeds in full second increments (ie. 10, 30, 60, or more). Using these speeds during the day would completely blow out the image.
So if you chose 20 (not 1/20th) as your number, that would leave the sensor exposed for 20 seconds. If the camera was locked down on a highway at night and your other settings were normalized, your result would be loooong streaks of lights from all the cars passing by the camera (or sensor). In our world, a laser pointer and some crazy arm movements at a 20 second exposure would yield some cool images. Try it!
For static laser shots, leaving the beam on for a 20 second exposure wouldn't blow out the scene or make the beam look as thick as a light saber but it will intensify the brightness of the beam 20x. If you're going for a wow factor, leave the beam on as long as you can without overheating it.
Just so that you know, on the other side of the spectrum, faster shutter speeds (ie. 1/250 of a second all the way up to 1/3200 and more) are meant for stopping action in bright light situations like sports. Not what we're after. Using those speeds at night even with a laser would result in complete black images. Might as well take the picture with the lens cap on
Aperture
A tiny adjustable hole in front of the lens that controls the amount of light coming in. This one is easy to understand but more challenging to use because it not only effects what you set your shutter at but it also affects your depth of field and what stays in focus. Let's leave focus out of the equation for the time being because most of the images we are after are wide shots where focus isn't as critical.
In a nutshell, the wider the hole, the more light is exposed to the sensor. Ever had your eyes dilated during an eye exam? It's where they put drops in your eyes that over 15 minutes or so, fully open the pupils of your eyes. This would be equivalent to the aperture being at it widest opening. In camera lingo for example, that would be an f/2.8. Just the opposite, an f-stop of f/22 would squeeze that opening as tight as possible letting in the least amount of light. Kinda like getting a light shinned in your eyes at night. You're pupils instantly goes from fully wide (f/2.8) to barely open (f/22). Make sense?
Check out this chart--->http://silverstrandphoto.files.wordpress.com/2010/06/0-7645-9802-3_0213.jpg
How does aperture work with shutter? Let's assume we're using a point-n-click camera that has adjustable shutter, f-stop and ISO settings and you want to take a beam shot of your laser at night. You set up the camera on the tripod and fire off the maximum 10 second exposure the camera has with the laser on the entire time. After reviewing the shot, you realize the scene barely came out or all you see is a faint beam over a black background. Now you think you can justify to your wife, girlfriend or mom that you need a $1200 DSLR camera. We'll, don't go into debt just yet there buddy because this is where aperture (plus ISO)"may" help.
If you check the aperture setting which is what... class? That's right, the f-stop. You may see that it was unintentionally set at f/15 or more which means what...class? That's right, the opening is at it's smallest opening allowing the least amount of light in. Lowering the f-stop to let's say f/1.8 is not always the magic bullet especially at night but it may help in some cases. So let's say it helped a bit but it's still not worthy of keeping. Noooo, bad boy! You still can't justify that DSLR. One more option that may help is ISO or gain. ISO is explained down below so for now, you'll just know it's an electronic volume control for light. While cranking it up may do the trick, too much "gain" will cause graininess in the photo resulting in a lack for better term, crappy picture.
If this is the case and you have maxed out all the "light gaining" abilities of the camera, yes, you may now run to mommy to OK the purchase. Just don't tell her I sent you. I got enough on my plate.")
**Side note -- Sorry if I offended any female LPF members by not mentioning the need of approval from husbands, boyfriends or dads. Iv'e always just assumed all the laser dorks in this place are males.
ISO
ISO stands for "International Organization for Standardization" and is taken from the Greek word "isos", meaning equal. Doesn't sound like it has anything to do with light gain but let's see where it takes us.
ISO pertains to how sensitive the image sensor is to the amount of light present. The higher the ISO, the more sensitive the image sensor gets and therefore gives the camera the ability to take pictures in low-light situations. More to come...
The Scene:
As I stated above, it was very dark outside so I had to fire off a few test shots (without the laser) until I found how much time I needed to expose the image to include the radio antenna I was aiming for. Of course in the final image, the neighborhood houses were nicely exposed because of their exterior lights.
The Beam:
In my case, I wanted two results. I wanted the beam and, wanted to show the dot hitting the radio antenna 3/4's of a mile away. Sure the laser can shoot much farther than that but that is the range I thought would work for both. I used a timer remote for the camera's exposure so I could see exactly when to turn on the laser with a second left. If you don't have one of these it's no big deal. Counting out loud or in your head will just be trial and error. addendum-->I originally stated that the key was to "fire off the beam one second before the shutter closes" but in reality, there is no perfect timing because every scenario is unique. But, the end result is to get the beam looking as realistic as possible while still capturing the scene.
The Stats:
Every case is going to be different depending on the available lighting or lack there of in my case and also personal taste. The is no "one way to do it" when it comes to photography. Here is what I was happy with:
Nikon D90
Exposure: 52 seconds
Focal length: 18mm
F-stop: f/13
ISO: 1000
- laser on with 1 second left.
Full camera data info link--->Jeffrey's Exif viewer
These are the setting that worked for me. The one second beam shot is NOT the only way to do it. Depending on your camera settings, you may have to increase or decrease the time the laser is on to see it; regardless of accuracy. I hope it helps others who may be struggling or don't even know where to start. I will not be offended if other members chime in with their own images and expertise. As I said, this is not the only way, just what I was happy with and thought others would enjoy.
Update---> I decided to make a video tutorial that'll explain everything and will include a bunch side by side comparisons of images. I work in the video production business (no, not porn) and have everything I need to create a tutorial that will be very easy to understand and follow. I want this to be a collaborative effort as I am not only one with knowledge on the topic. I would love ideas from other photo junkies as well so if anybody would like to offer up their expertise during the creation, please PM me letting me know you're interested and I will send quicktimes at different stages of the video build for you to review. You will get a video credit in the final video. More to come soon.
Attached is a picture I took earlier in the year when I had one of Jack's Opto 150mW green pointers. I did it under a moonless sky, far away from any city lights and the neighborhood could not even be seen in the live-view LCD on my Nikon D90 camera. So trust me, it was dark.
The following information is more for people interested in getting near accurate results of the beam. If you just want to play around a get the beam as bright as possible, there still is some info in here that'll help you get a more rock solid shot.
Camera
Any still camera with a long exposure option will do. Problem is, most point-n-click cameras don't have a long enough shutter setting to produce the type of image we are looking at here. "Aperture" and "ISO" if available on your model both play a vital role with the shutter. If your situation has more ambient light, your camera may be able to take the shot. Pretty much any DSLR camera these days is capable of producing a properly exposed image even in the darkest of nights.
Tripod
A TRIPOD IS A MUST. In my case, I used two tripods. One for the camera and the other for the laser which I pre-aimed for the shot. That way, the moment I turned the laser on, the dot would hit the exact spot I was aiming for. A hand held attempt on an exposed shot would cause unwanted "beam blur". The tripod I used for the laser was homemade in that I used the hollow handle on it to hold the laser in (added a picture of the laser tripod). If you can't find something that'll give you the ability to tweak the position of the laser while holding it rock steady, I know companies like o-like sell mini tripods just for lasers and are dirt cheap.
The Idea:
Use the long exposure setting on the camera along with aperture and ISO to "expose" the area or scene and the object you're hitting. Then fire off the laser at the last moment (duration varies depending on camera settings and scene) to accurately represent (or as close as humanly possible
) the brightness of the beam.CAMERA SETTINGS:
If camera settings scare you, don't worry, we are here to help. Once you get the fundamentals down you'll have a ton of fun experimenting with your images.
Exposure
The amount of light reaching the sensor is known as "the exposure". There are two mechanical parts of a camera that control exposure; shutter and aperture. ISO (a.k.a. gain) is the 3rd function of the camera that is used to electronically amplify light. All are explained below.
Shutter
A door that opens and closes to control the length of time light is exposed to the sensor. Every camera has one and while most are adjustable, some (basic point-n-clicks) only have this as an automatic option. As simple as I can explain it and for our purposes, adjusting shutter speed allows you to control how much light hits the sensor. The lower the number, the longer the door stays open which lets in more light. We're looking for speeds in full second increments (ie. 10, 30, 60, or more). Using these speeds during the day would completely blow out the image.
So if you chose 20 (not 1/20th) as your number, that would leave the sensor exposed for 20 seconds. If the camera was locked down on a highway at night and your other settings were normalized, your result would be loooong streaks of lights from all the cars passing by the camera (or sensor). In our world, a laser pointer and some crazy arm movements at a 20 second exposure would yield some cool images. Try it!
For static laser shots, leaving the beam on for a 20 second exposure wouldn't blow out the scene or make the beam look as thick as a light saber but it will intensify the brightness of the beam 20x. If you're going for a wow factor, leave the beam on as long as you can without overheating it.
Just so that you know, on the other side of the spectrum, faster shutter speeds (ie. 1/250 of a second all the way up to 1/3200 and more) are meant for stopping action in bright light situations like sports. Not what we're after. Using those speeds at night even with a laser would result in complete black images. Might as well take the picture with the lens cap on
Aperture
A tiny adjustable hole in front of the lens that controls the amount of light coming in. This one is easy to understand but more challenging to use because it not only effects what you set your shutter at but it also affects your depth of field and what stays in focus. Let's leave focus out of the equation for the time being because most of the images we are after are wide shots where focus isn't as critical.
In a nutshell, the wider the hole, the more light is exposed to the sensor. Ever had your eyes dilated during an eye exam? It's where they put drops in your eyes that over 15 minutes or so, fully open the pupils of your eyes. This would be equivalent to the aperture being at it widest opening. In camera lingo for example, that would be an f/2.8. Just the opposite, an f-stop of f/22 would squeeze that opening as tight as possible letting in the least amount of light. Kinda like getting a light shinned in your eyes at night. You're pupils instantly goes from fully wide (f/2.8) to barely open (f/22). Make sense?
Check out this chart--->http://silverstrandphoto.files.wordpress.com/2010/06/0-7645-9802-3_0213.jpg
How does aperture work with shutter? Let's assume we're using a point-n-click camera that has adjustable shutter, f-stop and ISO settings and you want to take a beam shot of your laser at night. You set up the camera on the tripod and fire off the maximum 10 second exposure the camera has with the laser on the entire time. After reviewing the shot, you realize the scene barely came out or all you see is a faint beam over a black background. Now you think you can justify to your wife, girlfriend or mom that you need a $1200 DSLR camera. We'll, don't go into debt just yet there buddy because this is where aperture (plus ISO)"may" help.
If you check the aperture setting which is what... class? That's right, the f-stop. You may see that it was unintentionally set at f/15 or more which means what...class? That's right, the opening is at it's smallest opening allowing the least amount of light in. Lowering the f-stop to let's say f/1.8 is not always the magic bullet especially at night but it may help in some cases. So let's say it helped a bit but it's still not worthy of keeping. Noooo, bad boy! You still can't justify that DSLR. One more option that may help is ISO or gain. ISO is explained down below so for now, you'll just know it's an electronic volume control for light. While cranking it up may do the trick, too much "gain" will cause graininess in the photo resulting in a lack for better term, crappy picture.
If this is the case and you have maxed out all the "light gaining" abilities of the camera, yes, you may now run to mommy to OK the purchase. Just don't tell her I sent you. I got enough on my plate.
**Side note -- Sorry if I offended any female LPF members by not mentioning the need of approval from husbands, boyfriends or dads. Iv'e always just assumed all the laser dorks in this place are males.
ISO
ISO stands for "International Organization for Standardization" and is taken from the Greek word "isos", meaning equal. Doesn't sound like it has anything to do with light gain but let's see where it takes us.
ISO pertains to how sensitive the image sensor is to the amount of light present. The higher the ISO, the more sensitive the image sensor gets and therefore gives the camera the ability to take pictures in low-light situations. More to come...
The Scene:
As I stated above, it was very dark outside so I had to fire off a few test shots (without the laser) until I found how much time I needed to expose the image to include the radio antenna I was aiming for. Of course in the final image, the neighborhood houses were nicely exposed because of their exterior lights.
The Beam:
In my case, I wanted two results. I wanted the beam and, wanted to show the dot hitting the radio antenna 3/4's of a mile away. Sure the laser can shoot much farther than that but that is the range I thought would work for both. I used a timer remote for the camera's exposure so I could see exactly when to turn on the laser with a second left. If you don't have one of these it's no big deal. Counting out loud or in your head will just be trial and error. addendum-->I originally stated that the key was to "fire off the beam one second before the shutter closes" but in reality, there is no perfect timing because every scenario is unique. But, the end result is to get the beam looking as realistic as possible while still capturing the scene.
The Stats:
Every case is going to be different depending on the available lighting or lack there of in my case and also personal taste. The is no "one way to do it" when it comes to photography. Here is what I was happy with:
Nikon D90
Exposure: 52 seconds
Focal length: 18mm
F-stop: f/13
ISO: 1000
- laser on with 1 second left.
Full camera data info link--->Jeffrey's Exif viewer
These are the setting that worked for me. The one second beam shot is NOT the only way to do it. Depending on your camera settings, you may have to increase or decrease the time the laser is on to see it; regardless of accuracy. I hope it helps others who may be struggling or don't even know where to start. I will not be offended if other members chime in with their own images and expertise. As I said, this is not the only way, just what I was happy with and thought others would enjoy.
Attachments
Last edited:


 Even so,you're NOT doing is wrong. It's just that it's not "accurate" and people looking for pictures of "the beam" will not see the real deal.