- Joined
- Feb 25, 2010
- Messages
- 1,643
- Points
- 113
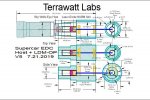
The Supercar EDC
Hello all. Please see pics of my latest build: “The Supercar”. This build started over one (1) year ago when discussions between Wossee ( Driver designer/builder ) and myself began. About that time, the G8 Collimation lens was introduced and in my opinion this lens in combination with 6X Cylindrical optics tames the NUBM044 LD to an acceptable degree.
Also my interest in designing and building the latest and greatest EDC had just taken hold….so….off to the races we go.
Vladimir ( Wossee) indicated he had topology for a 29mm dia 5A Boost drive designed to run on a single 3.7V 26650 Lipo cell. This driver is named: The Fat 5A Boost. It has a robust center spring contact for + and the typical outer ring contact for -. The drive also sports a two (2) wire external hook-up for I/O for your on/off switch.
Per Wossee; “ This Driver is a Prototype in the testing phase. As for the switch – the driver has a built in high-current electronic latching switch with recoverable reverse voltage protection operated from a small momentary switch “
So, all that needs to be done is connect the Driver - two (2) wire external hook-up to a push button momentary switch….for Push-On / Push-Off operation . The stock momentary switch that is supplied with the Skywolfeye is suitable. Perfect !!!
I replaced the stock momentary switch with a larger Push momentary I/O. This is optional for I believe the stock switch is fine for the I/O action.
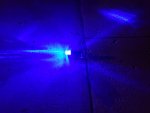
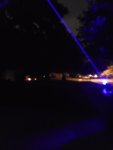
This driver has been the missing puzzle piece for a one cell 044 LD EDC !! Well…It is now a reality and here is an example of it’s use. I should note that the driver demands the best 26650 LiPo brand name cells. When cell voltage drops below minimum, the LD starts to blink on/off to advise you “ Low Voltage Condition “
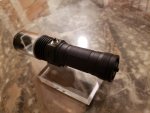
I choose the Skywolfeye Zoom-XM-L2 for the build host. This is a single cell/26650 Lipo with a side switch design. To me, this is a perfect host !! ====> Single cell/Side switch/Small/Good quality/Low cost !!!!! See here;
https://www.ebay.com/itm/ZOOM-XM-L2-U2-LED-3-Mode-8000LM-USB-Rechargeable-Flashlight-Torch-26650-Battery/283001124351
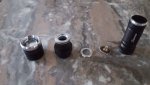
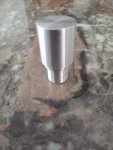
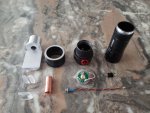
The next bit needed was a custome Aluminum machined unit to hold/center the CU 12mm x 27mm Standard diode mount and provide an attachment plane for the Cylindrical optics. I did, as usual, machine open the internal LD seat race on the CU mount. I like a friction fit vs. a press fit for the LD in it holder. Personal preference here.
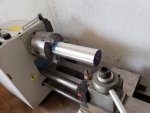
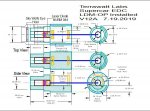
I machined the component labeled : LDM-OP …See pics. This unit serves to mount the CU LD holder and as a platform for the Cylindrical Lens ( C-Lenses) pair. You may recall this design from the past. The LDM-OP is secured to the host with one (1) small bolt from the exterior race of the Switch section unit.
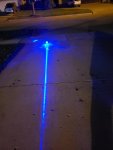
For the optics I used a G8 lens from DTR and a set of 6X Cylindrical Optics from our Group Buy. Again, this arrangement tames the 044 well. Also the NUBM044 LD was supplied by DTR.
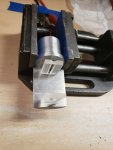
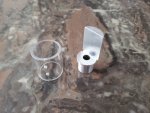
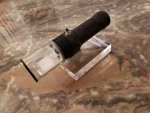
As you would predict… I incorporated a clear Acrylic Canopy/Sleeve to protect and display the optics. There is a black cap plate on the Acrylic end to further protect and act as a mask for a small amount of LD spill after the C-Lenses. The canopy/Sleeve is secured to the LDP-OP unit with two (2) small bolts.
The 29mm dia. driver fits perfect within the Switch section unit / host body, The driver unit is held in place by clamping action. This clamping action occurs when the battery tube is screwed into the to Switch section unit....capturing the driver. So, the driver is secured between the Battery tube and the Switch section unit. The clamping action also provides the negative ground path from the driver perimeter contact ring
======> to the battery tube wall.
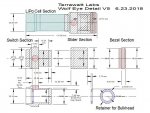
I did have to do machining to the slider component of the Skywolfeye….sanding off the end threads where the Bezel ring was originally attached. Also…the Slider portion was permanently epoxied to the host inner tube as there was no need for this piece to telescope anymore.
SO….here we have it….primarily due to the Wossee Fat 5A Boost driver, The Supercar….the most compact, using the NUBM044-highest LD we currently have available, corrected, EDC build that I have yet to see. Thank you Vladimir !!!!!
As a last minute addition, I added a rear Push on / Push off Tail switch. This was done for safety concerns !!! The Tail Switch MUST be activated or the Latching switch WILL NOT TURN THE UNIT ON….Perfect
Hope you enjoyed the show ! I am very happy we did this collaboration…and I am very, very happy it turned out….and…..that is DONE !!
See the pics below...
CDBEAM
Hello all. Please see pics of my latest build: “The Supercar”. This build started over one (1) year ago when discussions between Wossee ( Driver designer/builder ) and myself began. About that time, the G8 Collimation lens was introduced and in my opinion this lens in combination with 6X Cylindrical optics tames the NUBM044 LD to an acceptable degree.
Also my interest in designing and building the latest and greatest EDC had just taken hold….so….off to the races we go.
Vladimir ( Wossee) indicated he had topology for a 29mm dia 5A Boost drive designed to run on a single 3.7V 26650 Lipo cell. This driver is named: The Fat 5A Boost. It has a robust center spring contact for + and the typical outer ring contact for -. The drive also sports a two (2) wire external hook-up for I/O for your on/off switch.
Per Wossee; “ This Driver is a Prototype in the testing phase. As for the switch – the driver has a built in high-current electronic latching switch with recoverable reverse voltage protection operated from a small momentary switch “
So, all that needs to be done is connect the Driver - two (2) wire external hook-up to a push button momentary switch….for Push-On / Push-Off operation . The stock momentary switch that is supplied with the Skywolfeye is suitable. Perfect !!!
I replaced the stock momentary switch with a larger Push momentary I/O. This is optional for I believe the stock switch is fine for the I/O action.
This driver has been the missing puzzle piece for a one cell 044 LD EDC !! Well…It is now a reality and here is an example of it’s use. I should note that the driver demands the best 26650 LiPo brand name cells. When cell voltage drops below minimum, the LD starts to blink on/off to advise you “ Low Voltage Condition “
I choose the Skywolfeye Zoom-XM-L2 for the build host. This is a single cell/26650 Lipo with a side switch design. To me, this is a perfect host !! ====> Single cell/Side switch/Small/Good quality/Low cost !!!!! See here;
https://www.ebay.com/itm/ZOOM-XM-L2-U2-LED-3-Mode-8000LM-USB-Rechargeable-Flashlight-Torch-26650-Battery/283001124351
The next bit needed was a custome Aluminum machined unit to hold/center the CU 12mm x 27mm Standard diode mount and provide an attachment plane for the Cylindrical optics. I did, as usual, machine open the internal LD seat race on the CU mount. I like a friction fit vs. a press fit for the LD in it holder. Personal preference here.
I machined the component labeled : LDM-OP …See pics. This unit serves to mount the CU LD holder and as a platform for the Cylindrical Lens ( C-Lenses) pair. You may recall this design from the past. The LDM-OP is secured to the host with one (1) small bolt from the exterior race of the Switch section unit.
For the optics I used a G8 lens from DTR and a set of 6X Cylindrical Optics from our Group Buy. Again, this arrangement tames the 044 well. Also the NUBM044 LD was supplied by DTR.
As you would predict… I incorporated a clear Acrylic Canopy/Sleeve to protect and display the optics. There is a black cap plate on the Acrylic end to further protect and act as a mask for a small amount of LD spill after the C-Lenses. The canopy/Sleeve is secured to the LDP-OP unit with two (2) small bolts.
The 29mm dia. driver fits perfect within the Switch section unit / host body, The driver unit is held in place by clamping action. This clamping action occurs when the battery tube is screwed into the to Switch section unit....capturing the driver. So, the driver is secured between the Battery tube and the Switch section unit. The clamping action also provides the negative ground path from the driver perimeter contact ring
======> to the battery tube wall.
I did have to do machining to the slider component of the Skywolfeye….sanding off the end threads where the Bezel ring was originally attached. Also…the Slider portion was permanently epoxied to the host inner tube as there was no need for this piece to telescope anymore.
SO….here we have it….primarily due to the Wossee Fat 5A Boost driver, The Supercar….the most compact, using the NUBM044-highest LD we currently have available, corrected, EDC build that I have yet to see. Thank you Vladimir !!!!!
As a last minute addition, I added a rear Push on / Push off Tail switch. This was done for safety concerns !!! The Tail Switch MUST be activated or the Latching switch WILL NOT TURN THE UNIT ON….Perfect
Hope you enjoyed the show ! I am very happy we did this collaboration…and I am very, very happy it turned out….and…..that is DONE !!
See the pics below...
CDBEAM
Attachments
-
 20180621_080459_1529590755152.jpeg188.9 KB · Views: 47
 -
 LDM OP Start Machining.jpg129.1 KB · Views: 47
 -
 LDM-OP C Lens Testing.jpg77 KB · Views: 49
 -
 LDM-OP Installed V12A.JPG142.6 KB · Views: 49
 -
 LDM-OP Refined pic.jpg116.3 KB · Views: 46
 -
 LDM-OP Socket machined.jpg65.8 KB · Views: 40
 -
 LDM-OP V7.JPG70.8 KB · Views: 39
 -
 SkyWolf Detail V5.JPG162.7 KB · Views: 43
 -
 Supercar Host and LDM_OP V5.JPG143 KB · Views: 64
 -
 Supercar complete Ortho view.jpg124.6 KB · Views: 67
Last edited:


")

") we all love seeing what you have to share.
we all love seeing what you have to share.