Welcome to Laser Pointer Forums - discuss green laser pointers, blue laser pointers, and all types of lasers

Buy Site Supporter Role (remove some ads) | LPF Donations

Links below open in new window

FrozenGate by Avery

The Green Gargoyle 10.08 W @ 520nm

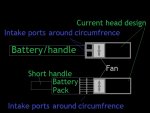
It works, but I like Robert/RCB's battery placement version more because it has a handle which is easier to hold as well as easy battery replacement. Only thing is, I don't know how long it would be, maybe too long, and that is why you are not going that direction?

I believe you can shorten the head quite a bit removing the Lipo battery packs to help make up for the additional length of some large Li-ion batteries being used in series instead. We could consider 18650 battery packs, they will produce more current and with more than one pack in series more voltage, but for more voltage in series we would need to either modify existing 2 x 2 series-parallel 8.4 V battery holders, or create our own so the voltage of stacked packs increases in series with all four batteries in parallel. This can provide 8,000 mAH of capacity, more with some batteries for over 10 AH total.


Last edited:


So, Bob,

Have you decided to try axicon construction at end? Interesting - this is something different from what everyone is doing!

BTW I have ordered one of these Astrolux MF04 torches on Ali. 130mm bezel diameter must be something - twice bigger than that of TK75! And same type of battery holder which is maybe easier to modiy to 4s connection (and have 16V power source for boost LD drivers).
 
OK....I agree that some sort of rear handle would be ergonomic !! I like RC 's lower design....with the shorter handle.

SO...we agree that the 50mm EDF will be adequate ?....and the current Optical/LD design is the way to go ?

SO....I question why we do not stick with some RC type LiPo pack ?? The pack can be charged from an external port....so...no need to open up the unit to charge the cells. No need to mess around with 4 x 18650 holders ( Modifying the holders )....Two of them...…...just Two (2) LiPo cell packs.

I am a big fan of keeping one LiPo Cell pack for the fan....and one LiPo Cell pack for the LD's. So....we use and monitor the pack voltage in a separate fashion......SO ... we go with RC's SH design ( Short Handle ) ????

This adaptation will add length to the overall build !!

Thoughts ??

CDBeam
 
If you are going to add a handle, might as well put batteries in it? Maybe use both Lipo's for lasers and battery pack in handle for fan, using one of those 2 x 2 battery holders.
 
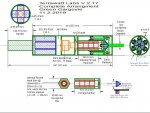
See new drawing. V 2.17

If we are going with the RC design...then we can fit four (4) 3S Lipo Cell packs behind the fan...I remain convinced the bundled LiPo packs are the way to go....and already configured correctly.....So 2 packs = 4400 mAh ( 4.4Ah) for the diodes....and 2 packs for the fan. Just install the LiPo pack in the tube...two (2) packs in Parallel = 11.25 VDC @ 4400 mAh

For the NDG7475 LD......say each LD consumes...1.4A....so....the combined consumption is 1.4 x 6 = 8.4Ah. OK....4.4Ah /8.4Ah =.5 hours = 30 min

For the fan...not sure..... See here http://www.fmsmodel.com/fms-50mm-11-blades-ducted-fan-with-inner-runner-motor-2627-kv4500-for-4s
I need help on this one.

I can Modify the 4 x 18650 holder to deliver.... whatever..15, VDC, 11.25VDC or 7.5 VDC....assuming each cell is at a nominal of 3.75 VDC....but...it is a pain in the ass. If we can get a better mAh with the 4 x 18650 cage...but...I fear we will need two (2) of them....which will extend the build by another 35mm ( approx.)

As for using the spare inside the rear handle ???.... To me...although very good for handling....it cannot be utilized.

Anyway....busy most of the weekend....so....I will not be around !! It has been a month since we started!!! Quite the ride hey ??

CDBEAM
 

Attachments

  • Green Gargoyle V2.17.JPG
    Green Gargoyle V2.17.JPG
    164.2 KB · Views: 7
This is looking very good, will look awesome when it's beaming.
I really like the air horn to separate intake/exhaust, it not only saves space but directs air efficiently/smoothly.
You could make the short handle hollow to create yet another intake path.
The fan could be on a separate switch so for short bursts of 10 seconds or less it likely won't be needed, or could mount a speed controller in the short handle.
I assume the fan is brushless and will use a PWM signal to set the speed, there's plenty of options on ebay or can make one, here's a possible option > https://www.ebay.com/itm/5V-PWM-Sig...076583&hash=item4b1bba3d09:g:ik4AAOSwXoxaYBTJ
 
Last edited:
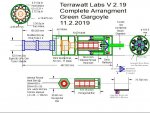
RC... See the latest render. V 2.19 This is now using the rear handle to hold eight (8) 18650 Li{o cells. Electrically, we will power the fan with 15 VDC from four cells….and the drivers with 15 VDC from four cells.

I have used your idea and we will now pull outside ambient air in from the rear bulk head via 12 holes...each hole @ 15.875mm dia. Great...Thanx !!! Between all of us....ALL the contributions....this beast should get built !!!!

And yes....I had planned on an ECS module to power the brushless fan.. !!

BUT....your recommended speed controller may be a better choice....as the ESC is normally coupled to a RC receiver to provide the PWM signal.

Must research this !! What a group effort !! Free entertainment for any member to watch...and see how to share the load !!

Bob
 

Attachments

  • Green Gargoyle V2.19.JPG
    Green Gargoyle V2.19.JPG
    176.3 KB · Views: 5
This is turning out to be everything I could hope for, yes speed control of the fan coupled to a thermistor would probably save us power, also, if there is a way to pulse width control the laser diode drivers, that could be useful to save battery power, if you didn't want full output.

Also alternatively, if at full fan output it doesn't keep the head cool enough, pulse width the laser diode power to reduce duty cycle. Maybe control both the fan speed first, and then if that doesn't keep it cool enough, start pulse width controlling the diodes.

All of this may be unnecessary though, as we don't know how well the fan will keep it cooled yet.

Edit: I've been meaning to mention this, but please incorporate a way to attach a beam expander on the front end. These photography teleconverters are really just fixed beam expanders and work well with a large input aperture. I used one in front of the output of a Sanwu 3.3 X expander with a NUBM44 high divergence laser diode and the beam did not overshoot the output lens diameter, worked great and you can use the variable focus adjustment of the Sanwu to make sure the beam is at full collimation to infinity focus, but should not be necessary if the input beam is fully collimated to begin with. Also, 3.6 expansion with the NDG7475 is plenty for that diode to achieve vert low divergence, especially with the G8 lens, ought to be awesome.


Last edited:
Love the newest design, very nice and the intake/exhaust have more separation too, should work very well as DLP projectors have been air cooled and they can make as much waste heat probably more.

I don't know how high the ambient air temp is out there in that sandbox where you work Chris but on a stateside cool night I expect you will have a respectable duty cycle, likely continuous on a cool night.
 
Yes, stateside should be good, not in Qatar due to the high temperature here much of the year above 40 C., but I don't like to use my lasers outside here anyway, not sure if the locals would put me in jail or not.
 
MMMMmmmmm…… OK...Will adapt for a BE. NO MORE add-ons....well...except for a Brass Bicycle Horn...THAT I would agree too !!!!

Don't ya just luv " Beam Humor " !! HAHAHAHA

CDBeam
 

Attachments

  • GG Horn 1.png
    GG Horn 1.png
    572.6 KB · Views: 0
Any serious laser pointer should have the ability for beam expansion, whether the kind of output this will produce will work well with one, that is another question. At least it is a radial output, much better than a knife edge output and I've seen an expander used with one of those.
 
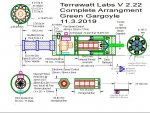
Have found a very small Multi Servo Tester unit...labeled " Fan Speed Control ". This unit attaches to attach to the ESC to control the fan speed by supplying a control signal to the ESC. Also placed the ESC unit and an I/O switch in the drawing. See V2.22

As to modulating the LD's....Maybe...could use six (6 ) Wossee Blackbuck 8A drivers....all attached to a common 10K pot ??

WOW... Talk about " 10 lbs o'crap...in a 10 lbs bag "

Honk, Honk !!

CDBeam
 

Attachments

  • Green Gargoyle V2.22.JPG
    Green Gargoyle V2.22.JPG
    205.8 KB · Views: 3
Last edited:
When you say common 10 K pot, do you mean a 6 gang pot with a single shift? If you meant a single potentiometer, I do not believe you can use the same 10K pot to control more than one driver because the pots are acting as a voltage divider, if in parallel with other units I don't think it will act right.

If it can be done with this driver it would likely require a 60K pot if all six drivers were paralleled. We can always ask Wossee but I've never seen this done before.

Well...Electronics is not my area....nor is Optics, Laser physics, Machining, Thermal design....etc, etc, etc....I do excel at bad jokes and drawing cartoons !! HAHAHA...Lucky you !!! We will check with Vladimir ( Wossee ) for guidance on modulating six (6) Blackbuck drivers at the same time.

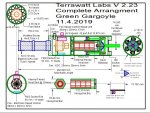
Attached latest updated render....V2.23

Later,
CDBeam
 

Attachments

  • Green Gargoyle V2.23.JPG
    Green Gargoyle V2.23.JPG
    219.9 KB · Views: 3


Back
Top