

- Joined
- Feb 25, 2010
- Messages
- 1,643
- Points
- 113
Cyan Cannon Epic Build
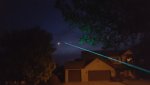
Well....at long last......The " Cyan Cannon " build is DONE...Stick a fork in it !! The beam is as perfect as I can make it...as far as my eye can see…...it is perfectly aligned !!
This build took several twists and turns...many, many design evolutions....much was learned....many, many frustrating moments...many designs....and redesigns....and modifications !!!
An extraordinary degree of patience were consistently delivered by Mr. Alaskan ….who pledged his patronage and funds for the build !!!... He came on board...sometime after the project was initially proposed and the build was started. He has been waiting a LONG time....and I just cannot find the words to really express how grateful I am for his understanding!!!
I have been driven by the "Demon of Perfection" for this project....and plagued by technical difficulties and set backs !! I have had other commission work slip in the que……allowed by the good nature of The Alaskan…whom has an endless amount of patience. So…..for that ….I apologize to Chris…and to all who may still be following this exceedingly LONG build.
But…She is done….at long last….and….looks and works….beautifully.
General Description
Allow me to refresh the reader as to just what the “ Cyan Cannon” project is.
The Cyan Cannon (CC) is a Hand Held / Combiner Laser unit. It incorporates the NDG7475 Green Laser Diode combined with the NUBM07 Blue Laser Diode. Both these diodes are Multi Emitter / High power diodes with an Astigmatic beam geometry ( Read uncorrected beam takes the shape of a line at a distance ). Both diodes demand correction with Cylindrical Lens optics to modify the beam down to an acceptable geometry and divergence. The goal……a Cyan/Aqua beam, High Power, Adjustable color output, Good Thermal management, Small as possible footprint, Low beam divergence accomplished with Corrective Optics, Reasonable cost, Sufficient run time….in a Hand Held Format !!! Such a project has not been done before !! No small order for sure !!!!!
Some Specifics
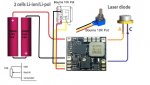
Power for the LD drivers is provided by a series arrangement of two (2) 26650 Lipo Cells.
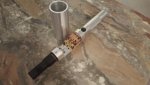
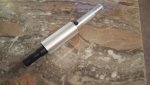
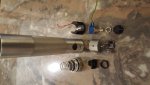
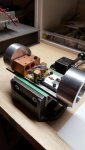
The Host for this unit was a modified 2 D Cell Aluminum Maglite Flashlight.
A high amp/10A On/Off Automotive switch was substituted for the original Maglite I/O switch.
The runtime looks to be about 40 min @ the Cyan output.
Both LD’s are collimated with a G2 Lens and the focus is set @ infinity.
A set of 6X Cylindrical lenses are used for beam correction.
A Beam Expander is employed for final Optical correction.
H-BE description
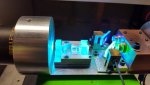
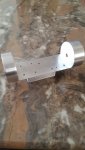
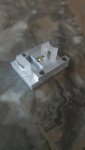
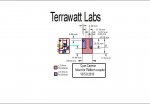
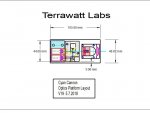
Between the Host and the Beam Expander is the unit I label as the H-BE….which stands for…Host to Beam Expander. As you can see in the drawings and pictures….the H-BE is machined from a solid Rod raw stock of 6061 Aluminum.
The H-BE has a machined flat platform section (which is machined into the bar stock) and this flat provides the surface to which to Laser Diode’s, Planar Optics and Cylindrical Optics are bolted to. At the back end of the H-BE, a machined recess accepts the Maglite host. At the front end of the H-BE, a second machined recess accepts a Beam Expander. Both Host and BE are fixed with set screw spaced at 120 degree apart.
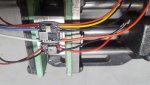
LD Drivers/Power output
The driver used for the NDG7475 is the Super X Drive-SXD-V3 set to deliver 2.2A. The driver used for the NUBM07 is the Worsee Black Buck 8A set to provide 4.5A. Final combined Optical Power Output comes in at 6.1 Watts.
Color selection/adjustment
Somewhere….during this long build journey…it was decided to include the ability to dial down the NUBM07 Blue to achieve a “ Color Mix “ attribute. The 0-5V modulation feature of the Worsee driver is PERFECT. Small…and does the job !! A Bourns 10K Pot varies the (0-5) VDC delivered to the 8A driver by a simple three (3) wire attachment between the Driver and the Pot.
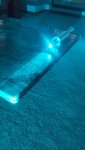
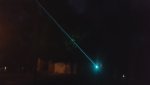
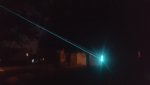
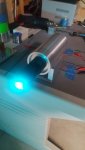
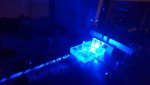
Now, the result is this; Dialed full down, the 520 nm Green line is only visible. Set at full on, the Blue 465 nm line almost completely over powers the Green line. One sees Royal Blue….with just a hint of Green.
Now….to emit the Cyan color, that Beautiful Blue/Green Aqua mix…..just dial down the Blue LD !!! I estimate, the Cyan Color is projected….at about 45% of the Blue LD power.
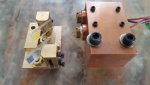
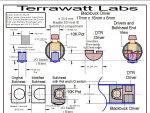
Copper Turret-LD Module mount
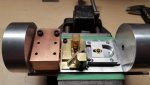
The diodes are purchased from DTR and are pressed into the standard DTR 12mm Copper Modules units . The Copper Modules are then secured into a Copper Block I call the Turret…. in parallel alignment. This Turret is then bolted to the flat section of the H-BE. All the Combiner Optics and Cylindrical Optics are also fixed to this flat platform on the H-BE.
Beam Path combining
The beam propagation is combined using Planar optics; One FS Bounce mirror and one Dichroic Mirror-Filter (Pass Green/Reflect Blue).
Blue Beam Path
A Front Surface bounce mirror steers the Blue beam 90 Deg left after it leaves the LD module. The Blue beam then strikes a Dichroic -Reflect Blue/Pass Green filter. The Blue beam then takes another 90 Deg turn…headed toward the Cylindrical Optic lenses.
Green Beam Path
The Green beam leaves the LD module. It passes right thru the Dichroic Filter and continues onward headed toward the Cylindrical Optic lenses.
Combined Blue/Green Path
It is at exactly at this spot/point….where the two beams meet…at the surface of the Dichroic Mirror/Filter….that they combine and go forward along a common axis. I call this condition “ Beam-On-Beam”. The Planar optics are epoxy fixed to the standard Brass Tension Flexmount units from Laser Show Parts. These Flexmount units provide the final fine adjustment/alignment required. The Flexmount units are secured to a special Brass unit identified as the Mount to Platform Coupler ( MTPC). The MTPC is then secured to the H-BE. Each Flexmount unit can be adjusted for Pitch and Yaw. Due the bolt down system used by the MTPC, the Flexmounts can be moved on the X/Y to achieve the Beam-On-Beam state.
Is it a completely PERFECT Beam-On-Beam combination….Well…If you want perfect….wait till you meet your Maker !!! No….at some distant, distant point ….the beams do diverge. But…If I cannot see it…WHO CARES !!! I imagine…on the Lunar surface….the beams have some degree of separation….SO ???
Cylindrical Optics
The next step is to use a pair of Cylindrical optics…to correct the Astigmatic nature of our diodes. I used a pair of 6X lenses from Opt Lasers…First a Plano Concave ( PCV)….then a Plano Convex ( PCX ). These lenses expand the Slow Axis so…the resulting beam geometry is not a line….but a round cornered rectangle. Again…..NOT a perfect circle….or a Perfect box….but very close. The Cylindrical Optics are mounted on a custom Aluminum adjustable mount labeled the RBT.
Beam Expander
The final optical is the Beam Expander. This unit is fixed to the end of the H-BE. The Beam expander used in this application is the 3X Melles Griot 09 LBZ 001. This BE was supplied by the Alaskan and is adjustable.
Final Blah, Blah, Blah
So…See the attached pics. They tell the story !! See the Beam Shots….What a Great Color….what a Great( And SAD) Day when this completed unit will be shipped to the Alaskan !! As always…it has been a privilege to complete this project and present these travels to LPF. I trust you will find these build details…. educational and inspiring !
The next build…is for ME !!!! Another Combiner…of course !!! I want Lime Green !!!!....and the build shall be labeled…. “ The Chartreuse Coruscation “…stay tuned for details !! I will …of course use the lessons learned in building the Cyan Cannon.
” To Infinity Focus…and Beyond “
CDBEAM
Note: Pics and drawings in the next two (2) post's
Well....at long last......The " Cyan Cannon " build is DONE...Stick a fork in it !! The beam is as perfect as I can make it...as far as my eye can see…...it is perfectly aligned !!
This build took several twists and turns...many, many design evolutions....much was learned....many, many frustrating moments...many designs....and redesigns....and modifications !!!
An extraordinary degree of patience were consistently delivered by Mr. Alaskan ….who pledged his patronage and funds for the build !!!... He came on board...sometime after the project was initially proposed and the build was started. He has been waiting a LONG time....and I just cannot find the words to really express how grateful I am for his understanding!!!
I have been driven by the "Demon of Perfection" for this project....and plagued by technical difficulties and set backs !! I have had other commission work slip in the que……allowed by the good nature of The Alaskan…whom has an endless amount of patience. So…..for that ….I apologize to Chris…and to all who may still be following this exceedingly LONG build.
But…She is done….at long last….and….looks and works….beautifully.
General Description
Allow me to refresh the reader as to just what the “ Cyan Cannon” project is.
The Cyan Cannon (CC) is a Hand Held / Combiner Laser unit. It incorporates the NDG7475 Green Laser Diode combined with the NUBM07 Blue Laser Diode. Both these diodes are Multi Emitter / High power diodes with an Astigmatic beam geometry ( Read uncorrected beam takes the shape of a line at a distance ). Both diodes demand correction with Cylindrical Lens optics to modify the beam down to an acceptable geometry and divergence. The goal……a Cyan/Aqua beam, High Power, Adjustable color output, Good Thermal management, Small as possible footprint, Low beam divergence accomplished with Corrective Optics, Reasonable cost, Sufficient run time….in a Hand Held Format !!! Such a project has not been done before !! No small order for sure !!!!!
Some Specifics
Power for the LD drivers is provided by a series arrangement of two (2) 26650 Lipo Cells.
The Host for this unit was a modified 2 D Cell Aluminum Maglite Flashlight.
A high amp/10A On/Off Automotive switch was substituted for the original Maglite I/O switch.
The runtime looks to be about 40 min @ the Cyan output.
Both LD’s are collimated with a G2 Lens and the focus is set @ infinity.
A set of 6X Cylindrical lenses are used for beam correction.
A Beam Expander is employed for final Optical correction.
H-BE description
Between the Host and the Beam Expander is the unit I label as the H-BE….which stands for…Host to Beam Expander. As you can see in the drawings and pictures….the H-BE is machined from a solid Rod raw stock of 6061 Aluminum.
The H-BE has a machined flat platform section (which is machined into the bar stock) and this flat provides the surface to which to Laser Diode’s, Planar Optics and Cylindrical Optics are bolted to. At the back end of the H-BE, a machined recess accepts the Maglite host. At the front end of the H-BE, a second machined recess accepts a Beam Expander. Both Host and BE are fixed with set screw spaced at 120 degree apart.
LD Drivers/Power output
The driver used for the NDG7475 is the Super X Drive-SXD-V3 set to deliver 2.2A. The driver used for the NUBM07 is the Worsee Black Buck 8A set to provide 4.5A. Final combined Optical Power Output comes in at 6.1 Watts.
Color selection/adjustment
Somewhere….during this long build journey…it was decided to include the ability to dial down the NUBM07 Blue to achieve a “ Color Mix “ attribute. The 0-5V modulation feature of the Worsee driver is PERFECT. Small…and does the job !! A Bourns 10K Pot varies the (0-5) VDC delivered to the 8A driver by a simple three (3) wire attachment between the Driver and the Pot.
Now, the result is this; Dialed full down, the 520 nm Green line is only visible. Set at full on, the Blue 465 nm line almost completely over powers the Green line. One sees Royal Blue….with just a hint of Green.
Now….to emit the Cyan color, that Beautiful Blue/Green Aqua mix…..just dial down the Blue LD !!! I estimate, the Cyan Color is projected….at about 45% of the Blue LD power.
Copper Turret-LD Module mount
The diodes are purchased from DTR and are pressed into the standard DTR 12mm Copper Modules units . The Copper Modules are then secured into a Copper Block I call the Turret…. in parallel alignment. This Turret is then bolted to the flat section of the H-BE. All the Combiner Optics and Cylindrical Optics are also fixed to this flat platform on the H-BE.
Beam Path combining
The beam propagation is combined using Planar optics; One FS Bounce mirror and one Dichroic Mirror-Filter (Pass Green/Reflect Blue).
Blue Beam Path
A Front Surface bounce mirror steers the Blue beam 90 Deg left after it leaves the LD module. The Blue beam then strikes a Dichroic -Reflect Blue/Pass Green filter. The Blue beam then takes another 90 Deg turn…headed toward the Cylindrical Optic lenses.
Green Beam Path
The Green beam leaves the LD module. It passes right thru the Dichroic Filter and continues onward headed toward the Cylindrical Optic lenses.
Combined Blue/Green Path
It is at exactly at this spot/point….where the two beams meet…at the surface of the Dichroic Mirror/Filter….that they combine and go forward along a common axis. I call this condition “ Beam-On-Beam”. The Planar optics are epoxy fixed to the standard Brass Tension Flexmount units from Laser Show Parts. These Flexmount units provide the final fine adjustment/alignment required. The Flexmount units are secured to a special Brass unit identified as the Mount to Platform Coupler ( MTPC). The MTPC is then secured to the H-BE. Each Flexmount unit can be adjusted for Pitch and Yaw. Due the bolt down system used by the MTPC, the Flexmounts can be moved on the X/Y to achieve the Beam-On-Beam state.
Is it a completely PERFECT Beam-On-Beam combination….Well…If you want perfect….wait till you meet your Maker !!! No….at some distant, distant point ….the beams do diverge. But…If I cannot see it…WHO CARES !!! I imagine…on the Lunar surface….the beams have some degree of separation….SO ???
Cylindrical Optics
The next step is to use a pair of Cylindrical optics…to correct the Astigmatic nature of our diodes. I used a pair of 6X lenses from Opt Lasers…First a Plano Concave ( PCV)….then a Plano Convex ( PCX ). These lenses expand the Slow Axis so…the resulting beam geometry is not a line….but a round cornered rectangle. Again…..NOT a perfect circle….or a Perfect box….but very close. The Cylindrical Optics are mounted on a custom Aluminum adjustable mount labeled the RBT.
Beam Expander
The final optical is the Beam Expander. This unit is fixed to the end of the H-BE. The Beam expander used in this application is the 3X Melles Griot 09 LBZ 001. This BE was supplied by the Alaskan and is adjustable.
Final Blah, Blah, Blah
So…See the attached pics. They tell the story !! See the Beam Shots….What a Great Color….what a Great( And SAD) Day when this completed unit will be shipped to the Alaskan !! As always…it has been a privilege to complete this project and present these travels to LPF. I trust you will find these build details…. educational and inspiring !
The next build…is for ME !!!! Another Combiner…of course !!! I want Lime Green !!!!....and the build shall be labeled…. “ The Chartreuse Coruscation “…stay tuned for details !! I will …of course use the lessons learned in building the Cyan Cannon.
” To Infinity Focus…and Beyond “
CDBEAM
Note: Pics and drawings in the next two (2) post's
Last edited:


")