

- Joined
- Aug 25, 2010
- Messages
- 533
- Points
- 63
Hello forum.
Yesssss .. another painful and suffered birth came to light!
This time me and CDBEAM 777 met a very big dose of problems and issues.
A considerable amount of misfortune has also intervened to complicate our existence even more.
But now the masterpiece is ready to be unveiled.
As usual you will not be disappointed by the build.
As a big new I have learned very well how to design beautiful hosts with 3D CADs and how to use a
massive, complicated and pricey CNC milling machine.
Sorry, we have skipped to shot a lot of passages during the build, so there are only a few photos.
This was also due because the project was interrupted several times and some photos were lost.
Well ... breath to the trumpets and roll the drums, it begins!
INDIGO IMPERATOR PROJECT.
---------------------------------
MINAMOTO KOBAYASHI: commissioner, 3D CAD design, logo design, CNC operator, aluminum machining, weldings, canopy machining, final optical alignment, assembling, testing;
CDBEAM 777: name concept, 2D CAD design, DTR copper module modification, copper ultra mount machining, acrylic lens holder machining, some holes in the host, first canopy machining, first optical alignment;
THORLABS: incredibly fast, kindly and professional technical support, beam expander, extra collimation lens, little cherries, candy and biscuits") ;
;
TECHLIFE: CNC rent, teacher;
DTR: Nichia NUBM44 diode, 405-G2 lens;
X-Wossee: Blackbuck 8 laser driver @ 4.75A, some nice advices and good support;
PODO from Sanwu lasers: Spiker host plus extra part;
OPT LASERS: corrective optics;
FLAMINPYRO: pill, contact spring;
MarKING company: logo and characters engraving;
BADBOYBILLY: host idea.
And now, the introduction directly from CDBEAM 777:
Indigo Imperator - a joint collaboration build.
--------------------------------------------------
The Indigo Imperator is the latest build using the difficult to optically correct NUBM044 LD.
This build was a co-operative effort between myself and Minamoto.
The build consisted of :
1. A single NUBM044 Laser Diode;
2. An optically corrected beam path with two cylindrical lens set-up from Opt Lasers;
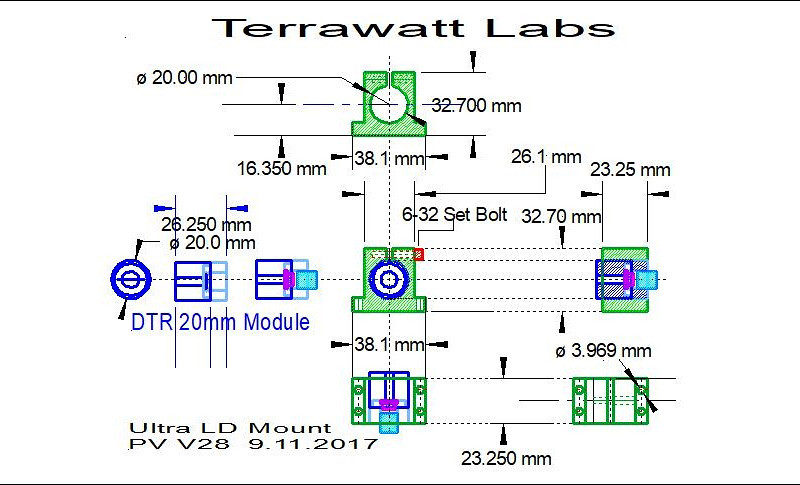
3. A new Terrawatt Labs LD mount design called the "Ultra Mount " which is a solid Copper mount which incorporates the DTR 20mm LD mount;
4. A Sanwu host which uses three 26650 LiPo cell in a series arrangement;
5. A 8A Blackbuck driver set at 4.75A;
6. A Thorlabs 3X Beam Expander;
7. A G2 Collimation lens;
8. A solid aluminum cylinder section we call the H-BE (Host to Beam Expander), which is the platform for the LD/LD Mount , LD driver and Cylindrical lenses/Cylindrical lens mount.
The H-BE also is the bridge between the host/battery compartment and the Beam Expander component.
The Beam Expander is fixed to the front of the H-BE and the host/battery compartment is fixed to the rear of the H-BE.
Let me note that the cylindrical lens compartment "cut-out" geometry is not a new design: Badboybilly used this concept back in May 2017.
It works great for eliminating much of the side light effects generated by the cylindrical lenses and or their holder. Thanx BBB.
Those disclaimers noted: this build does utilize the new Terrawatt Labs LD holder, the "Ultra Mount".
There is a separate thread regarding the design philosophies of the Ultra Mount: see the thread in the laser projector section.
Pitch, yaw and radial alignment are easy with this mount design.
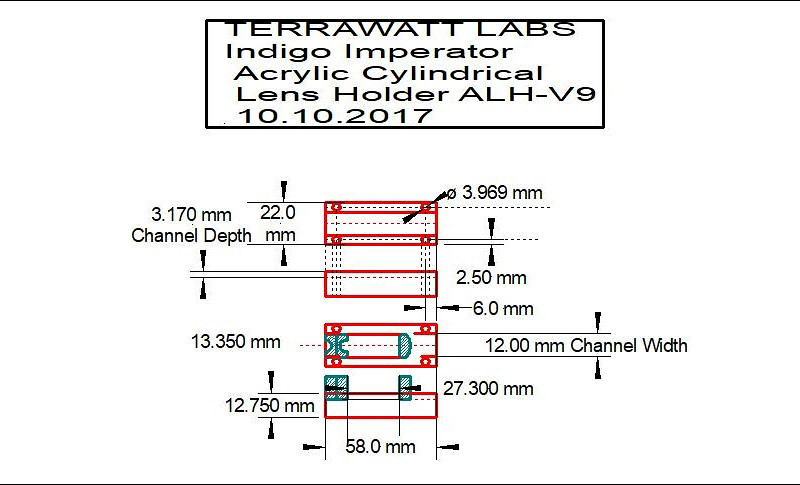
I did the 2D CAD work, design/machining of the "ultra mount and acrylic cylindrical Lens mount.
I was responsible for the first optical arrangement and alignment.
The general design elements of the main aluminum section was a joint effort. This section is called the H-BE.
CAD work was my contribution with some aspects being added by Minamoto. The H-BE unit was CNC machined by Minamoto.
The unit OD is polished to a beautiful mirror finish.
Minamoto has become quite THE machinist, for he did the machining of the H-BE, and it is absolutely perfect.
Doing a build all at one location is a challenge.
Doing a build on two different continents ... WOW ... quite a challenge !!!
But we got it done!
With adequate attention to detail, even with several thousand mile shop to shop distance, all fit in a perfect harmony.
The combination of polished aluminum, copper, acrylic with the great looks of the Sanwu host are a great look!
We have used the H-BE platform concept in previous builds and it continues to be a solid and valuable design.
All said the H-BE is just a container to fix and align all the optical and electrical components.
In closing, thank you Minamoto for commissioning this work.
In the area of machining I fear the student has become the Master!
More lessons learned, we share and we push the build envelope, just a little bigger.
Thanx for reading.
CDBeam 10/2017
P.S.: since I have eliminated a 1/2 KG of esclamation points from the original CDBEAM introduction, for those who need them you can find them grouped here:
<!!!!!!!!!!!!!!!!!!!!!!!!!!!!!!!!!!!!!!!!!!!!!!!!!!!!!!!!!!!!!!!!!!!!!!!!!!!!!!!!!!!!!!!!!!!!!!!!!!!!!!!!!!!!!!!!!!!!!!!!!!!!!!!!!!!!!!!!!!!!!!!!!>
:crackup::crackup:
And now, the most juicy part.
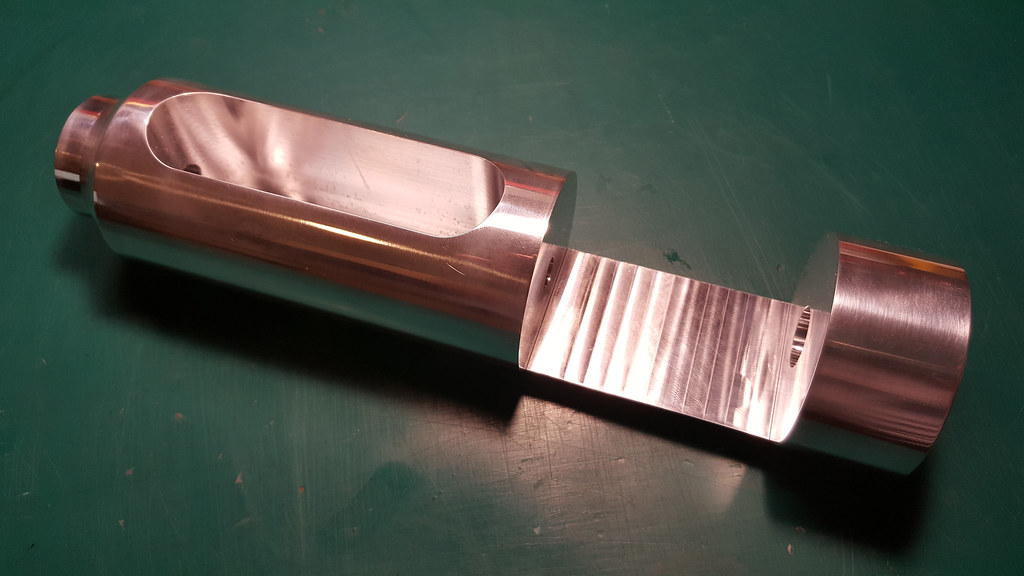
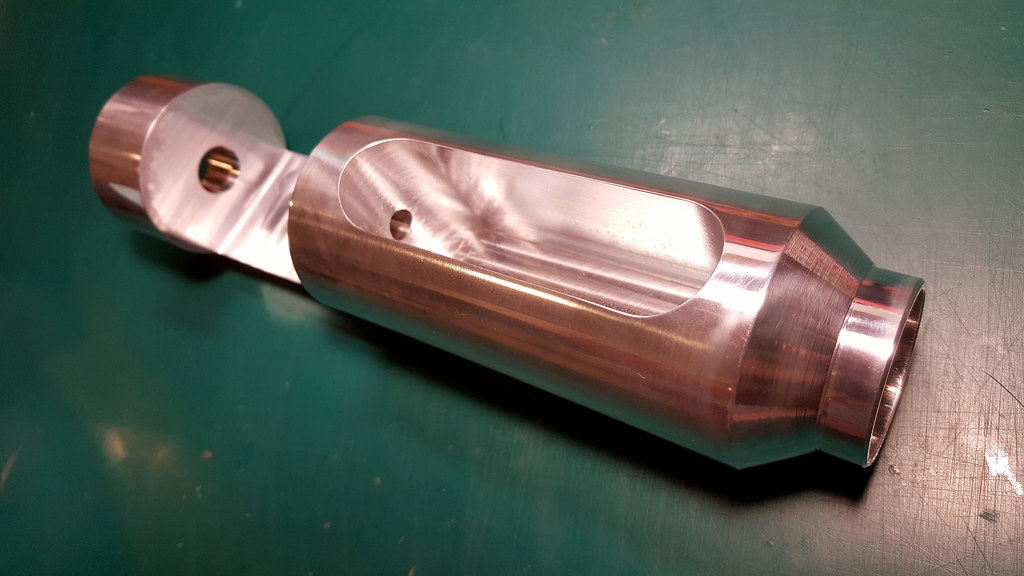
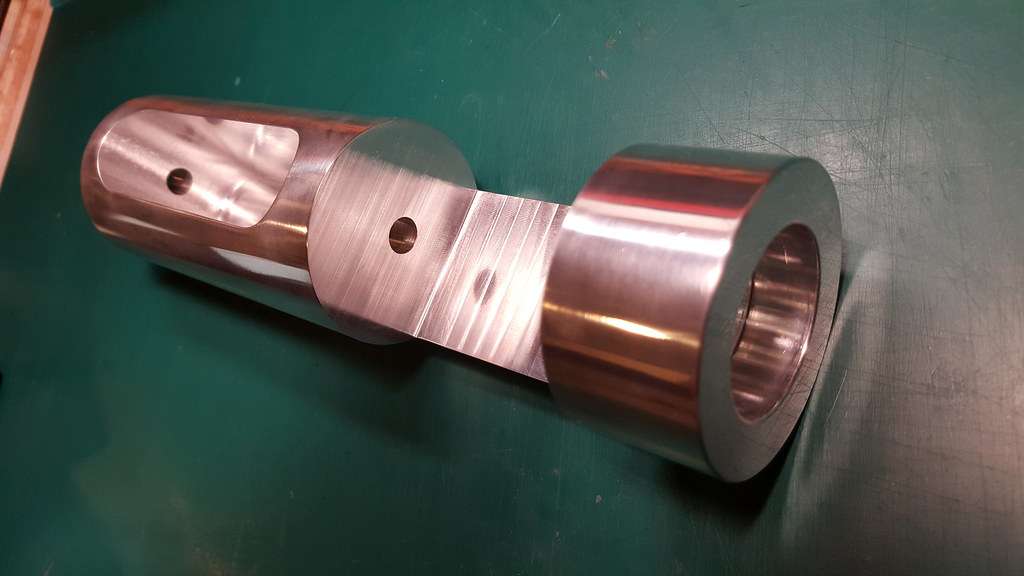
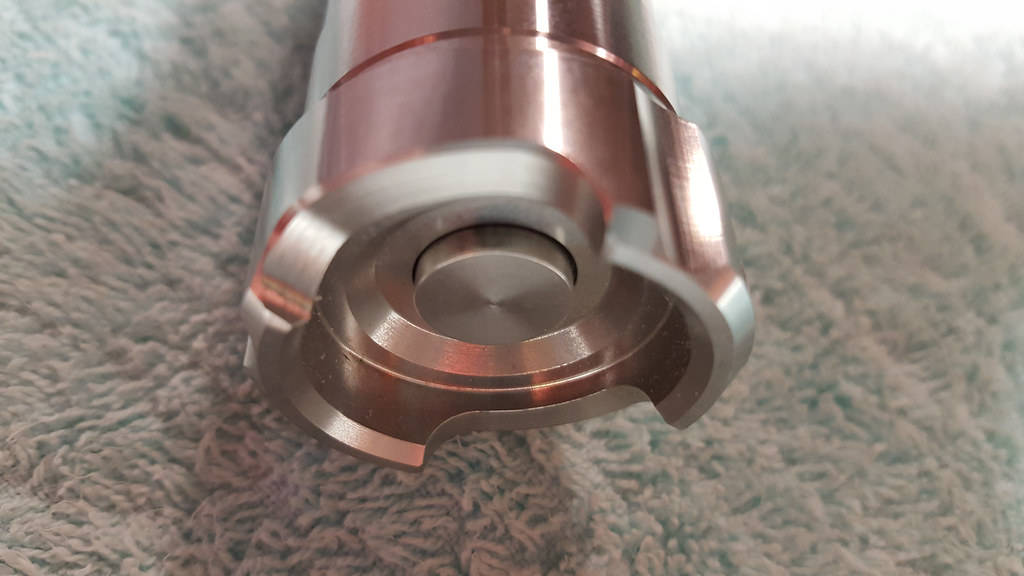
The CNCed awesome massive aluminum host:
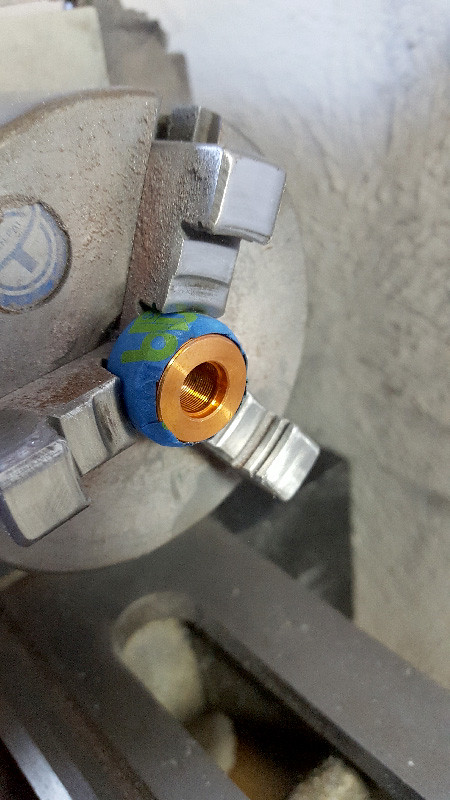
Ultra Mount 20mm Bore Hole Operation:

Module opening up the diode seat:
Module with NUBM044 diode installed:
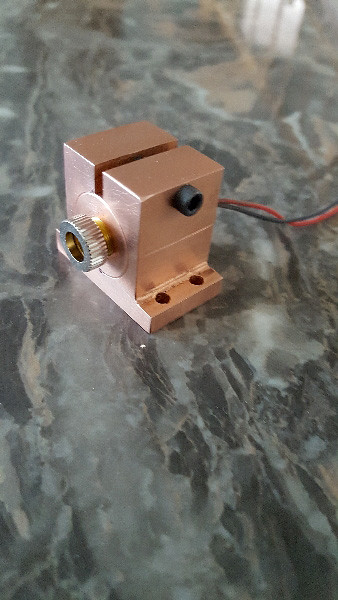
Raw ultramount turret and DTR 20mm module:

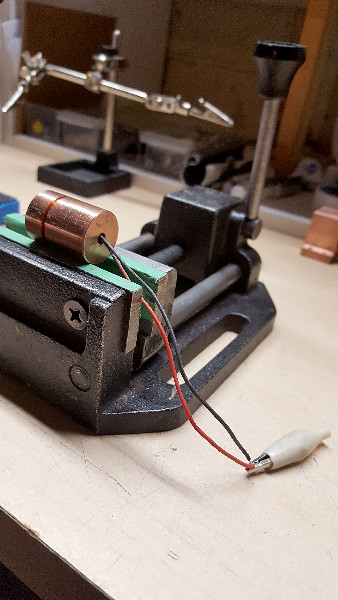
Finished ultramount turret with DTR 20mm module+diode installed:
Mount being radially aligned:
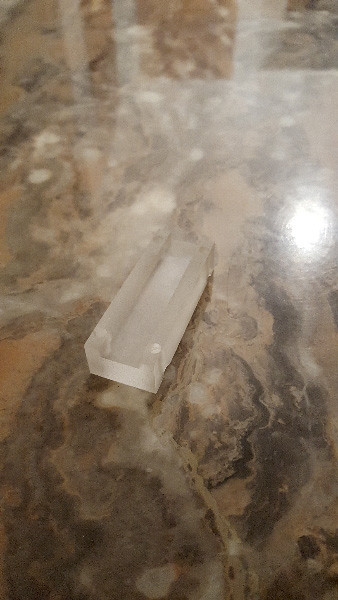
Machined acrylic lens holder:
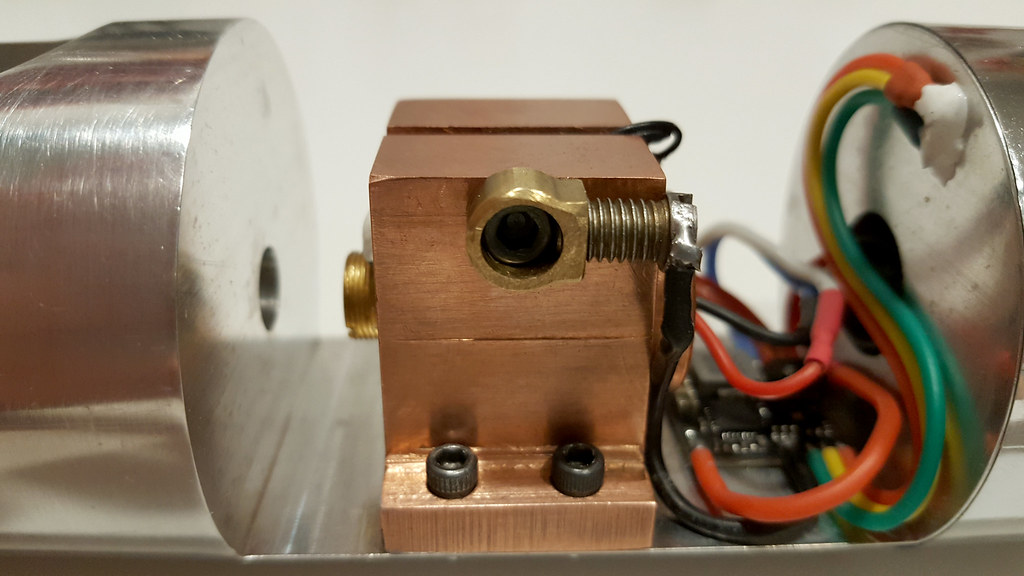
Turret mounted, driver glued and connected:

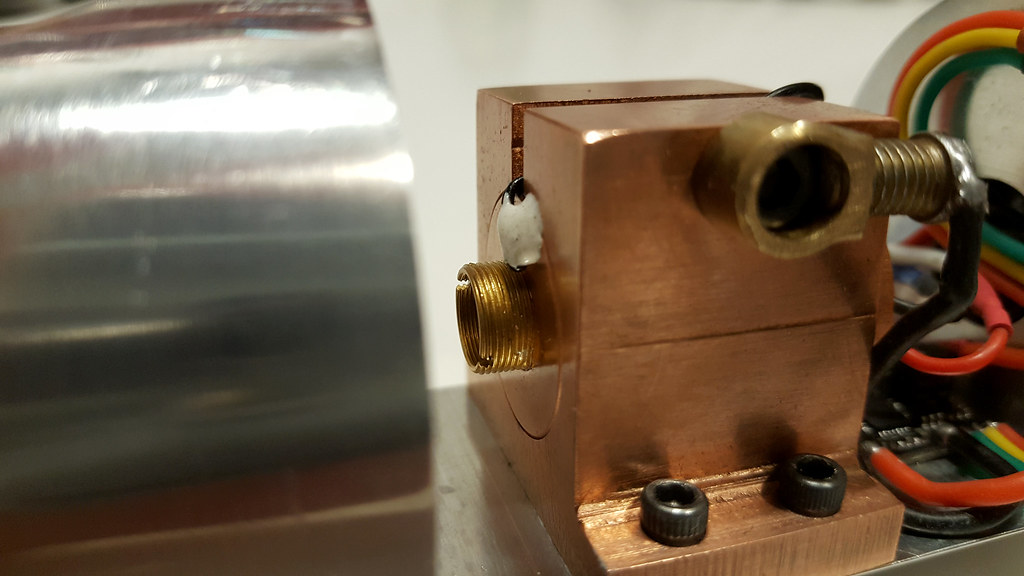
Since the pill negative contacts was too weak to sustain so much amperes, I was forced to found an alternative solid negative path:
Probe glued:
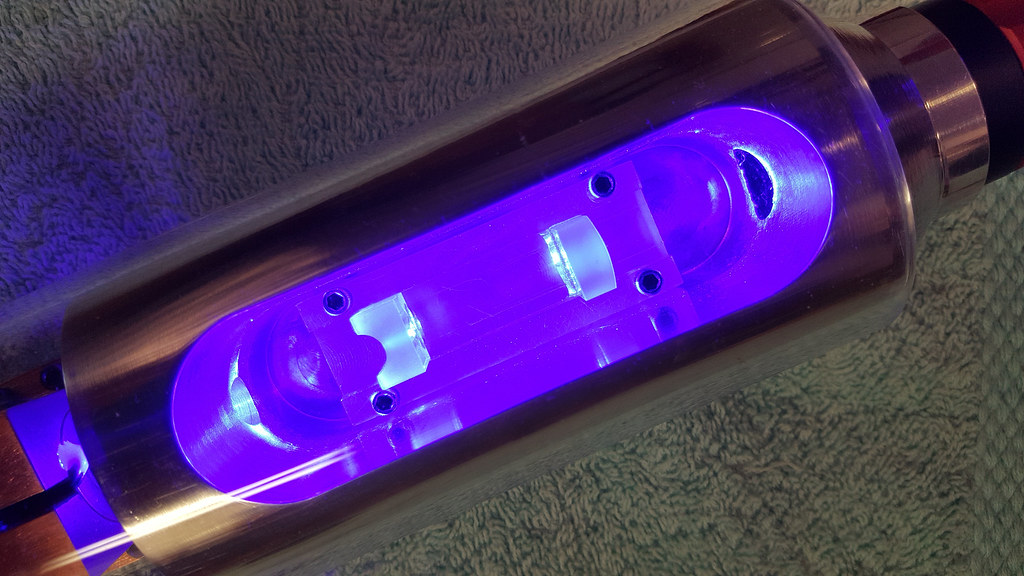
Corrective optics aligned, glued and mounted:
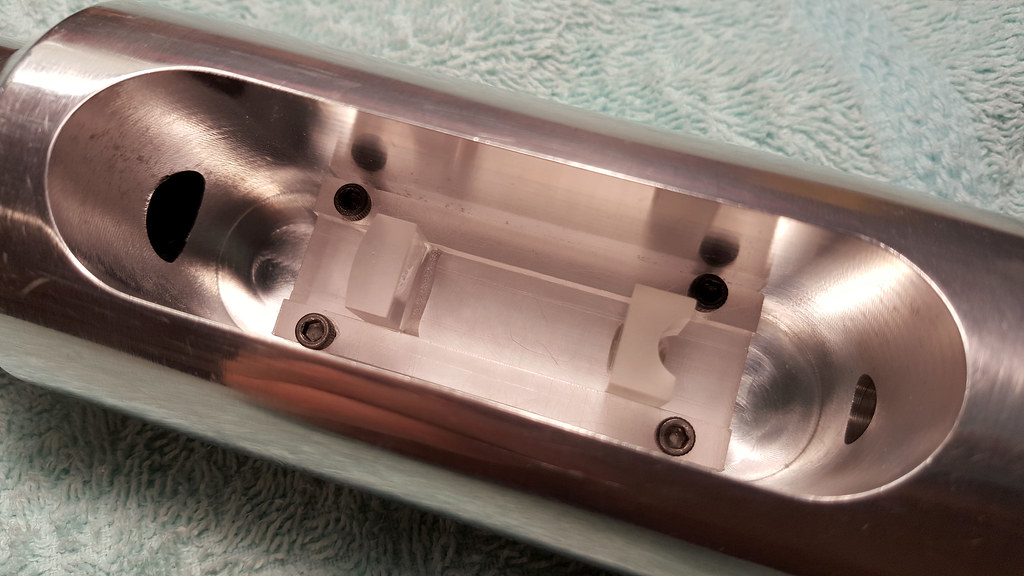
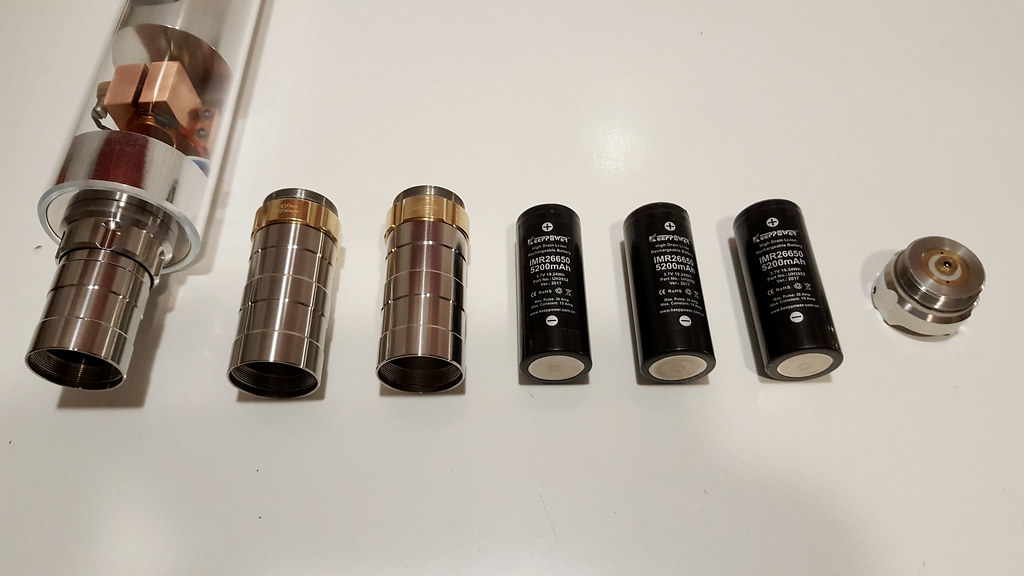
Battery compartment adaptation:
A strong and precise clicky switch:
Battery compartment unmounted:
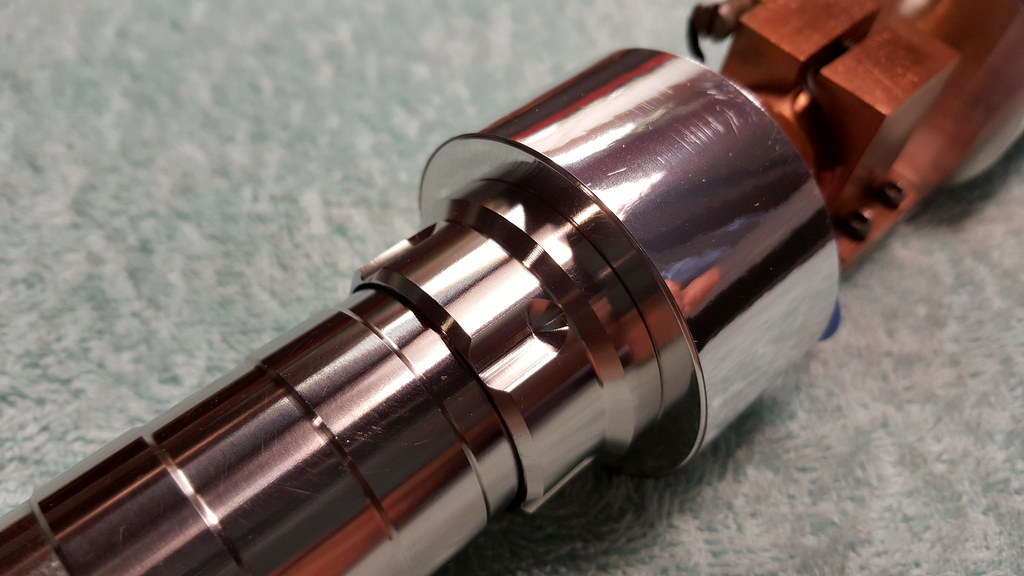
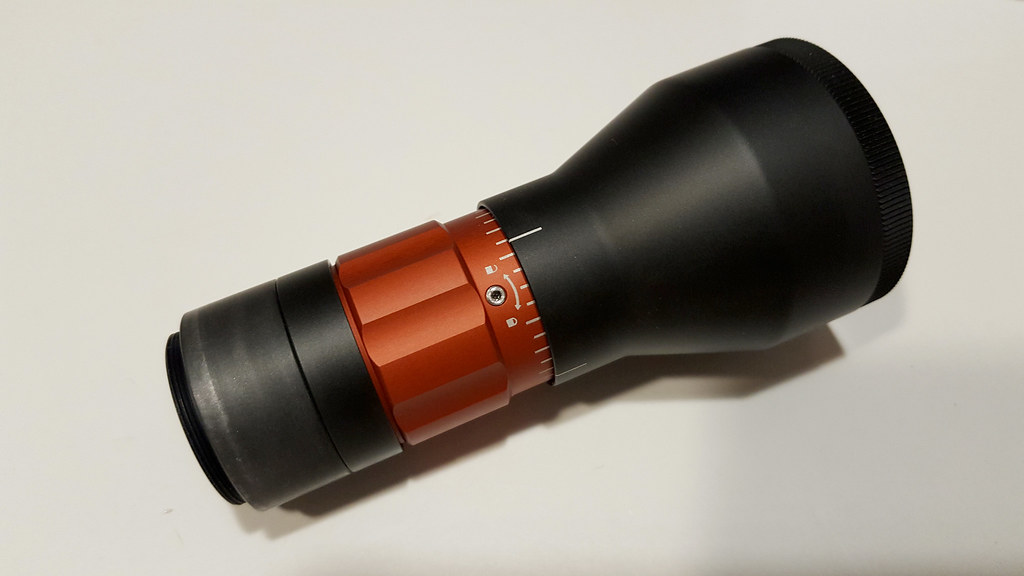
Professional Thorlabs fixed magnification 3x beam expander:
Since I wish to obtain a focusing point closer to the BE exit, I added a Thorlabs 500mm converging lens just before the BE entrance thru a small lens holder:
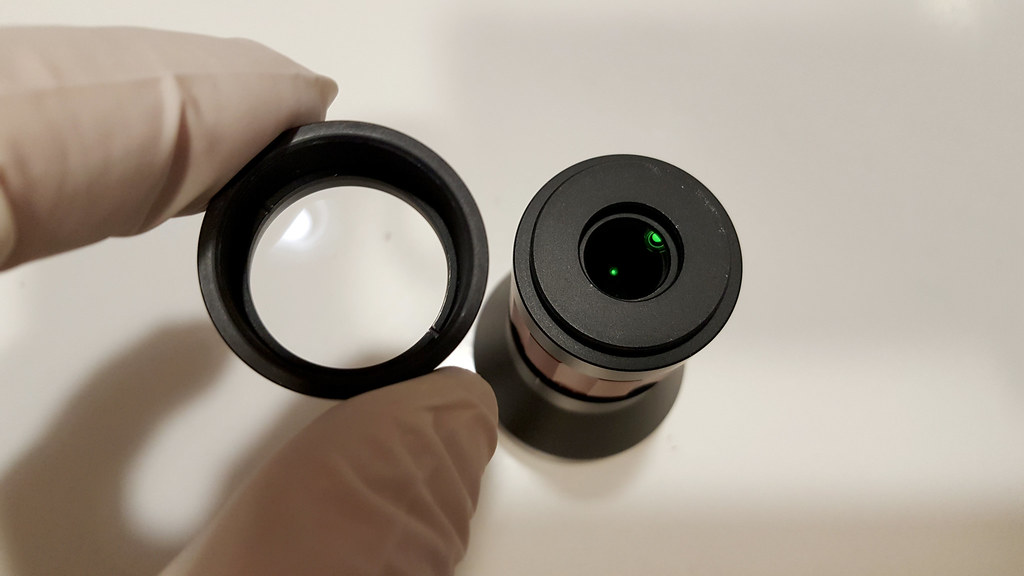
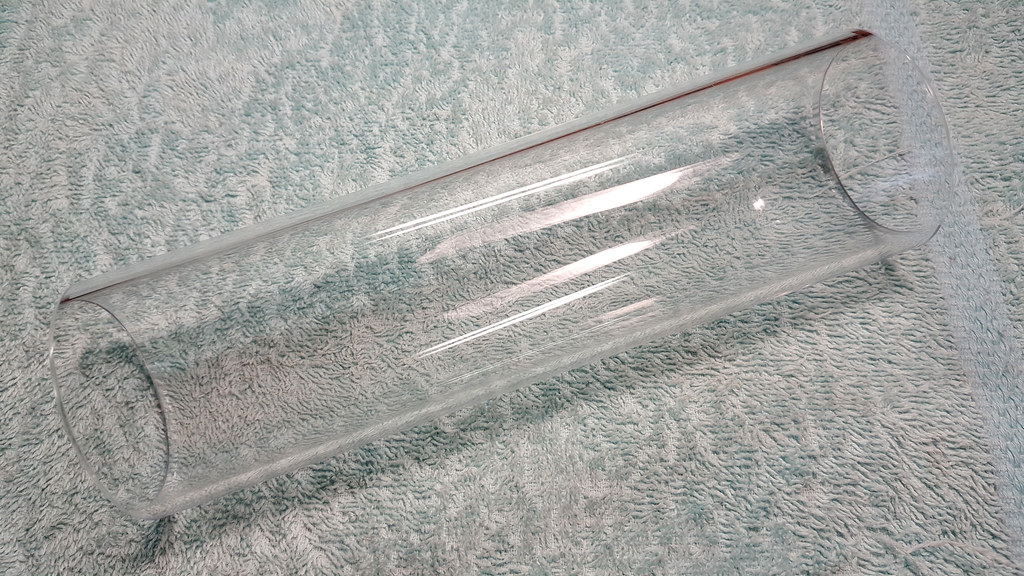
A machined perfect-fit acrylic canopy:
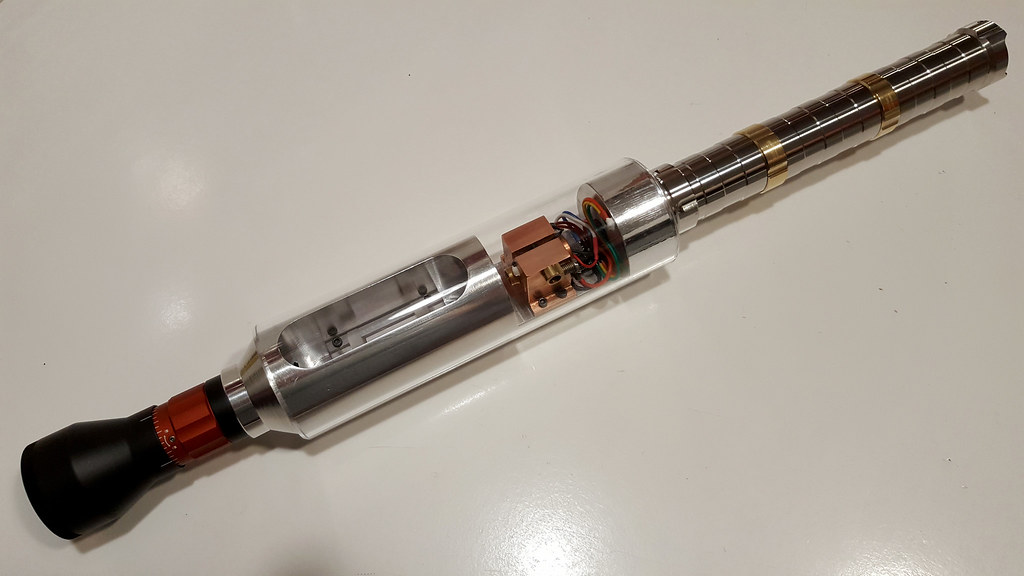
The Indigo Imperator fully assembled:
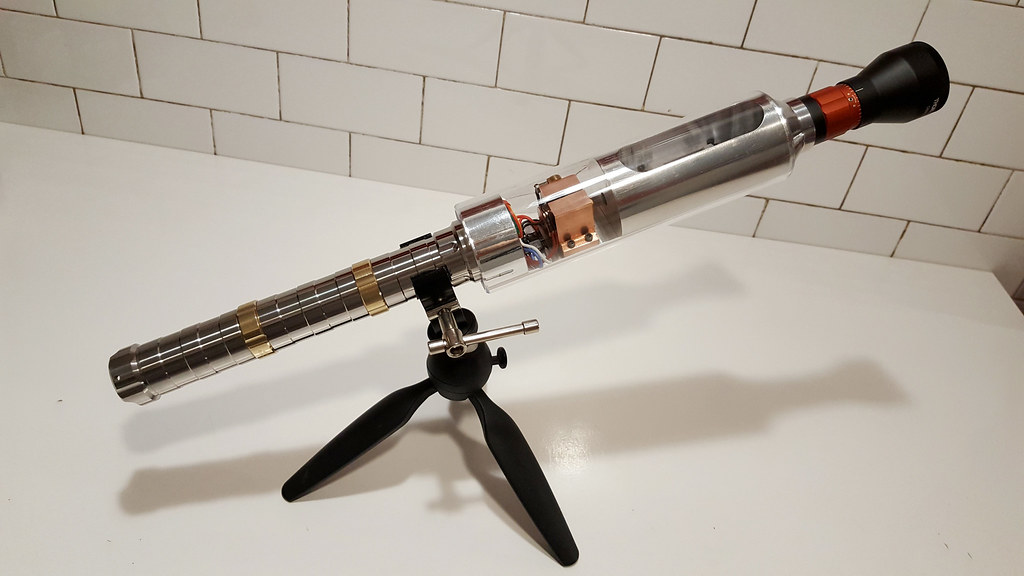
Indigo Imperator mounted on Manfrotto tripod:
A touch of class, the logo engraved on the ring:

.. and the rest of datas on the other ring:

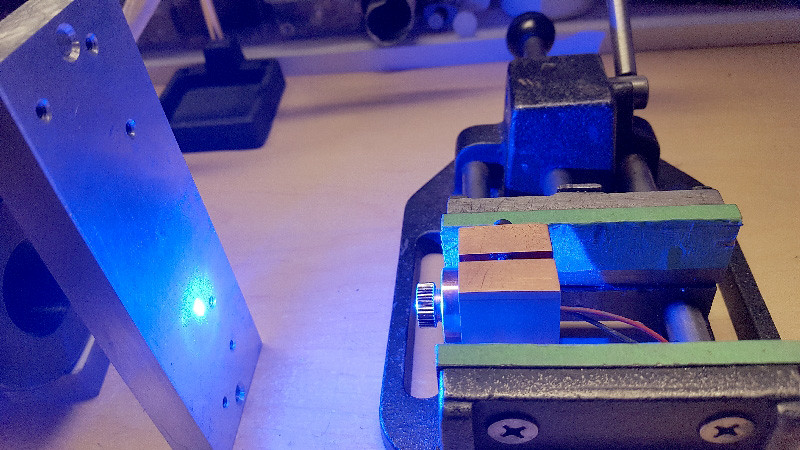
Corrective optics enlightened by the beam:
The corrected dot shape against a wall:
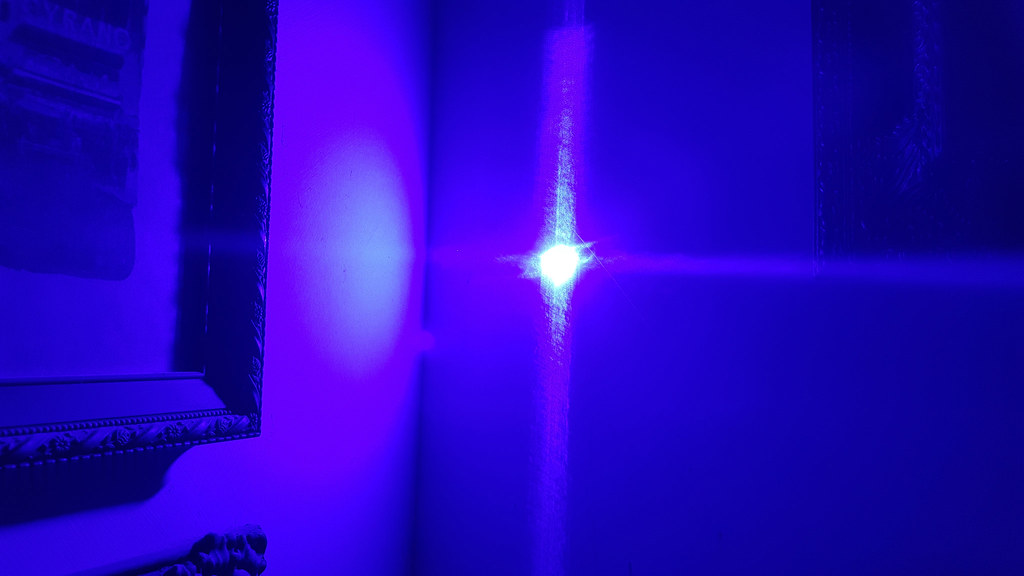
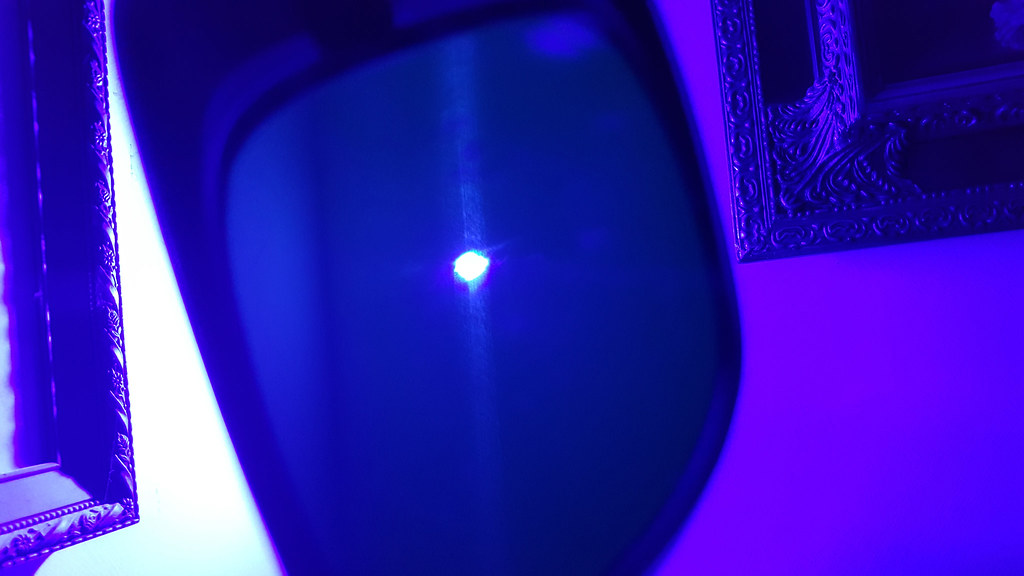
Same as above, but filtered. I obtained a very nice rounded dot:
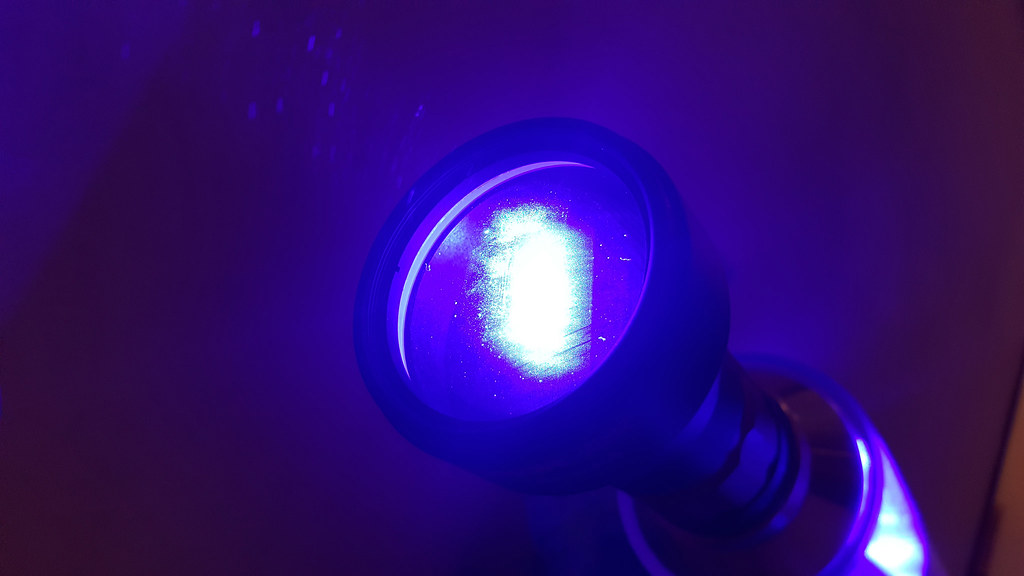
The beam shape thru the output BE lens:
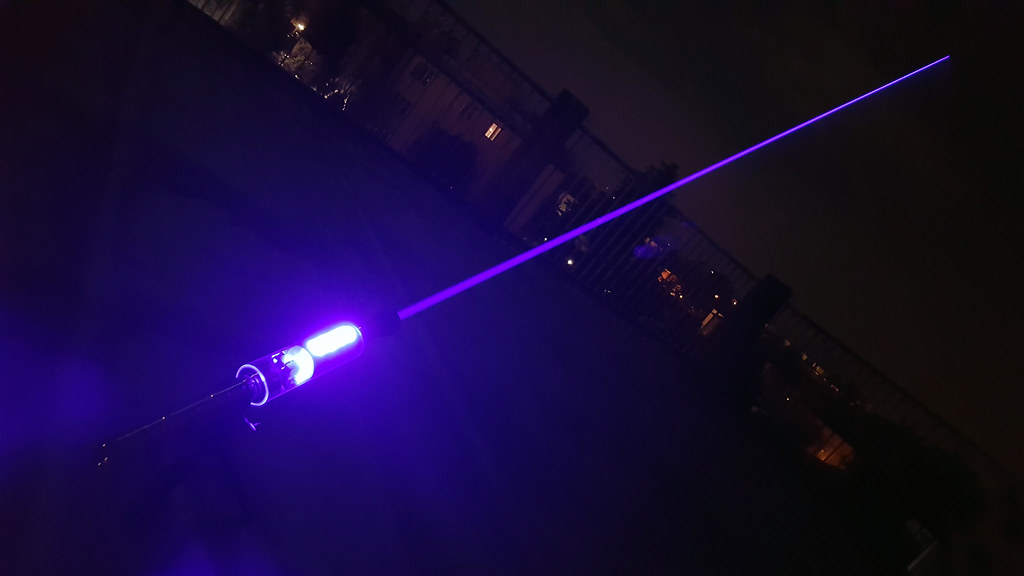
The beamshots in the night. The camera sensor caught a violet tonality, but in the real life the colour is a nice blue without any violet shade:

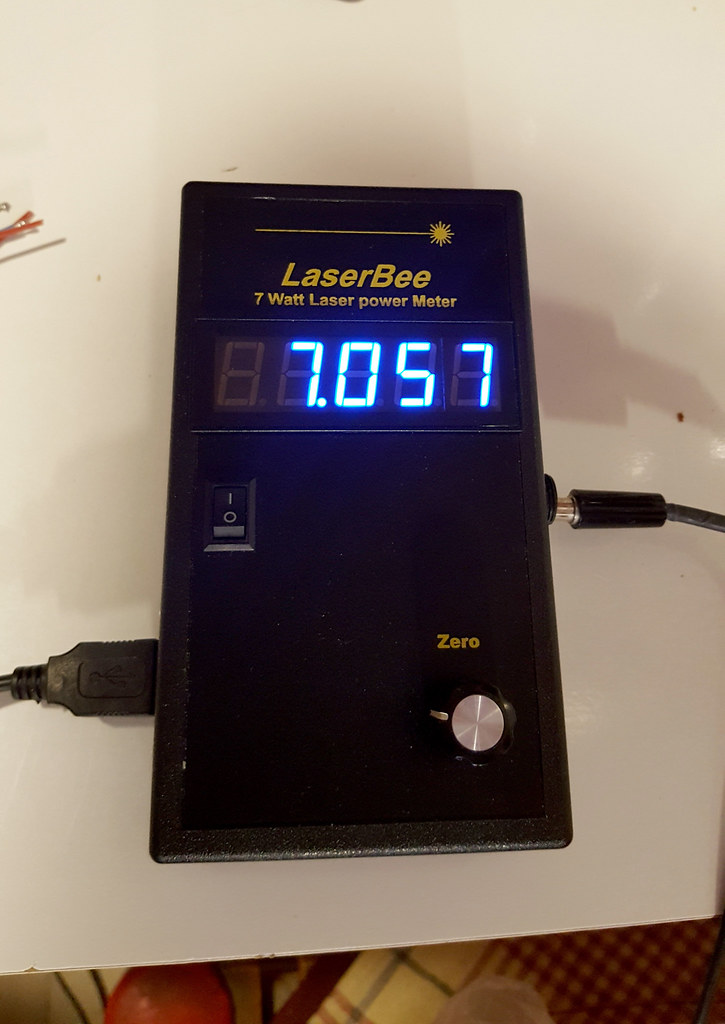
The impressive output power just after the 405-G2 lens:
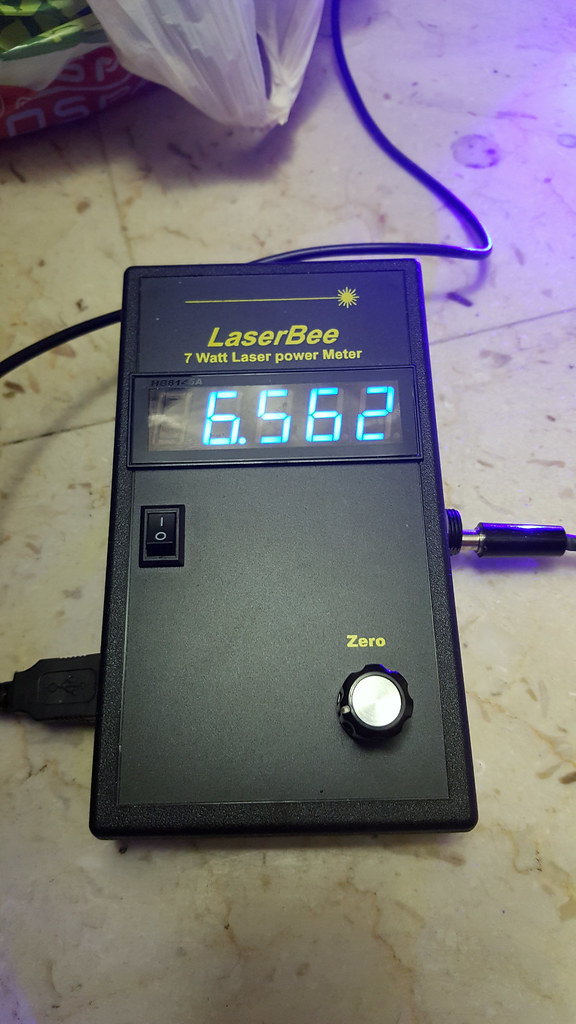
The incredible output power after 2 corrective optics, one converging lens and the three lenses inside the BE:
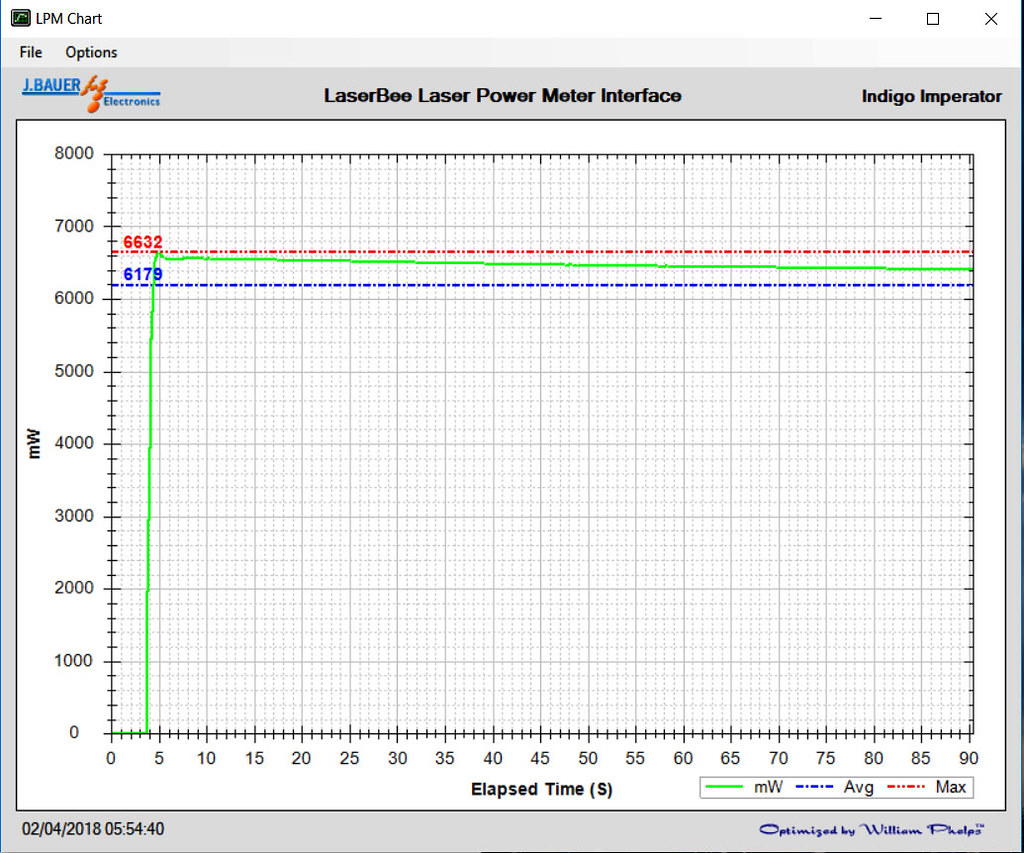
The performance graph:
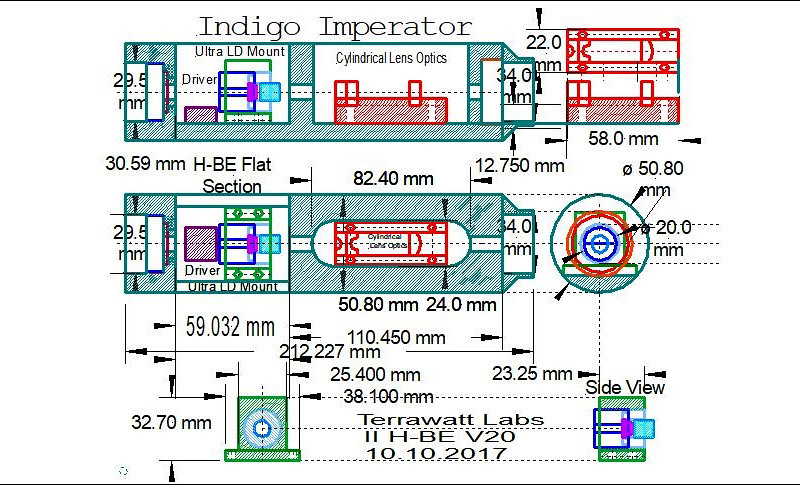
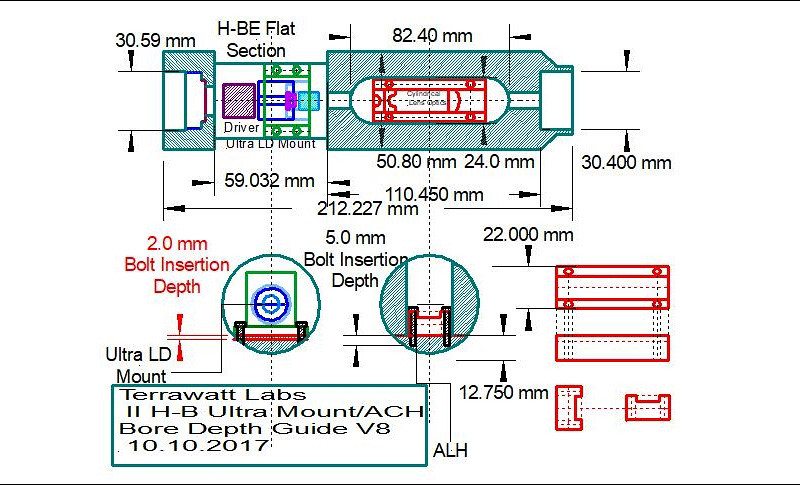
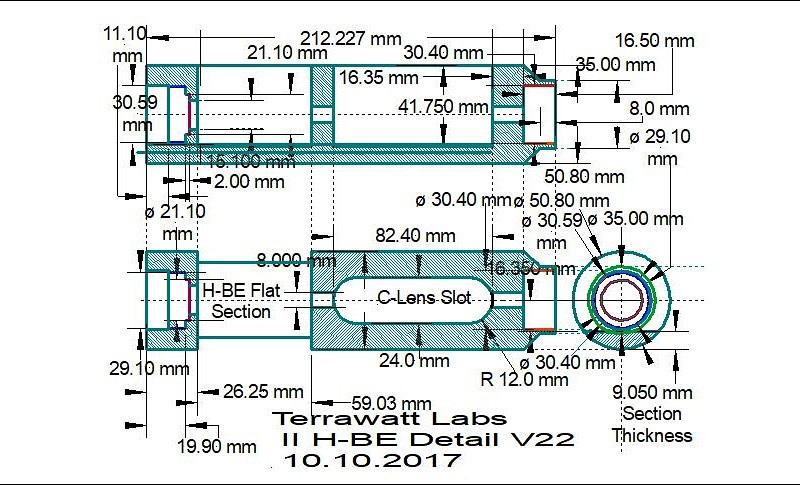
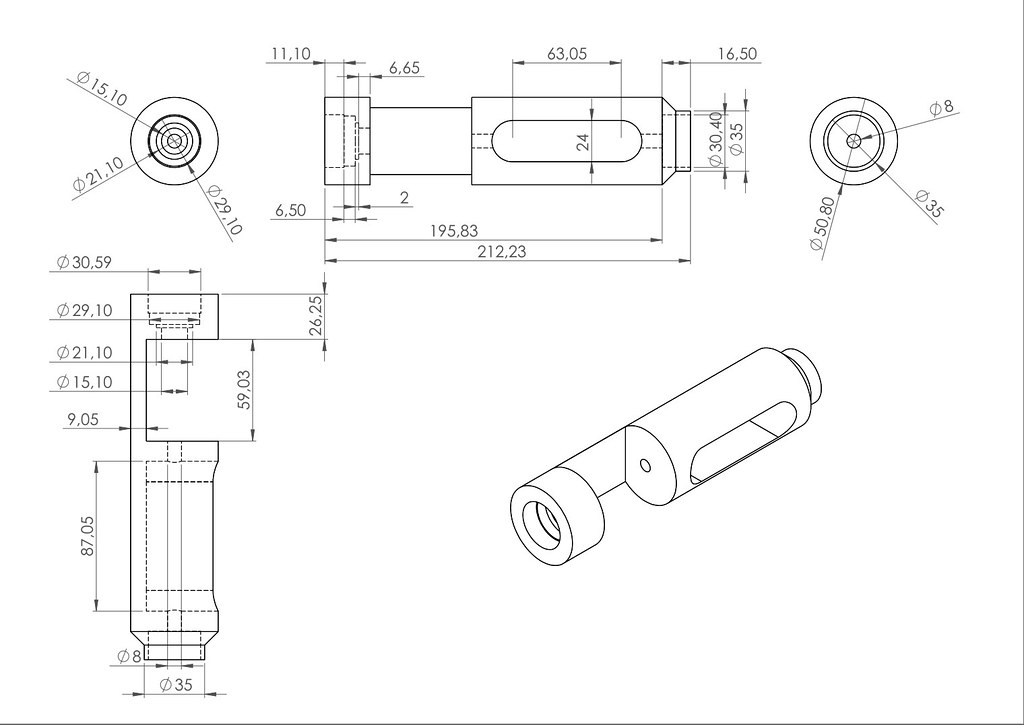
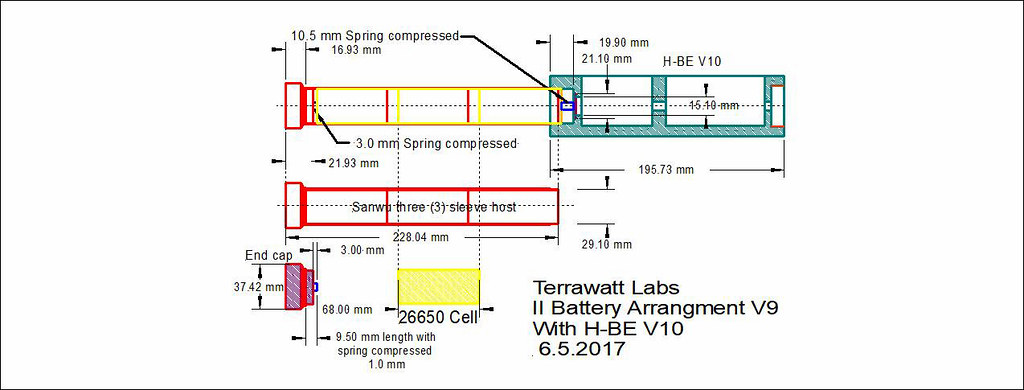
And for the interested people, all the CAD designs:
Many thanks for all the people involved in this mammoth project.
For the momment this was my last project, because I switched my few free time to the dangerous pyro world.
You can read about my new builds very soon in the "other" section of this forum.
This is not a goodbye, it is only a long break :na:.
See ya soon.
Richard.
Yesssss .. another painful and suffered birth came to light!
This time me and CDBEAM 777 met a very big dose of problems and issues.
A considerable amount of misfortune has also intervened to complicate our existence even more.
But now the masterpiece is ready to be unveiled.
As usual you will not be disappointed by the build.
As a big new I have learned very well how to design beautiful hosts with 3D CADs and how to use a
massive, complicated and pricey CNC milling machine.
Sorry, we have skipped to shot a lot of passages during the build, so there are only a few photos.
This was also due because the project was interrupted several times and some photos were lost.
Well ... breath to the trumpets and roll the drums, it begins!
INDIGO IMPERATOR PROJECT.
---------------------------------
MINAMOTO KOBAYASHI: commissioner, 3D CAD design, logo design, CNC operator, aluminum machining, weldings, canopy machining, final optical alignment, assembling, testing;
CDBEAM 777: name concept, 2D CAD design, DTR copper module modification, copper ultra mount machining, acrylic lens holder machining, some holes in the host, first canopy machining, first optical alignment;
THORLABS: incredibly fast, kindly and professional technical support, beam expander, extra collimation lens, little cherries, candy and biscuits
;TECHLIFE: CNC rent, teacher;
DTR: Nichia NUBM44 diode, 405-G2 lens;
X-Wossee: Blackbuck 8 laser driver @ 4.75A, some nice advices and good support;
PODO from Sanwu lasers: Spiker host plus extra part;
OPT LASERS: corrective optics;
FLAMINPYRO: pill, contact spring;
MarKING company: logo and characters engraving;
BADBOYBILLY: host idea.
And now, the introduction directly from CDBEAM 777:
Indigo Imperator - a joint collaboration build.
--------------------------------------------------
The Indigo Imperator is the latest build using the difficult to optically correct NUBM044 LD.
This build was a co-operative effort between myself and Minamoto.
The build consisted of :
1. A single NUBM044 Laser Diode;
2. An optically corrected beam path with two cylindrical lens set-up from Opt Lasers;
3. A new Terrawatt Labs LD mount design called the "Ultra Mount " which is a solid Copper mount which incorporates the DTR 20mm LD mount;
4. A Sanwu host which uses three 26650 LiPo cell in a series arrangement;
5. A 8A Blackbuck driver set at 4.75A;
6. A Thorlabs 3X Beam Expander;
7. A G2 Collimation lens;
8. A solid aluminum cylinder section we call the H-BE (Host to Beam Expander), which is the platform for the LD/LD Mount , LD driver and Cylindrical lenses/Cylindrical lens mount.
The H-BE also is the bridge between the host/battery compartment and the Beam Expander component.
The Beam Expander is fixed to the front of the H-BE and the host/battery compartment is fixed to the rear of the H-BE.
Let me note that the cylindrical lens compartment "cut-out" geometry is not a new design: Badboybilly used this concept back in May 2017.
It works great for eliminating much of the side light effects generated by the cylindrical lenses and or their holder. Thanx BBB.
Those disclaimers noted: this build does utilize the new Terrawatt Labs LD holder, the "Ultra Mount".
There is a separate thread regarding the design philosophies of the Ultra Mount: see the thread in the laser projector section.
Pitch, yaw and radial alignment are easy with this mount design.
I did the 2D CAD work, design/machining of the "ultra mount and acrylic cylindrical Lens mount.
I was responsible for the first optical arrangement and alignment.
The general design elements of the main aluminum section was a joint effort. This section is called the H-BE.
CAD work was my contribution with some aspects being added by Minamoto. The H-BE unit was CNC machined by Minamoto.
The unit OD is polished to a beautiful mirror finish.
Minamoto has become quite THE machinist, for he did the machining of the H-BE, and it is absolutely perfect.
Doing a build all at one location is a challenge.
Doing a build on two different continents ... WOW ... quite a challenge !!!
But we got it done!
With adequate attention to detail, even with several thousand mile shop to shop distance, all fit in a perfect harmony.
The combination of polished aluminum, copper, acrylic with the great looks of the Sanwu host are a great look!
We have used the H-BE platform concept in previous builds and it continues to be a solid and valuable design.
All said the H-BE is just a container to fix and align all the optical and electrical components.
In closing, thank you Minamoto for commissioning this work.
In the area of machining I fear the student has become the Master!
More lessons learned, we share and we push the build envelope, just a little bigger.
Thanx for reading.
CDBeam 10/2017
P.S.: since I have eliminated a 1/2 KG of esclamation points from the original CDBEAM introduction, for those who need them you can find them grouped here:
<!!!!!!!!!!!!!!!!!!!!!!!!!!!!!!!!!!!!!!!!!!!!!!!!!!!!!!!!!!!!!!!!!!!!!!!!!!!!!!!!!!!!!!!!!!!!!!!!!!!!!!!!!!!!!!!!!!!!!!!!!!!!!!!!!!!!!!!!!!!!!!!!!>
:crackup::crackup:
And now, the most juicy part.
The CNCed awesome massive aluminum host:
Ultra Mount 20mm Bore Hole Operation:
Module opening up the diode seat:
Module with NUBM044 diode installed:
Raw ultramount turret and DTR 20mm module:
Finished ultramount turret with DTR 20mm module+diode installed:
Mount being radially aligned:
Machined acrylic lens holder:
Turret mounted, driver glued and connected:
Since the pill negative contacts was too weak to sustain so much amperes, I was forced to found an alternative solid negative path:
Probe glued:
Corrective optics aligned, glued and mounted:
Battery compartment adaptation:
A strong and precise clicky switch:
Battery compartment unmounted:
Professional Thorlabs fixed magnification 3x beam expander:
Since I wish to obtain a focusing point closer to the BE exit, I added a Thorlabs 500mm converging lens just before the BE entrance thru a small lens holder:
A machined perfect-fit acrylic canopy:
The Indigo Imperator fully assembled:
Indigo Imperator mounted on Manfrotto tripod:
A touch of class, the logo engraved on the ring:
.. and the rest of datas on the other ring:
Corrective optics enlightened by the beam:
The corrected dot shape against a wall:
Same as above, but filtered. I obtained a very nice rounded dot:
The beam shape thru the output BE lens:
The beamshots in the night. The camera sensor caught a violet tonality, but in the real life the colour is a nice blue without any violet shade:
The impressive output power just after the 405-G2 lens:
The incredible output power after 2 corrective optics, one converging lens and the three lenses inside the BE:
The performance graph:
And for the interested people, all the CAD designs:
Many thanks for all the people involved in this mammoth project.
For the momment this was my last project, because I switched my few free time to the dangerous pyro world.
You can read about my new builds very soon in the "other" section of this forum.
This is not a goodbye, it is only a long break :na:.
See ya soon.
Richard.
Last edited:


") :crackup:
:crackup: