Hmm, looking at the schematics available online for driver circuits for the OPSL- maybe it's trivial for you guys, but it looks like a pretty time consuming project for me, and with my luck so far, I'm certain I'd just fry that $40 OPSL and then not be able to find another one, so I think I'm throwing in the towel on this hobby.

Welcome to Laser Pointer Forums - discuss green laser pointers, blue laser pointers, and all types of lasers
How to Register on LPF | LPF Donations
Navigation
Install the app
How to install the app on iOS
Follow along with the video below to see how to install our site as a web app on your home screen.
Note: This feature may not be available in some browsers.
More options

You are using an out of date browser. It may not display this or other websites correctly.
You should upgrade or use an alternative browser.
You should upgrade or use an alternative browser.
Hologram Laser Questions
- Thread starter bostjan
- Start date


18LJ
0
- Joined
- Oct 31, 2017
- Messages
- 77
- Points
- 18
Not sure if itll help but if ur going for cheap find a used laserdisc player thats in working condition the older models often have tiny hene tubes inside u can salvage?
Haha, probably cheaper to buy a HeNe tube than to try to acquire a laserdisc player these days.Not sure if itll help but if ur going for cheap find a used laserdisc player thats in working condition the older models often have tiny hene tubes inside u can salvage?
Way back, the best place to get HeNe lasers was American Science and Surplus. They had tons of old grocery scanners they sold as salvage. Usually the power on those was ultra-low, though. I regret not grabbing a few different ones, just to see what they had, but the one I did manage to obtain it actually lab grade - probably twice the power of the register tubes, yet still less than one milliwatt.
I got a few cool things from that warehouse, but it seems like times have changed and most of those items would be considered too dangerous nowadays.
18LJ
0
- Joined
- Oct 31, 2017
- Messages
- 77
- Points
- 18
Oh ya i forgot abouth meredith. I dunno what your budget allows but if ur able to drop a few bills you can get a decent hene and powersupply from here
I still haven't seen any specifications on any lasers for sale on the coherence length, except for a 635 nm diode from LaserLands that was advertised as having a 0.3 nm peak width.
I guess it's not really something people advertise or probably even bother to measure, unless it's a specific and very expensive lab laser.
That said, $1100 for a complete HeNe system, brand new, seems like a reasonable price to me, but that's really not in my budget.
I guess it's not really something people advertise or probably even bother to measure, unless it's a specific and very expensive lab laser.
That said, $1100 for a complete HeNe system, brand new, seems like a reasonable price to me, but that's really not in my budget.
I'm getting a little better luck with an Optnext 638 nm diode. The angle of incidence is definitely an important parameter to get a feel for, and, in my opinion (at least at this point), it's easier to get a good exposure with a higher power laser over a short time than a low power laser over a long time.
- Joined
- Jan 2, 2008
- Messages
- 1,513
- Points
- 83
I bought a new green HeNe from them a few years ago, super price at the time and I still have one of their original brass mounts that are for 5.6 or 9 mm diodes, believe it or notOh ya i forgot abouth meredith. I dunno what your budget allows but if ur able to drop a few bills you can get a decent hene and powersupply from here
Reputable source!
Eidetical
Well-known member
- Joined
- May 14, 2022
- Messages
- 202
- Points
- 63
At the risk of necroposting, I should chime in on this old thread. My best advise for starting in holography is to use silver-halide film instead of photopolymer. Yeah, it needs wet processing but that's been a simple thing for photographers to do at home for well over 100 years. Develop, wash, fix, wash, dry. Or bleach instead of fix. Or develop, wash, hot bleach, wash, fix, wash, then dehydrate in isopropanol (the SHSH process) to get very bright imagery that won't degrade in sunlight (after sealing) if really ambitious. Silver-halide with a small cheap He-Ne is what everyone used in the 20th century. The SP-127 mentioned above gives plenty of light for plates up to 12x16". 10 mW should be good for up to 8x10".
Photopolymer is a different animal altogether. It needs a huge amount of exposure compared to silver-halide. That means a much more expensive single-mode laser. It doesn't need wet processing, but it does need UV post curing. Sunlight is recommended for this, but it doesn't get the film as clear as it should be. A UV curing source like from Norland is best, but can also be expensive. The film also needs to be mounted to clean glass if not purchased that way. This can be done well with a modified pouch laminator or hand-cranked laminating rollers, but avoiding bubbles caused by dust is the challenge. I use an ionizing air gun to help with that, but those are also not cheap. Finally, what you end up with needs to be sealed with a cover glass to protect the photopolymer hologram and keep it from lifting off the base plate while handling it.
Another issue with the Covestro HX200 photopolymer (resold by Liti and Geola) is that it requires around 4 mW/cm^2 at the film to get it to start working. At that power level, it wants around 40 mJ/cm^2 for optimum results. The problem is that if the laser and setup don't provide the 4 mW/cm^2, the material just won't start working properly. Increasing the exposure time won't help the situation like it will when using silver-halide (which has no minimum power level to make it start working), and dim holograms are the result. This is why the Liti kit was a "hobby killer", like a department store telescope. Good results are very difficult with the lasers they provided.
One way recommended by Covestro to help with the minimum power issue is to give the film a pre-exposure using incoherent light (say from an LED) immediately before the holographic exposure. That blanket exposure kicks the molecules into motion (to grossly oversimplify the mechanism involved) as needed, then the fringe pattern exposure can happen on top of that. I've read about this from Covestro, but haven't done it or heard about anyone who did. This would be a great help to those wanting to use photopolymer at home with lower powered lasers. I'd be willing to support that effort if someone was serious about it.
I'm not saying that good results can't be made with the photopolymer at home. They can, but it requires a focus on the sort of things most beginners are not aware of because interferometric stability isn't required by anything else they've encountered. Increasing exposure time increases the opportunity for motion of the object, air currents, or vibrations to move the fringes and degrade the recording. The good results I've seen have come from those already experienced in holography so they know how to address those issues in an otherwise simple setup.
Last edited:
Eidetical
Well-known member
- Joined
- May 14, 2022
- Messages
- 202
- Points
- 63
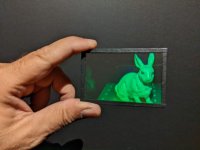
After writing the above comments, I questioned myself about what I said. It's been sooo long since I've made a pictorial hologram, I thought I'd give it a shot. This Bunny test hologram was made yesterday to see how low of an exposure I could do and still get good results. The first pic shows the result of 4.5 mW/cm^2 in the reference beam, 45 mJ/cm^2 at 10 seconds. The nose of the bunny is 5" behind the plate, and the 20X objective was 36" from the plate. Beam ratio was measured to be about 45:1. The film is Covestro HX200 mounted on 0.7 mm glass. The Coherent Verdi V6 laser's output power was 2.4W.
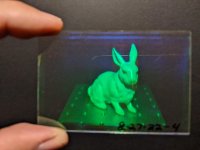
The hologram below was an exposure with 0.5 mW/cm^2 in the reference beam. The same 45 mJ/cm^2 at 90 seconds. Hard to see a difference with the camera, but the lower powered exposure is probably half as bright as the higher powered one but it's still a very bright and clean hologram. The laser output power was probably around 400 mW for the low powered exposure. I could go lower, but exposure times longer than 2 minutes invite too many other problems. I'd rather wait until I can set up a pre-exposure lamp as mentioned above. So it looks like I was a bit too harsh with my comments above.
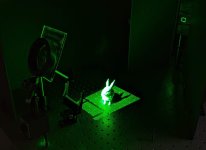
Here's the setup. The beam enters from the top right corner.

The hologram below was an exposure with 0.5 mW/cm^2 in the reference beam. The same 45 mJ/cm^2 at 90 seconds. Hard to see a difference with the camera, but the lower powered exposure is probably half as bright as the higher powered one but it's still a very bright and clean hologram. The laser output power was probably around 400 mW for the low powered exposure. I could go lower, but exposure times longer than 2 minutes invite too many other problems. I'd rather wait until I can set up a pre-exposure lamp as mentioned above. So it looks like I was a bit too harsh with my comments above.

Here's the setup. The beam enters from the top right corner.

Last edited:
Eidetical
Well-known member
- Joined
- May 14, 2022
- Messages
- 202
- Points
- 63
I changed the microscope objective in the spatial filter to a 10X to concentrate the light more, built a plateholder that allowed me to expose the plates without index-matching oil, and mounted the photopolymer on 1.6 mm thick glass with AR coating on one side (the outside). The pic below shows (on the right) a hologram made using a 50 mW input beam at 532 nm giving 0.15 mW/cm^2 in the reference beam. The beam ratio was 20:1, and the exposure was 30 mJ/cm^2 which took 200 seconds. Despite less uniformity of the diffraction efficiency across the plate, the brightness of the image is surprisingly good.
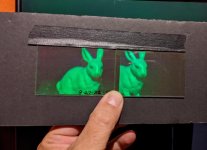
I did the pic below in front of a hologram of a cannabis plant (only one in the world!) to show its brightness in comparison to a nice bright silver-halide image from the mid-'90s (gotts keep the vintage thing going!).
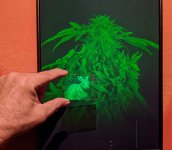

I did the pic below in front of a hologram of a cannabis plant (only one in the world!) to show its brightness in comparison to a nice bright silver-halide image from the mid-'90s (gotts keep the vintage thing going!).

Eidetical
Well-known member
- Joined
- May 14, 2022
- Messages
- 202
- Points
- 63
Today I installed a mirror behind the bunny, and used p-polarized light on plates without AR coating on the back. The shot below was done with 50 mW beam reflecting off two cheap aluminum steering mirrors before a spatial filter with a 10X objective that again was 36" from the plate. The mirror behind the bunny increased the light in the object beam so the beam ratio was now 2.4:1. Exposure was with 0.19 mW/cm^2 in the reference beam, 40 mJ/cm^2 at 150 seconds. 5 minutes settling time. One can see reflections of the scene off the background mirror that are waaaaay deep. All the non-uniformity caused by my use of s-polarization are gone, and there are no other fringes visible despite being at 38 degrees incidence with the reference beam instead of Brewster's angle.
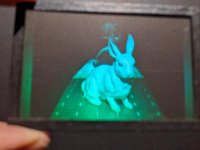

18LJ
0
- Joined
- Oct 31, 2017
- Messages
- 77
- Points
- 18
That plant hologram is beautiful. I'm surprised it captured that much detail. Is there a special technique that helps when trying to get a holo of an object that has really complex structures like a planr spread over a wide area, I've noticed most holograms I come across are of small objects pictures up close or ones that are more zoomed out in more of a "scene" type of orientation. Is it more difficult to capture holograms of objects ts up close while retaining details of the background. Also I saw on some reddit post a long time ago a large hologram (coffee table sized) of a city skyline. How do you capture holograms like that of a large distant landscape without shining a laser on the entire skyline?
Eidetical
Well-known member
- Joined
- May 14, 2022
- Messages
- 202
- Points
- 63
All holograms record information down to microscopic resolution. It's the replay light that determines the resolution of the images replayed. I'm using an obsolete Ikea Jansjo LED clamp-based lamp to replay the holograms above. It's still available on Ebay, and is the absolute best light ever for lighting holograms (other than laser). The currently available Jansjo is USB-powered and way too dim.
The cannabis hologram "master" was made with a pulsed frequency-doubled Nd:YLF laser giving green light in a 30ns pulse of about 700mJ. What's seen above is a hologram of that master hologram, shot with a 35mW red He-Ne laser and processed to replay in green.
Hologram and scene size is generally determined by the size of the optical table used to make the hologram. Some images are originally captured with conventional photography and made into a "master" hologram with a process camera built on a large optical table. Similar to a lenticular 3D photograph, but without the need for a plastic lenticular lens in front like on those old postcards.
- Joined
- Jun 18, 2012
- Messages
- 1,046
- Points
- 83
I have one of the green tiny opsl. They are very sensitive to temp and intensity varies a lot if you don’t heat sink them and control temp. Amazing beam on them however. If you want one I’ll look for it. I never finished setting them up and stuck them in a drawer so they are brand new old stock.
laser diodes also drift with temp. You might fix your issue immediately just by putting your laser diode on a tec and cooling slightly to keep it stable.
a spatial filter is nothing more than a lens followed by a pin hole fooled by a lens. You focus the laser on the pinhole and move it slightly backwards to cut off the trash on the edge of the beam. The second lens is either a telescope or the same as the first Lens to collimate the beam again. You can make the pinhole with the laser if it’s got 100 mw of so in aluminum foil, on a laser cutter. Tip of a pin. Lots of ways. Not sure the filter will do much for holography.
I think your fringes are getting smeared from freq and phase drift Of the diode due to lack of temp control.
you see this even in hene unless it’s been running for a while like an hour ad still even they slowly cycle.
Eidetical
Well-known member
- Joined
- May 14, 2022
- Messages
- 202
- Points
- 63
Sorry if I derailed this thread with general comments about holography. The only way to really know if your laser is running in single longitudinal mode is with a scanning Fabry-Perot interferometer. A Michelson interferometer often gives a false positive result because a very short coherence length from a very short cavity laser can show fringes regardless of the path length difference in the interferometer. The best thing is to buy a laser with verified coherence length, either from a seller who can test it properly or from another holographer.
High powered multimode diode lasers can run single mode when just above threshold current. You may get 50 to 100 mW, but you'll want to keep the current constant and keep the laser thermally stable. That usually requires that the laser be outside of the enclosure surrounding the exposure system. Air currents can destroy fringe stability as much as mechanical vibrations can. And speaking about vibrations, don't underestimate the effects of acoustical sources. Turn off the HVAC and the radio. No movement or talking during the exposure. Acoustical vibrations from vehicles and aircraft make objects move and plates vibrate like drumheads.
Use a shutter and not the power switch for the laser to do the exposure. Holography is an exercise in peaceful, calm absolute stability.
Spreading the beam can be done with a curved mirror, but the resulting spot will probably be mottled and ugly. A spatial filter is used to give a nice uniform expanded spot of light from a nice round input beam. If the beam from your laser is not nice and round, you may have difficulty getting a nice beam out of a spatial filter, but it is possible. I don't think any of the problems mentioned in this thread are the result of not using a spatial filter, which will only make your light look smoother.
I highly recommend signing up to Holowiki.org linked above. I've posted on there (BobH) almost since the beginning, and many others have provided decades of experiences there as well although it's not very active now. Another place to ask such questions is on the facebook holography page. Many old timers are there as well as many interested in doing it at home. Seems like the Seattle area is a current hotbed of activity for artists working with dichromated gelatin material. There are also two holography shows now running. One (historical) in Port Huron, Ohio and the other (art) in Kingston, NY. And there's my exhibit of holography in Tempe, AZ too. Best advise for anyone wanting to do holography at home is to visit a working holographer and all are welcome to do so here. There's also Ed Wesly at Ed Wesly & Sons Holography in Chicago, Jason Sapan at Holographic Studio in New York City, Rob Taylor at Forth Dimension Holographics in Nashville, Indiana, and August Muth at Light Foundry in Santa Fe.
Last edited:

