Welcome to Laser Pointer Forums - discuss green laser pointers, blue laser pointers, and all types of lasers

Buy Site Supporter Role (remove some ads) | LPF Donations

Links below open in new window

FrozenGate by Avery

FS: Key Chain CR2 Build Kit! - SCHWEET!

Re: FS: Key Chain CR2 Kit! - SCHWEET!

OK, got some air and went back in to double check things.

With 185mA from a MicroDrive powered by a 9V bench supply, the diode is a happy diode (in other words, it's not toast).

With 185mA from a FlexDrive powered by a 3V CR2, it returns to pseudo-toast mode.

I'm confused and open to suggestions.

How do you know your FlexDrive is putting out 185mA?
- Is it on the diode or on the dummy load when you see that it's putting out current?
- What is the Vf of the dummy load?
- Do you have an adjustable PSU, so that you could power the dummy from the Flex, while CAREFULLY turning the voltage from 5.5V down to 2.5V to see if the current THROUGH the dummy stays the "SAME"?

I've had some problems with FlexDrives, but usually they all had a good reason, none of them ever gave up on me just like that. :thinking:


It COULD be a damaged IC, if it was trying to push current through air at one time (loose connection during testing?), resulting in the chip trying to do something, starting out OK, but failing?

I'm just guessing.. I'd have to see it, test it, to figure out what the problem is.

But there are not many possibilities:
- broken pot (unlikelly in your case from description)
- short from soldering / solder drops left on driver (again unlikelly)
- damaged chip from no load operation (most likelly? altho it does have a Zener to protect from that?!?)

I always test every driver on a dummy by measuring the current and varying the input voltage from MAX to MIN several times (and sometimes by letting it run for an hour) the entire time checking that the current is not changing!

On a FlexDrive, if the current changes more than 2-4mA (from 2.5-5.5V) or if the current changes erratically, something is wrong! Often the only solution is to use another FlexDrive...


I always have a bunch of my own dead drivers from when i make them, and kill them during testing, by forgetting to check all connections and the chip burns out boosting to 25V... Only solution is to replace the chip. Since it has no legs it's not fun, but luckily it only has six pins underneath!

The chip on FlexDrive has TEN pins underneath, that is something i would not attempt to solder by hand! Especially since the PCB is not adjusted for hand soldering...


EDIT: Battery voltage under 2.5V can cause strange behavior... Problem is, often you can't measure battery voltage under load, and no load voltage tells you little... Old Lithium Primaries could be the cause in theory...
 
Last edited:


Re: FS: Key Chain CR2 Kit! - SCHWEET!

I have seen this problem more than once now. That's why I asked about it. I just fixed that pocket mini from the UK that you were helping the gentleman with.

When I first tested it, I used a standard primary. It was only putting out 170mW WITH the low loss lens. I thought that was a bit strange because I know what it was before everything got twisted off.

I replaced the battery with a fully charged RCR123 and the power went up to 240mW. Same diode, same flexdrive, no adjustment, 170mW to 240mW with a new battery.

Go figure?

Peace,
dave

I have seen as much as 6mA difference on early FlexDrive versions between a used Primary Lithium and a full Li-Ion..
But usually this would not result in more than a 10mW power difference on a PHR..

Except in one case, where the PHR was in a kink!
Since the lower voltage from the Primary Lithium resulted in a HIGHER current than from a higher voltage from a Li-Ion, the PHR came out of a kink and went from 180 to 220mW! On a Li-Ion it fell back into the kink and the power was 180mW again.. Strangelly enough, as the input voltage drops, the current climbs on the old FlexDrives (less on the new ones as far as i can tell, but same direction).


But i don't think you're using PHRs in the case you are describing, and 6x's don't have kinks (well one does but that's a whole different story, and that one would not go above 140mW anyway)....


EDIT: You are describing the exact opposite... Higher power from a higher voltage battery. Haven't seen that yet on FlexDrives... Will test more carefully from now on.

EDIT 2: I just happened to test an old v2 FlexDrive at a VERY high current load, and it does behave like you're describing - the lower the input voltage, the lower the current.. :(

I'm gonna try changing some caps, then i'm moving to a v3 if it doesn't help.
 
Last edited:
Re: FS: Key Chain CR2 Kit! - SCHWEET!

Ok guys I think i just broke my new v5 flexdrive, i had it all working and put it together but when i clicked it on it flickered and that was all. Then i disassembled it and found that my ground pin poked through my scotch tape and into the "little coil" labeled 3R3 (sorry don't know the technical name) breaking off a corner of the spool and probably shorting across. I don't see any broken wires in this coil just the corner of the plastic snapped off. So the question is did I ruin the driver or is there something I can do to repair it?
 
Re: FS: Key Chain CR2 Kit! - SCHWEET!

You will have to test the driver with a test load, but if it is just the outer part that 'chipped' off, it will probably be alright.

But I don't know if anything component got 'fried'...
 
Re: FS: Key Chain CR2 Kit! - SCHWEET!

So think the diode is toast? Please explain what you think happened in there Jay. Thanks for the quick reply you're awesome!
 
Re: FS: Key Chain CR2 Kit! - SCHWEET!

Hard to say exactly what happened...

I am picturing that you had the connection pins insulated with heat shrink tubing. (tip - bend the wires over to make more room)

If it was the diode case pin that touched the driver, then that is battery negative via the module/heatsink/host.
 
Re: FS: Key Chain CR2 Kit! - SCHWEET!

Ok guys I think i just broke my new v5 flexdrive, i had it all working and put it together but when i clicked it on it flickered and that was all. Then i disassembled it and found that my ground pin poked through my scotch tape and into the "little coil" labeled 3R3 (sorry don't know the technical name) breaking off a corner of the spool and probably shorting across. I don't see any broken wires in this coil just the corner of the plastic snapped off. So the question is did I ruin the driver or is there something I can do to repair it?

If you only broke the shielding of the coil, but didn't damage the insulation on it's wires, the driver will still work just fine.
Only difference is, it will create a little bit more of RF noise..


I chipped the edge of my first v4 Flexdrive's coil very soon but it didn't pose any problems. Problems usually happen from bad soldering and shorts. You also have to be EXTREMELLY careful with that tiny pot!

With the latest FlexDrives, there is also a small potential problem with the fact that there is a tiny part between the driver's output pads - on both sides! I think one is the Zener to prevent the driver from killing itself in no-load operation, and the other a resistor to discharge the output capacitors, to prevent cap-zapping...

It's easy to short a diode pin or driver output pad to the wrong side of one of those part - it's all very tight there... You also have to inspect the driver for tiny solder drops that could short a part sometimes...
 
Last edited:
Re: FS: Key Chain CR2 Kit! - SCHWEET!

Since i received two of these CR2 Keychain kits yesterday, i started thinking which diodes to put in them...

Obviously i'd love to have a very tiny 8x, but an 8x at 300mA is powered by 1.68W of electrical power, and produces 1.28W of heat. I wanted to make sure the build is capable of dissipating that for long enough first, since i'm not a big fan of counting in my head while using a laser...


Luckily i also found a way to increase heat dissipation into the host slightly, by modifying the heatsink in a way that it can now be screwed into the head of host and held there tightly!

For heatsink testing i put a low efficiency LOC inside, pushed to 500mA - to kill it, and to see how stable the power is (= efficiency of heatsinking).
A LOC at 500mA also produces 1.2W of heat..

I need to explain how i managed to screw the heatsink in place, and take a few more pictures, problem is the concept does not work with the new FlexDrives, and i stumbled upon it by accident..


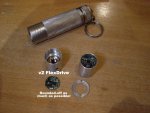
For now just one picture of the modified CR2 Keychain - heatsink testing in action.


Very nice little host Jay! I especially love how heavy it feels!
Can't wait for the LOC to die so i can make it a bluray! :evil:
 

Attachments

  • CR2 Keychain Mod P5.JPG
    CR2 Keychain Mod P5.JPG
    119.4 KB · Views: 270
Last edited:
Re: FS: Key Chain CR2 Kit! - SCHWEET!

Very nice Igor... You Scientist you!

I love how you test every possible thing and explain your reasoning and results...

Glad you like the host! :)

I know that you mentioned to me in e-mail that you had some V3 FlexDrives, that you could sand round, and actually fit 'flat' into my heatsink to allow it to be shorter so that the flashlights stock threaded ring could be used to complete the assembly.

That's good thinking! I couldn't do that with a V4 FlexDrive. And the V5 FlexDrives are the same size as the V4's.

So I don't know if anybody else will be using your custom modification, but it sure is a good one! :gj:

One other thing I would like to mention. Even if you are using a V4, or V5 FlexDrive, and follow my tutorial, this is still a very nice build with good heatsinking. The tail cap spring is very strong, and presses the heatsink very tight into the host, where it makes good contact with the front of the host.

That said, you found a way to improve it! But the only problem is, I don't think there are very many V3 FlexDrives left out there that we can trim 'round' for your custom modification...
 
Last edited:
Re: FS: Key Chain CR2 Kit! - SCHWEET!

I know that you mentioned to me in e-mail that you had some V3 FlexDrives, that you could sand round, and actually fit 'flat' into my heatsink to allow it to be shorter so that the flashlights stock threaded ring could be used to complete the assembly.

That's good thinking! I couldn't do that with a V4 FlexDrive. And the V5 FlexDrives are the same size as the V4's.

Actually, i stumbled upon it by pure accident, because i used to put v2 and v3 FlexDrives into my reds, by rounding them off and mounting them horizontally above the round battery contact board, that sealed off my v2 Heatsink/Modules - the one made specially for the v2 and v3 FlexDrives (MaxMass-FlexDrive - they had a larger bottom drillout for a horizontal Flexdrive, then it went narrow for more aluminum mass, only leaving room for two wires to connect diode and driver, and then the ID went slightly wider again to accept the AixiZ module head...


And i had old FlexDrives and heatsinks around from before, i was just recently using them to make reds for a Bonus Batch, and i had a rounded off FlexDrive just laying there on my worktable, while thinking how to put your CR2 kit together.

For a while i couldn't figure out how you did it, and since my computer just crashed (from having too many forum tabs open at once) i also lost the link to this thread, so i started thinking how it could be done..
For a moment i even tried unscrewing the host's head.. :angel:

Well, then i realized it all goes in from below, gutted it, and thought about it some more...

And then i noticed the old FlexDrive lying there on the table, and just for fun i tried putting your CR2 heatsink over the rounded off FlexDrive. To my surprise it fit! I didn't expect it to, my AA heatsinks are much "fatter"! But somehow it did..

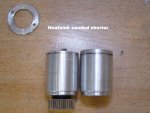
Once i realized that, the rest was easy... I just had to carefully sand 1mm of the bottom of your heatsink away with a diamond plated Dremel sanding ring, and suddenly there were a few threads exposed - just enough for the host's original ring to start grabbing!


One other thing I would like to mention. Even if you are using a V4, or V5 FlexDrive, and follow my tutorial, this is still a very nice build with good heatsinking. The tail cap spring is very strong, and presses the heatsink very tight into the host, where it makes good contact with the front of the host.

That said, you found a way to improve it! But the only problem is, I don't think there are very many V3 FlexDrives left out there that we can trim 'round' for your custom modification...

Jay, i didn't do this because i wouldn't like your approach, i did it because i didn't know your approach... :angel:
Besides, you had to make it work with what was and will be available (v4 & v5 FlexDrives) and you did!
If you found the same host during the time of v2 and v3 FlexDrives, you would have come up with the same idea on the other hand...


Otherwise, the main thing i was trying to figure out was what will hold the module up there.

I was trying to decide between friction + thermal paste on the step or even thermal epoxy on the step to hold it up there for good..

If it wasn't for the trimmed leftover FlexDrive on my table, i would have done one of those two things.. If i were to use thermal epoxy, there would be the danger of no electrical contact, so i'd probably stick an eposed wire between the heatsink and host (for the negative contact).
On the other hand, the same wire might have resulted in enough friction to hold the heatsink in place and solve the problem anyway!


I just tried it without the ring, with nothing but the battery (and tailcap spring) pressing the heatsink up into the host's head, to see if there is any difference... Since i have some thermal paste on the lip and the step of the heatsink, the results were pretty much the same, when it came to power stability.

If i wanted to go into details (to see if there even is a measurable difference), i'd have to solder miniature temperature sensors on the diode directly and try making temperature graphs with and without the ring to see if it even matters... I'm just happy it holds the module in place and is easy to take appart and put together.


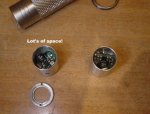
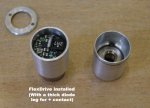
Otherwise, i just sorted and edited the pictures explaining how i did it.

The main problem here is, that i used a v2 FlexDrive for the heatsink testing... v2's sometimes had some problems, and this one didn't want to work outside of the host properly (length of wires connecting it to battery have a HUGE impact!). I had to add some caps, and i even ran out of room for an additional diode protection cap (it's not finished yet, there are still many things left to figure out)...


When it comes to current stability, a v4 FlexDrive build is better (i wouldn't dare put an 8x on this particular driver cos it acted funny).. Next i have to try the remaining v3 FlexDrives i have left..

I think the pictures are self explanatory, there is one thing missing tho... At the moment, nothing is holding the FlexDrive in place.. I will have to make a plastic spacer that will go between the ring and the FlexDrive, and prevent it from moving.

Altho at this moment the FlexDrive fits the heatsink so nicelly, that it won't tilt from the pressure from the battery...
 

Attachments

  • P1 - CR2 Keychain Mod.JPG
    P1 - CR2 Keychain Mod.JPG
    156.1 KB · Views: 248
  • P2 - CR2 Keychain Mod.JPG
    P2 - CR2 Keychain Mod.JPG
    152.7 KB · Views: 205
  • P3 - CR2 Keychain Mod.JPG
    P3 - CR2 Keychain Mod.JPG
    118.1 KB · Views: 243
  • P4 - CR2 Keychain Mod.JPG
    P4 - CR2 Keychain Mod.JPG
    110.2 KB · Views: 286
  • P5 - CR2 Keychain Mod.JPG
    P5 - CR2 Keychain Mod.JPG
    115.2 KB · Views: 277
Last edited:
Re: FS: Key Chain CR2 Kit! - SCHWEET!

Very nice Igor...

It's a great improvement to be able to use the threaded ring. My style (using the V4 and V5 FlexDrives), simply was 'snug' fit and wouldn't come out unless you pushed the assembly out from the module end.

And I relied on the really strong tail cap spring to add good pressure for contact to the host.

But definitely the threaded ring holding the assembly in place is a good improvement.

Never thought we would want to get older versions of the FlexDrive!

Those of you who want Igor's 'special' version, better get in line! I doubt he has many of the older version FlexDrives left...

But remember, the build is fine with the V5 drivers as well! :)
 
Re: FS: Key Chain CR2 Kit! - SCHWEET!

Never thought we would want to get older versions of the FlexDrive!

Haha, me neither, i was actually worried what i'd do with the old ones.. Now i almost wish i had more... :crackup:


Those of you who want Igor's 'special' version, better get in line! I doubt he has many of the older version FlexDrives left...

No, i don't, and while i WANTED to use them up on reds, after this i quickly converted some reds to v4 FlexDrives... :yabbem:
I think i may have FIVE v3 FlexDrives.. The v3's with a few caps added on top can be made just as stable as the new v4's and v5's..

You sent me one kit for me, one for Glenn for that trade you have which leaves THREE v3 FlexDrive builds like above available for sale... :undecided:

Only three available.... :angel:


But remember, the build is fine with the V5 drivers as well! :)

True! I tested it with nothing but the battery pushing the module up into the head (i removed the ring completelly) and the power stability on my LPM was the same as far as i could tell with my eyes (without going as far as plotting graphs and comparing them), it's just a different assembly method..


Otherwise, Jay, check your email.. I think i found yet another assembly method, where availability would not be an issue (but the heatsink would be more massive - still need to test if it's possible tho, but that method COULD even work with my driver!).. :angel:
 
Last edited:
Re: FS: Key Chain CR2 Kit! - SCHWEET!

Otherwise, Jay, check your email.. I think i found yet another assembly method, where availability would not be an issue (but the heatsink would be more massive - still need to test if it's possible tho, but that method COULD even work with my driver!).. :angel:

Well, If you come up with a special 'IgorT method' using the V5 Flexdrives, then by all means I will machine special heatsinks for your builds.

That said, I will leave my original tutorial and design 'as is', for the people who want to buy the kit direct from me for DIY... :)
 
Re: FS: Key Chain CR2 Kit! - SCHWEET!

Got my Laserbee today. I can officially confirm the LaserCheck (or at least my LaserCheck) is no good at 405nm for some reason.

lpmggw.jpg
 
Re: FS: Key Chain CR2 Kit! - SCHWEET!

Now that you have a meter with a thremal head, you will have accurate readings from all wavelengths... (as long as the meter is calibrated)

Hey I noticed that the gap between your EzFocus adapter and your host is kind of big. Is the AixiZ module flush with the heatsink?

Module position inside the heatsink, it will affect this 'gap' thicknes...
 
Re: FS: Key Chain CR2 Kit! - SCHWEET!

Well, If you come up with a special 'IgorT method' using the V5 Flexdrives, then by all means I will machine special heatsinks for your builds.

That said, I will leave my original tutorial and design 'as is', for the people who want to buy the kit direct from me for DIY... :)

Unfortunatelly i got too excited too fast... There was not enough room, you were right.. :yabbem:

Otherwise i left the test laser run for 30-60 minutes several times, and while it was "hot" (in human terms) at the end, the diode was still happily cool, at half the temperature it is made to work at...

So with normal use, the design is perfect as it is. :yh:


P.S. Only problem, the damned open can just won't die!!! :thinking:
Perhaps i need to set it to 600mA... :evil:


Back
Top