D
Deleted member 17304
Guest
Hi again, got my last build of these new diodes done (for now at least).
Around a year ago, I was looking for a WL nano host for cheap to put a 488nm diode into. This was long before the sharp 488's were out, but when we knew they were coming. After a few PM's, another member has graciously offered to send me a dead one he had so long as I post a build using it. I'm a bit late, but when you read this I want to say thank you again :beer:
Onto the build. I always heard that pen builds were extremely difficult, and I put off this one for last thinking it would be an arduous process. I was pleasantly surprised to find out this turned out to be a pretty easy build.
Without any other delay, onto the build!
This is everything that went into making this. Host, caps, button, diode & driver.

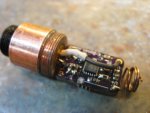
Missing a pic of the internals of the driver, realized after I put it all together... Inside is one of the new Sharp 490nm diodes, set at a very low current to get ~10mW out. This is using one of the Astral PicoDrives (soldered on to the diode and pressed by Paul, thanks!). I've soldered the negative lead from the driver to the case pin on the diode (not pictured).
From there, I needed to attach the positive lead of the diode in series with the push button. These are the push button blank boards offered by laser66.

Went a little crazy with the solder on the board, the wire did not want to stick to the solder I have. Either way, I've checked to be sure this wasn't shorting itself out anywhere.

From there, I slid the board into the plastic holder and wrapped the lead around the other end of the board to hide away some slack

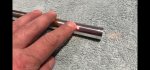
Then comes sliding everything down into the host. This part is tricky to get aligned right on the first try

It's easy enough to twist the module with something that can grip the plastic holder

And with that, pop the button in place and screw the head cap on. Throw some batteries in and it's good to go!


Once again, a huge thanks to Paul for the small soldering work that I'd never be able to do myself, and a huge thanks to the member who sent me this host -- you know who you are. :thanks:
Link to album
Around a year ago, I was looking for a WL nano host for cheap to put a 488nm diode into. This was long before the sharp 488's were out, but when we knew they were coming. After a few PM's, another member has graciously offered to send me a dead one he had so long as I post a build using it. I'm a bit late, but when you read this I want to say thank you again :beer:
Onto the build. I always heard that pen builds were extremely difficult, and I put off this one for last thinking it would be an arduous process. I was pleasantly surprised to find out this turned out to be a pretty easy build.
Without any other delay, onto the build!
This is everything that went into making this. Host, caps, button, diode & driver.
Missing a pic of the internals of the driver, realized after I put it all together... Inside is one of the new Sharp 490nm diodes, set at a very low current to get ~10mW out. This is using one of the Astral PicoDrives (soldered on to the diode and pressed by Paul, thanks!). I've soldered the negative lead from the driver to the case pin on the diode (not pictured).
From there, I needed to attach the positive lead of the diode in series with the push button. These are the push button blank boards offered by laser66.
Went a little crazy with the solder on the board, the wire did not want to stick to the solder I have. Either way, I've checked to be sure this wasn't shorting itself out anywhere.
From there, I slid the board into the plastic holder and wrapped the lead around the other end of the board to hide away some slack
Then comes sliding everything down into the host. This part is tricky to get aligned right on the first try
It's easy enough to twist the module with something that can grip the plastic holder
And with that, pop the button in place and screw the head cap on. Throw some batteries in and it's good to go!
Once again, a huge thanks to Paul for the small soldering work that I'd never be able to do myself, and a huge thanks to the member who sent me this host -- you know who you are. :thanks:
Link to album


")