

- Joined
- Sep 16, 2007
- Messages
- 3,667
- Points
- 113
Recently I received a question regarding how I build my pens.
I don't remember if I made a tutorial before so here's a new one.
Materials and tools:
Step 0: Preparation
Step 1: Electrical Setup
Step 2: Module Assembly
Step 3: Final Assembly in Host
Why you should do it this way:
This method is clean and robust. The driver and diode pins never have pressure on them from the batteries because the module back encloses the sensitive electronic components. It is also possible to heatsink the driver using a piece of a 10mm diameter cylindrical rod - if done properly, it will contact the module back for heat transfer. Removing the module is also easy if repairs or adjustments are needed. Threading a spare module with a lens into the 9mm threaded lens hole of the laser module, clamping that in a vice, and pulling firmly and slowly, will allow you to pull the whole module out of the host. If you use flexible wire (I use the awesome silicone insulated wire) you can even remove the module back and switch assembly to adjust the driver without de-soldering any of the joints - just do it carefully. Using the module back increases mass for heatsinking which allows better run-times for relatively high power output. If you are using a custom focus adapter, you can set the lens to infinity with the adapter installed, then press the diode in fully until the focus adapter is flush with the host. This will give you a "hard stop" at infinity focus.
I don't remember if I made a tutorial before so here's a new one.
Materials and tools:
- Epoxy
- Super glue
- Sharp, strong scissors
- Toothpick (for epoxy application)
- Wire stripper
- Soldering iron & solder
- Scotch tape
- Patience
Step 0: Preparation
- Take about 2 inches of wire and strip the insulation from the ends; apply a small amount of solder to both ends
- Apply a small amount of solder to the driver input and output pads
- Carefully bend the diode pins about 2mm from the end; apply a small amount of solder to the pins
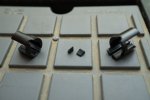
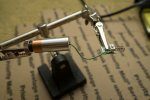
- Trim the black plastic switch board mount (Image 1) - this is easy to do with a good pair of scissors
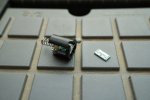
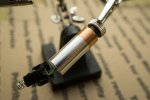
- Trim about 6mm from the switch board (Image 2)
Step 1: Electrical Setup
- Solder the driver to the diode (don't forget to set the driver to your desired output range)
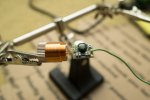
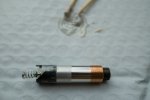
- Solder the wire to the appropriate input on the driver for your build (mine is (+) (Image 3)
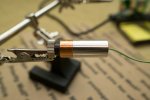
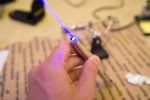
- Pass the wire through the module back; thread the back onto the module (Image 4)
- Solder the wire to the switch output pad (you can find the correct connection by using the TEST feature of a digital multimeter - connect one terminal to the spring, the other to one of the switch solder connections; if you are touching the correct connection, the MM will beep only when you press the switch - Image 5)
Step 2: Module Assembly
- Place the switch board in the plastic mount; superglue it in place; the spring contact point should not protrude beyond the switch board mount (this keeps the module length minimal to save space - Image 6))
- Hide excess wire inside the module back (Image 6)
- Connect your module to a power source and test that everything works
- Mark the module (I just use a knife to scratch a notch on the front of
the copper part but a marker will work, too) to designate the position perpendicular or parallel to the fast axis of the diode - this is done so that when the module is fitted into the host, the beam exits either vertically | or horizontally --- rather than diagonally / - I find this more aesthetically pleasing and prefer a horizontal beam (but I chose the vertical orientation this time - Image 6) - Apply a small amount of epoxy to the flat side of the switch board mount with a toothpick or similar item and stick it to the back of the module; the switch should align with the mark you made on the module to designate the orientation of the beam
- Secure the switch assembly to the module back with scotch tape and allow epoxy to fully set; be patient (Image 7)
Step 3: Final Assembly in Host
- Remove the tape, trim off any excess epoxy with a knife or razor (to allow module to slide into the host)
- Press the module into the host; ensure that the switch aligns with the hole for the button - you can do this by looking through the back of the host and checking the orientation
- Stick the button into the hole
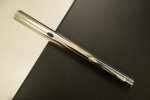
- Insert batteries and marvel at your work (Image 8)
Why you should do it this way:
This method is clean and robust. The driver and diode pins never have pressure on them from the batteries because the module back encloses the sensitive electronic components. It is also possible to heatsink the driver using a piece of a 10mm diameter cylindrical rod - if done properly, it will contact the module back for heat transfer. Removing the module is also easy if repairs or adjustments are needed. Threading a spare module with a lens into the 9mm threaded lens hole of the laser module, clamping that in a vice, and pulling firmly and slowly, will allow you to pull the whole module out of the host. If you use flexible wire (I use the awesome silicone insulated wire) you can even remove the module back and switch assembly to adjust the driver without de-soldering any of the joints - just do it carefully. Using the module back increases mass for heatsinking which allows better run-times for relatively high power output. If you are using a custom focus adapter, you can set the lens to infinity with the adapter installed, then press the diode in fully until the focus adapter is flush with the host. This will give you a "hard stop" at infinity focus.
Attachments
Last edited:


")