

10fenny
0
- Joined
- Sep 10, 2014
- Messages
- 1,054
- Points
- 83
Hey guys! Joe here.
So I finally finished my first build!!
A few details before I go on. As many of you probably don't know.. I am a full time mechanic, So this little gauge wiring and tiny CB's were a huge step for my patients. I am used to man-handling large/obscurely shaped objects into submission with cuts and scrapes up to my armpits. This will make more sense as you read my awesome writing.
When I first started the build I had everything perfectly laid out, organized, and looking very tidy. Well after a lot of frustration, CB contact breaking, and what seemed like an "everything going wrong/murphy's law" event I soon became very lax with the internal appearance. I mean I wasn't at work so the only people I had to please was myself and you guys, but its a first build so we will see how much crap/comments I get.
Anyways on to the pictures!!!!
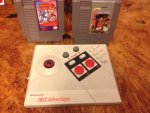
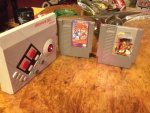
The host is an original Nintendo joystick. I ordered one online awhile back. I have a lot of nerd hobbies and retro gaming is one. The joystick showed up broken... Until I had an idea!


So there is the host itself. The main aperture hole needed only light sanding for the heat sink to fall into place. Who doesn't love Mega Man 2 Or contra!!
Now I'm not going through a complete build walk through.
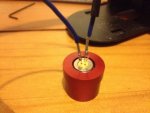
Here to start is how I soldered My LD to my... sigh... way-too-big-never-gonna-use-again wiring from work. I like to keep the module/LD in the heat-sink while I solder for better heat dissipation. I also have temperature numb fingers, so right after each solder joint I would do a pinching action to further absorb heat. This particular diode is a mitsu 300-400mW 650nm that i got off ebay. 10 for 29$!!! That is also an aluminium heat-sink from survival laser that I've had sitting around for a few weeks now

Here is the battery holders that I epoxied in... again. So I didn't feel the need to clean it up.. again!!! You can also see that when I used some of my awesome RTV to hold the heat sink in that its pretty sloppy. It's called right stuff. When you get it going out of the tube sometimes it's hard to stop ha.

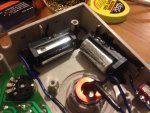
So this Picture shows basicly the schematic of the whole thing.. sort of. You can see the large wiring and terrible soldering. When I got some 26 gauge silicon insulated wiring from "flaminpyro" it was a new world!!! After being ready for this project and seeing another build by "Nii" I liked a few of his components. I then also felt I did not want to go too far in the "re-inventing the wheel". I saw The contact board and when I looked it up I saw that it had FIVE modes: Full power, little bit less power, low power, fast blinky, and slower blinky. I liked that, so I applied it to my own design. Its the round shaped one that I "had" heat-sink epoxy holding it down till... well never mind. You can see the rectangular shaped adjustable current driver. I read a few things how it should not be powered by two 3v batts but the specs show it needs at least five to power. It's a cheap build so I'm not too worried. I have yet to heat-sink it, but I have a lot of tiny awesome ones from work I'm going to use. So I limit myself to like a 10 sec duty cycle.

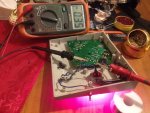
Here I am actually setting the current. I know about dummy loads, but I could not get enough info to make one for this build. I kept getting distracted by.. everything on this forum. The diodes were cheap enough that I threw the virgin diodes into the volcano! So to say. The driver maxes out at half an amp so worst case it would... Blow the diode.. Ha!
The multimeter read neg. I should have swapped leads for the pic. That's 350-360mA! As for the different modes: Less power was about 300mA and low was an awesome 30mA!

So I finally finished my first build!!
A few details before I go on. As many of you probably don't know.. I am a full time mechanic, So this little gauge wiring and tiny CB's were a huge step for my patients. I am used to man-handling large/obscurely shaped objects into submission with cuts and scrapes up to my armpits. This will make more sense as you read my awesome writing.
When I first started the build I had everything perfectly laid out, organized, and looking very tidy. Well after a lot of frustration, CB contact breaking, and what seemed like an "everything going wrong/murphy's law" event I soon became very lax with the internal appearance. I mean I wasn't at work so the only people I had to please was myself and you guys, but its a first build so we will see how much crap/comments I get.
Anyways on to the pictures!!!!
The host is an original Nintendo joystick. I ordered one online awhile back. I have a lot of nerd hobbies and retro gaming is one. The joystick showed up broken... Until I had an idea!
So there is the host itself. The main aperture hole needed only light sanding for the heat sink to fall into place. Who doesn't love Mega Man 2 Or contra!!
Now I'm not going through a complete build walk through.
Here to start is how I soldered My LD to my... sigh... way-too-big-never-gonna-use-again wiring from work. I like to keep the module/LD in the heat-sink while I solder for better heat dissipation. I also have temperature numb fingers, so right after each solder joint I would do a pinching action to further absorb heat. This particular diode is a mitsu 300-400mW 650nm that i got off ebay. 10 for 29$!!! That is also an aluminium heat-sink from survival laser that I've had sitting around for a few weeks now
Here is the battery holders that I epoxied in... again. So I didn't feel the need to clean it up.. again!!! You can also see that when I used some of my awesome RTV to hold the heat sink in that its pretty sloppy. It's called right stuff. When you get it going out of the tube sometimes it's hard to stop ha.
So this Picture shows basicly the schematic of the whole thing.. sort of. You can see the large wiring and terrible soldering. When I got some 26 gauge silicon insulated wiring from "flaminpyro" it was a new world!!! After being ready for this project and seeing another build by "Nii" I liked a few of his components. I then also felt I did not want to go too far in the "re-inventing the wheel". I saw The contact board and when I looked it up I saw that it had FIVE modes: Full power, little bit less power, low power, fast blinky, and slower blinky. I liked that, so I applied it to my own design. Its the round shaped one that I "had" heat-sink epoxy holding it down till... well never mind. You can see the rectangular shaped adjustable current driver. I read a few things how it should not be powered by two 3v batts but the specs show it needs at least five to power. It's a cheap build so I'm not too worried. I have yet to heat-sink it, but I have a lot of tiny awesome ones from work I'm going to use. So I limit myself to like a 10 sec duty cycle.
Here I am actually setting the current. I know about dummy loads, but I could not get enough info to make one for this build. I kept getting distracted by.. everything on this forum. The diodes were cheap enough that I threw the virgin diodes into the volcano! So to say. The driver maxes out at half an amp so worst case it would... Blow the diode.. Ha!
The multimeter read neg. I should have swapped leads for the pic. That's 350-360mA! As for the different modes: Less power was about 300mA and low was an awesome 30mA!
Attachments

Last edited:


") \
\