Welcome to Laser Pointer Forums - discuss green laser pointers, blue laser pointers, and all types of lasers
How to Register on LPF | LPF Donations

Navigation
Install the app
How to install the app on iOS
Follow along with the video below to see how to install our site as a web app on your home screen.
Note: This feature may not be available in some browsers.
More options
You are using an out of date browser. It may not display this or other websites correctly.
You should upgrade or use an alternative browser.
You should upgrade or use an alternative browser.
wtb coustem host
- Thread starter glona
- Start date


daguin
0
- Joined
- Mar 29, 2008
- Messages
- 15,989
- Points
- 113
glona said:this is to nay one who has access to a lathe i have afew designs i wont to see if someone could try and do on a lathe il pay for your tiem and materials let me know and il show you the designs
:-?It boggles the mind :-?
Peace,
dave
Kenom
0
- Joined
- May 4, 2007
- Messages
- 5,628
- Points
- 63
Re: wtb custom host
Your best bet is to take it to a machine shop and have them do it for you. I'll be the first to tell you that those that have the lathes don't have the inclination to take on projects like this as it's just not worth thier time. Now a machine shop however will love to take your money.
Love the comment Dan, it does indeed boggle the mind.
daguin
0
- Joined
- Mar 29, 2008
- Messages
- 15,989
- Points
- 113
Re: wtb custom host
You're incorrigible. However, on you it looks good")
Peace,
dave
Kenom said:Love the comment Dan, it does indeed boggle the mind.
You're incorrigible. However, on you it looks good
Peace,
dave
- Joined
- Mar 14, 2008
- Messages
- 1,402
- Points
- 0
glona said:ok i found a nabor i know pretty good hes got a mini lathe so i got a question how do i set up the clicky switch nad spring thing from the driver in the aluminem barrel ? i could never figer out how it worked
*sigh*
glona said:Ok, I found a neighbor that I know pretty good. He's got a mini lathe. So, I have a question. How do I set up the clicky switch and spring thing from the driver in the aluminium barrel? I could never figure out how it worked.
Kenom
0
- Joined
- May 4, 2007
- Messages
- 5,628
- Points
- 63
hahaha some people just never learn.
V
V1.15
Guest
You simply connect the spring on the end of the vacuum waabulator to the negative lead to the switch. Follw that lead out of the switch and solder it on to the side of the laser diode bearing. That bearing should mesh up inside of the photon transmittal board. If you soldered the negative lead to the current stabilization portion of the diode case, make sure you un solder it, or the diode fluid could leak out and then your nice BR diode is useless. Look into the window on the top of the diode can (not powered of course - BE SAFE!) to see if you can tell if there is any seperation of the window from it's screen and storm shutters - if there is seperation, you will need to replace the diode fluid (or have it replaced if you don't know how).glona said:ok i found a nabor i know pretty good hes got a mini lathe so i got a question how do i set up the clicky switch nad spring thing from the driver in the aluminem barrel ? i could never figer out how it worked
Drill a hole in the endcap and glue in a switch. Use plenty of glue, you don't want it coming back out. Glue it in. Use more glue. Be sure is it REALLY glued in there. Safety is a priority in this step. Now take those wires off the switch, and connect them to the battery. I find if you wrap the wires aroud the batties that this whole thing will work much better. Use more batteries. It wouldn't hurt ot add more glue at this stage. Use some tape to keep the glue in. Leave the tape on until the glue hardens. Connect that to the hexavalent copolymer lead of the laser - and don't forget to ground it, or it won't work right.
If you followed these directions correctly, you are ready to slide that whole assembly into the coustem host [sic] and add some batteries. If you were very careful and didn't upset the static collector grid of the diode's posthypnotic region you should be ready for some fireworks!
Be sure to take lots of pictures and videos along the way to document the build. This way, if it doesn't work, you will be able to post some pics (and hey - those are worth a kilo-word I am told
") ) along with your text so we can help you more.
) along with your text so we can help you more. Good luck on the build. I can't wait to see it!
ok gang - I don't know any history about this, but might it be that English is not Glona's native language?
if you don't know the answer to that, maybe it would be more helpful to tackle the real issues presented - if Glona's just not making sense, that would be different from not being able to convey it clearly - eh? There are plenty of posters around here with perfect grammar and spelling that need to rtfm, among other things. If Glona's one of them, then have at it - otherwise maybe consider lightening up a bit.
Sneeze,
DanQ
Kenom
0
- Joined
- May 4, 2007
- Messages
- 5,628
- Points
- 63
He's from the states and is fluent in english. This is a matter of lazyness.
Ah - thanks Kenom. 30 lashes with a wet blanket for me.Kenom said:He's from the states and is fluent in english. This is a matter of lazyness.
and to lazy lazer lovers:

and

rog8811
0
- Joined
- Jul 24, 2007
- Messages
- 2,749
- Points
- 0
I would guess dyslexeia diclextier dyclesstier word blindness is a part of the problem, I work with people who send e-mails that are very similar
To the point in question though, most of these small clicky swiches have 4 prongs sticking out, opposite the push button.
You need to find out which are paired up to make contact, let us call the pairs A-A and B-B. Fold an A and a B back down the body of the switch. you will need to then drill the cap, that it fits into, to a size that is a good tight fit to make these pins press against the aluminium.
The other pins are folded together on the back of the switch and the spring is soldered to them (springs are usually chome plated steel, you need to file through the plating to get the solder to stick).
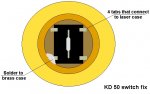
If the above is still confusing I will do a picture for you....in fact below is one I did showing how to mod the switch on a KD50 to get better contact... it is similar to what I tryped above except that switch has 6 contacts not 4.
Regards rog8811
To the point in question though, most of these small clicky swiches have 4 prongs sticking out, opposite the push button.
You need to find out which are paired up to make contact, let us call the pairs A-A and B-B. Fold an A and a B back down the body of the switch. you will need to then drill the cap, that it fits into, to a size that is a good tight fit to make these pins press against the aluminium.
The other pins are folded together on the back of the switch and the spring is soldered to them (springs are usually chome plated steel, you need to file through the plating to get the solder to stick).
If the above is still confusing I will do a picture for you....in fact below is one I did showing how to mod the switch on a KD50 to get better contact... it is similar to what I tryped above except that switch has 6 contacts not 4.
Regards rog8811
Attachments