Welcome to Laser Pointer Forums - discuss green laser pointers, blue laser pointers, and all types of lasers

Buy Site Supporter Role (remove some ads) | LPF Donations

Links below open in new window

FrozenGate by Avery

Using a DC/DC converter to power the laser

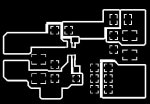
this is the pcb im using. i have provided room for large 100uF tantalums, which made the whole pcb much bigger. i shouldnt have done that as the tiny 10uf ceramic ones are adequate. also, the thermal reliefs in the copper pour increase the path the current has to travel, which calls for more parasitic loops and spikes. the placemet of the output capacitor is also very critical.. anyway, enough of self-criticism. im going to redesign this w/o those huge tantalum pads in parallel.
 

Attachments

  • pcb.jpg
    pcb.jpg
    23.3 KB · Views: 172


phenol said:
this is the pcb im using. i have provided room for large 100uF tantalums, which made the whole pcb much bigger.

im going to redesign this w/o those huge tantalum pads in parallel.

I also left space for larger capacitors, but my board came out small enough.. But of course not in parallel...

BTW: Very interesting design.. It didn't make any sense to me at first, when i looked at it.. Lot's of GND plane... Did you use photosensitive boards, or toner transfer for etch resist?


Oh, one last question.. The only 100k resistors i found for R2 were the smallest possible package and i don't think they are 1%.. Do you think this is critical?

For R1 i found bigger ones, and they'll be in parallel, so the current won't be a problem.
 
i used the toner transfer method. took me 10 trials to come up with a usable imprint. i guess i didnt use the corrent paper. instead,i used a glossy page from a magazine that wasnt even blank, to begin with :P. the toner didnt quite like the nitric acid, tho. it began falling off soon after the pcb had etched completely.
as for R2, use any resistor in the kohm range u can find. it need not be 100k, let alone 1% :o . DIM is a high Z input for PW-modulated pulse trains. in this configuration it is always high because the resistor conncts it to Vin. it can be used to decrease the current. if unused, R2 keeps the input high, and the chip pumps the max current set by the shunt.
 
phenol said:
i used the toner transfer method. took me 10 trials to come up with a usable imprint. i guess i didnt use the corrent paper. instead,i used a glossy page from a magazine that wasnt even blank, to begin with :P. the toner didnt quite like the nitric acid, tho. it began falling off soon after the pcb had etched completely.
Buy some printable labels, and use the waxy backing sheet... Just make sure this sheet is in one piece.. If the label is A4 size, the backing is usually in more pieces, but if there are more labels, the backing sheet is in one piece...

It transfers perfectly.. Unfortunatelly it's sometimes hard to print on - the toner won't stick to it (which is also the reason why it transfers so perfectly)..

But i figured out a trick, to make it stick - Print the PCBs, and scratch them off with a credit card untill all the toner is off, and clean with a dry paper towel, untill clean.

When you print for the second time, the toner sticks! Then, after the ironing, you just wait till everything cools off, and pull the waxy sheet away.. If there are areas where it didn't transfer fully, iron some more, let cool and peel of...

If done properly, there is no toner on the waxy sheet afterwards, it's just pink, where it used to be....


as for R2, use any resistor in the kohm range u can find. it need not be 100k, let alone 1%  :o . DIM is a high Z input for PW-modulated pulse trains. in this configuration it is always high because the resistor conncts it to Vin. it can be used to decrease the current. if unused, R2 keeps the input high, and the chip pumps the max current set by the shunt.
Ok, thanks... I have 100 kOhm resistors, but they are very small, this is what i was worried about..

Ok, enough talk, i'm gonna start working now.
 
phenol said:
i used the toner transfer method. took me 10 trials to come up with a usable imprint. i guess i didnt use the corrent paper. instead,i used a glossy page from a magazine that wasnt even blank, to begin with :P. the toner didnt quite like the nitric acid, tho. it began falling off soon after the pcb had etched completely.
I have transfer paper and usually use it, but a couple of times I've had a laser-printed copy of my board but didn't want to go down to Kinko's just to copy it onto the transfer paper. Then there was the time before, when I resisted buying the special stuff and was in a hurry... so I've successfully used plain paper.

The amount of time, heat and pressure you use are critical. Haven't tried this, but it seems like labels - the actual label, not the backing - might be good. But you also need to be very careful to get the paper, of whatever kind, to let go of the 'ink' - which means water or whatever needs to get under there before you start pulling the paper off.

But the easiest way is to break down and get some transfer paper, which is not very expensive and goes a long way.

DanQ
 
danq said:
The amount of time, heat and pressure you use are critical. But you also need to be very careful to get the paper, of whatever kind, to let go of the 'ink' - which means water or whatever needs to get under there before you start pulling the paper off.

But the easiest way is to break down and get some transfer paper, which is not very expensive and goes a long way.

I've seen that transfer paper, but now that i figured out, how to use the label backing with perfect results, i don't intend to buy it..

I just made another transfer, this time i didn't print, scratch of and print again, but just scratch the label backing and wipe it with a paper towel, and it printed perfectly..
And the best thing is, that i don't have to soak it in water to get it off.. I just peel it off, and the waxy sheet is empty, with all the toner on the board.

I don't see, how anything could be easyer than this..


Those special modded laminators, that company sells would be good to have tho... No guesswork about pressure and time, and always consistent results....


Haven't tried this, but it seems like labels - the actual label, not the backing - might be good.
Are you sure you didn't misunderstand this? Or someone who misunderstood it told it to you this way, but you're supposed to use the waxy label backing.. I don't see why labels would be any better than plain paper.


Look at this link: http://www.spambutcher.com/art7/900117/
 
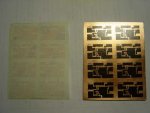
Just look at these results.. No soaking and a perfect transfer. You can still see, where the toner was on the label backing (where it's pink), but now everything is on the board..

Before printing, i scratch the label backing with a credit cards edge and then wipe it with a paper towel, so the toner attaches to it during printing (otherwise it won't stick evenly)..
Then i warm up the board for half a minute, apply the label backing, and iron it for a couple minutes, with a lot of pressure.
Then i just wait for it to cool down and carefully peel the waxy sheet off.


It's amazingly simple and very effective. I don't think that special paper can do any better..
There are only a couple of tiny spots, that i have to retouch with a permanent marker.

On the first try, i even sucessfully transferred tiny 0.5 - 1mm letters, and they were then visible in copper after etching, even tho they were only made up from a few pixels.. Here i removed them, but i left the National logo, and the inscription "LM3410 X1 - PCB" and it's visible (0.3mm high letters).


The only way, this could be made better, is by using that special sealing film, that attaches to the toner.. I actually have this film from a stamp making kit, where you also needed a laser printer or copier toner, and the film sticks to it and seals it.. But for these boards, i can do that with a marker. I would only use that for a larger volume, but for that i use the factory anyway..
 

Attachments

  • Label_backing_transfer.JPG
    Label_backing_transfer.JPG
    33.7 KB · Views: 142
:o thats too good to be true. the first paper i tried with was exactly label backing. the toner did stick to it but i could easily peel it off with a nail. now im wondering why it didnt transfer to the PCB...maybe i didnt apply the exact pressure long enough...mayb the pcb surface had poor adhesive properties... or the HP toner sux. next time im going to preheat the pcb
 
that does look good... I'll have to try it. Actually just came back from OfficeMax, where I picked up a Samsung laser printer for just $60. The replacement cartridges cost $80!!!
It was either that, or an HP for $100 with cartridges at $60 ::)

So I guess when this cartridge goes out, the printer gets replaced and disassembled for parts. The world is crazy.

DanQ
 
phenol said:
:o thats too good to be true. the first paper i tried with was exactly label backing. the toner did stick to it but i could easily peel it off with a nail. now im wondering why it didnt transfer to the PCB...maybe i didnt apply the exact pressure long enough...mayb the pcb surface had poor adhesive properties... or the HP toner sux. next time im going to preheat the pcb

These boards are actually the first time, that i ever etched my own circuits... And i'm amazed by the results myself.. The first try was almost exactly as succesfull.. The second was not, because i heated the board so long, untill the copper separated, but the third was perfect, as you can see...


Yes, you can scratch the toner off the label backing with a nail.. That's why it transfers so good, after ironing.. The only time it didn't transfer well was, when i was peeling it off warm. How did you do it? EDIT: Oh, you didn't pre heat the board! that's the problem... When you preheat the board, the sheet immediatelly sticks to it.

Oh, and i use steel wool (what's it called?) to scratch the entire pcb, before transfer of course, so it's surface is rough.. Then i clean it with alcohol, after that it's just the standard transfer practice:

- scratch the board with steel wool in circles, to make it's surface less smooth and then clean with alcohol (or any other solvent)
- 30-40 seconds warming up the board with the iron, and lots of pressure, moving it around, to heat it evenly
- carefully apply the sheet, so that it's perfectly flat
- put another paper over it and iron for around 3 minutes with a LOT of pressure, moving the iron around to heat evenly
- let it cool off completelly! (the page i linked to recommends doing it warm, but i ruined a board this way.. cold is better)
- peel off
- remove toner with acetone and the steel wool thingy


And if there is an area where it didn't transfer well, put it back, iron some more, cool down and peel off. (but i didn't have to do this even once)

Moving the iron around is important, because it is not evenly hot itself.. I measured the steel plate with an IR thermometer, and there are hot spots, and cooler spots..

When done properly, the label backing sheet comes off almost by itself and you only have to fix some minor spots with the marker, as you can see in the pic.


My main problem was, that the toner didn't want to stick to the label backing in the first place.. But i already explained the solution for that.
At first i printed, scratched the ink off, cleaned with a paper towel and printed again on the same area, but then i decided to see, what happens if i just scratch the label backing with a credit card and wipe it with a paper towel (before printing anything), and it worked just as well, or even better.


It works so great, that i think i'll use it for work, when smaller numbers are required...


I just need to find a better label backing.. This one is very old, and has labels for cassetes. Unfortunatelly, this means it has indentations, where the cassete shaped cutouts are.. This sometimes causes rounded lines, where the toner doesn't transfer. I think the less labels on the sheet, the better, but A4 labels sometimes have the backing in three parts, which is useless.
 
it sucks being on the other side of the world in another time zone!

here is how I transfer my boards.
my parents are sign writers, so i use the waste backing paper they use for signs.
to get the toner to stick, i get a semi-damp paper towel and wipe the paper, pushing down.
then just tape a piece of the paper to some A4 paper with masking tape and print.

to iron it on, i place the paper on the board and put a couple of layers of normal paper on top. i have my iron set to the second highest setting and i then just put the iron on, letting everything warm up. after half a minute, i move the iron around, pushing down. a minute of this should be enough. then i use the edge of the iron to push down on the middle of the layout to make sure it is all stuck down. let it cool a bit and inspect your work by pulling up the edge. if it didn't all transfer put the paper back down and try again.

any large areas that look a bit dodgy, touch up with a sharpie.

to etch my boards I use Ammonium Persulphate. which is great stuff. its not reusable, but it is far more safe than ferric chloride. I just use 1 teaspoon of powder for boards of this size. if you keep the etchant hot, it will etch in around 5 minutes. another bounus is that the liquid is clear so you can see when the boards are done
 
woop said:
it sucks being on the other side of the world in another time zone!
Where are you from, anyway?


to iron it on, i place the paper on the board and put a couple of layers of normal paper on top. i have my iron set to the second highest setting and i then just put the iron on, letting everything warm up.
Do you preheat the board, before applying the label backing? That seems to be very important.. Scratching it up is important too..

I was lucky to stumble on the correct instructions the first time.. (that page i linked to above)


to etch my boards I use Ammonium Persulphate. which is great stuff. its not reusable, but it is far more safe than ferric chloride. I just use 1 teaspoon of powder for boards of this size. if you keep the etchant hot, it will etch in around 5 minutes. another bounus is that the liquid is clear so you can see when the boards are done
Is Ammonium Persulphate the same as Natrium Persulphate (or Sodium(?) Persulphate)? This is what i have, but one teaspoon doesn't do sh**..

During the first etching it simply didn't want to do anything, untill i dissolved some more in hot water and added it on top.. For the second etching i used the old solution and just warmed it up, but i guess not enough, cos it again took VERY long to etch completelly..

On the box it says 200g/l, since i used less water i calculated how much i need, but i ended up using way more.. I think what i did wrong was not to heat it up enough.. After pouring it into a bottle and heating it in a microwave it etches very fast tho..

But i don't see why it wouldn't be reusable.. As long as not all of it reacts with the copper, it should still etch well. Not with one teaspoon of course, but i have MUCH more in my solution, so i guess next time i'll just warm it up longer.
 
i use diluted nitric acid as etchant. it is very quick, transparent /deep blue with Cu(NO3)2/ and reusable. I have been using the same solution for over two years with as many as 20-40 etchings. however, i have found that any marker pen i have used cant resist its action - it simply peels off from the board exposing the protected area underneath. the same with toner. i was lucky, though, to have it last until the xposed areas were etched completely.
 
as with any etchant, the hotter it is the faster it works. when mine cools down too much, i put the container in boiling water to heat it up again.
on the bottle of Ammonium Persulphate it says not to reuse once mixed. it instructs to use 1 part to 5 part water and etch at 75C
'sharpie' brand markers seem to work well
maybe nitric acid isn't the best etchant for toner transfer.

I put together a new board today. with the bootstrap circuit. i powered it up to see if it works (it does) but i haven't tested voltage range of efficiency. i will do that tomorrow (its 11:00PM here) the new board also has tantalum and ceramic output caps, hopefully that will take out most of the spikes. and its also double layer, with the link for feedback on the bottom, i just used a dremel to make that track.
I think most of the power loss is in the main diode as it gets noticeably warm after a minute.

oh and I am in Australia.
 
woop said:
as with any etchant, the hotter it is the faster it works. when mine cools down too much, i put the container in boiling water to heat it up again.
on the bottle of Ammonium Persulphate it says not to reuse once mixed. it instructs to use 1 part to 5 part water and etch at 75C
'sharpie' brand markers seem to work well
Mine is Natrium Persulphate, and it doesn't say not to reuse.. It only says that it gets weaker when reused, and also, that it works best at 45-50°C


I put together a new board today. with the bootstrap circuit. i powered it up to see if it works (it does) but i haven't tested voltage range of efficiency. i will do that tomorrow (its 11:00PM here) the new board also has tantalum and ceramic output caps, hopefully that will take out most of the spikes. and its also double layer, with the link for feedback on the bottom, i just used a dremel to make that track.
I think most of the power loss is in the main diode as it gets noticeably warm after a minute.
That sounds great! Can't wait to hear about the results...

The datasheet does say, that the diode gets warm and to put it away from the IC because of that, and also, that it can be the source of most of the losses, if not selected properly..

Which diode are you using? The 5817?

BTW: How many of these circuits did you build so far? Did you ever get a short or a bad connection under the IC?


oh and I am in Australia.
How come everyone from OZ i meet online works with electronics?

A while ago i was arranging for some PCBs to be made in my country for someone from down under..
Unfortunatelly it didn't work out well in the end, because even tho it was just as cheap as in China, they weren't able to make the PCBs thin enough, without the danger of the traces breaking...
 
Which diode are you using? The 5817?
I don't know, a smd schottky diode from some SMPS, it seemed to have a low forward voltage when tested with my multimeter.

BTW: How many of these circuits did you build so far? Did you ever get a short or a bad connection under the IC?
thats two now. i haven't had a short yet, but i did have to put this one back in the oven because the chip wasn't sitting flat. and resolder the pins by hand to make sure the connections where ok. all in all it hasn't been as hard as i expected, soldering a chip with no pins...


Back
Top