Welcome to Laser Pointer Forums - discuss green laser pointers, blue laser pointers, and all types of lasers

LPF Donation via Stripe | LPF Donation - Other Methods

Links below open in new window

ArcticMyst Security by Avery

Super Cheap 1.5V DIY Driver!

Joined
Jan 12, 2008
Messages
3,290
Points
83
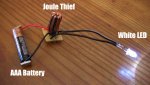
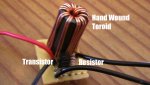
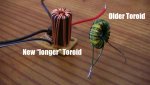
Then it would be easier if I just went to my ol school and did some tests there ;). The schematic is right up front, and it isn't very complicated to put together (tho winding the toroid is tricky).

Here is a great tutorial how to make the original circuit, pay extra attention to the toroid part:


Joined
May 4, 2009
Messages
2,216
Points
83
^ That vid is what i say that made me want to build one of these little circiuts in the first place
 
Joined
Sep 1, 2009
Messages
108
Points
0
This is very close to a Bedini circuit. It looks like you are trying to get rid of the radiant energy spikes with the caps. The smaller to keep the energy constant and the 50V to handle the big spikes.

I'm a novice so forgive my question if it seems silly. Can you explain the schottky diode?
 
Joined
Jan 12, 2008
Messages
3,290
Points
83
Yes my idea with the small cap is to short the very big spikes to GND and the big cap to smooth the ripple and act like a reservoir. The schottky diode only lets the reservoir cap gets charged from the the transistor when the pulse is high, and not lead the charge back into the transistor when the pulse is low. I don't think a normal 1n400X diode is fast enough.
 
Joined
Nov 22, 2008
Messages
1,506
Points
48
If I can find a Schottky diode, I'll build one and give it a test on the oscilloscope at school. I have a toroid from a PS2 power adapter, very similar to the one you have, so we should get similar results.
 
Joined
Jan 12, 2008
Messages
3,290
Points
83
That's great! If you can, please test with an 1n4001 diode and see which performs best.

When I let the circuit run with a PHR dummyload with 3V input, and short the schottky diode the light goes very dim (yes my dummy load makes light), so I know the diode does something.
 
Joined
Jan 12, 2008
Messages
3,290
Points
83
^ That vid is what i say that made me want to build one of these little circiuts in the first place
Me too, when I first saw it like a year ago I made two little flashlights from junk and forgot it.
 
Joined
May 4, 2009
Messages
2,216
Points
83
After you said that i would have better results with a longer toroid i decided to rebuild mine with just that and here it is, and sure enough, the LED is brighter :D
 

Attachments

  • JT 1.JPG
    JT 1.JPG
    118.9 KB · Views: 3,094
  • JT 2.JPG
    JT 2.JPG
    115.6 KB · Views: 939
  • JT 3.JPG
    JT 3.JPG
    113.2 KB · Views: 777
  • JT 4.JPG
    JT 4.JPG
    100.6 KB · Views: 769
Joined
Jan 12, 2008
Messages
3,290
Points
83
Good work! Adding the Schottky diode + caps, and replace the 1k resistor with a pot will make it even more bright, even destroy the LED with a little luck (lol).
 
Joined
May 4, 2009
Messages
2,216
Points
83
Thanks! I will have to try that, theres a lot of potential in this little circuit
 
Joined
Feb 29, 2008
Messages
2,344
Points
0
I'm planning to make the simple version, as seen here:
Make a Joule thief.

I'm pretty confused though. He appears to fold wire in 2, so there are 2 ends together, and then wraps it round, and has 4 at the end?

How is that done?
 
Joined
Sep 1, 2009
Messages
108
Points
0
Its pinched together for easy threading then cut to form a bi filler coil.

You can also twist two diffrent color wires together to help avoid confusion. and untwist once its all wound.
 
Joined
Nov 22, 2008
Messages
1,506
Points
48
You thread 2 wires around the toroid next to each other, so there will end up being 2 at the "top" and 2 at the "bottom". The ones at the "top" of the toroid are 1 and 3, and the bottom ones are 2 and 4.
 
Joined
Jan 12, 2008
Messages
3,290
Points
83
The video I posted earlier is the exact same thing, but it shows much more clearly how to make the coil. But the simple version is NOT good for lasers. It is purely inductive emf-spikes.
 
Joined
Sep 1, 2009
Messages
108
Points
0
/Laugh

Beat charlie by 3 secs.

I plan on doing a few this weekend, should be fun.
 
Joined
Jan 12, 2008
Messages
3,290
Points
83
Its pinched together for easy threading then cut to form a bi filler coil.

You can also twist two diffrent color wires together to help avoid confusion. and untwist once its all wound.
I wouldn't twist the wires together, it may effect the performance allot, maybe even stop working. I don't know if it's true but it kinda makes sense to me. Try not to make the wire-pairs overlap each other in the toroid.


Top