Welcome to Laser Pointer Forums - discuss green laser pointers, blue laser pointers, and all types of lasers

LPF Donation via Stripe | LPF Donation - Other Methods

Links below open in new window

ArcticMyst Security by Avery

PLD-40 Fiber coupled laser diode, for CNC cutting/engraving

Joined
May 2, 2018
Messages
1
Points
0
Hi, I have recently gained an interest in converting one of my old CNC machines into a laser cutter/engraver. I came across the PLD-40 fiber coupled laser on ebay for a price within my range, and the most power I had seen on a laser this price and size. Being quite new to lasers i did some research and figured out that this laser basically shoots a beam into the fiber optic cable. (correct me if im wrong please). Now if i wanted to use this as a Cutter/engraver, i would need to somehow focus the output of this fiber optic cable, and i am unsure of how to do that and weather or not this is actually a feasible idea. Or just tell me if i am terrible wrong.
 
Last edited:


Joined
Sep 20, 2013
Messages
17,425
Points
113
Try using the search function as there are threads and many posts concerning how to do this. Edmunds and Thorlabs have the necessary parts and fiber preparation equipment needed to terminate and add lenses to these fiber optic cables.
 
Joined
Sep 12, 2007
Messages
9,399
Points
113
Such a thing is NOT plug-and-play. Additional power, cooling, and optics need to be implemented.

Many convex lenses would work, but you'll want an air-assist system to keep the lens clean and aid cutting. You'll also need a very large TEC with associated heat sink, or a chilled water supply with a water block, and a constant current power supply with modulation input capable of over 12A at at least 4.8V. This additional hardware is going to triple your price at a minimum, or probably add a zero if you're not thrifty.
 
Last edited:
Joined
Jul 10, 2015
Messages
9,903
Points
113
Yes and your fiber will need to be terminated and polished, I recently got one and this is what my fiber looks like under magnification, I'm currently waiting for tools, I did find some bargains, here's just some of what I have bought.

59989d1525335414-pld-40-fiber-coupled-laser-diode-cnc-cutting-engraving-sany2471.jpg


59990d1525335414-pld-40-fiber-coupled-laser-diode-cnc-cutting-engraving-sany2478.jpg


12219-fiberend3.jpg


12218-fiberend2.jpg


https://www.survivallaserusa.com/Ea...5_Laser_Safety_Goggles/p1667092_11309188.aspx

https://www.ebay.com/itm/W1209-12V-...e=STRK:MEBIDX:IT&_trksid=p2060353.m2749.l2649

http://vi.raptor.ebaydesc.com/ws/eB...146&category=182022&pm=1&ds=0&t=1525338397664

I MAY NOT USE THIS DC TO DC AS IS, I'M GOING TO SCOPE IT AND LIKLEY MAKE MODIFICATIONS, you could use a blackbuck8 to get 8a, mine needs 4.8v at 12a but it is used so I may under drive it a little. Mine is a 30w so at 8a it could do 15-20w est. Also I wonder if a pair of blackbuck6 drivers in parallel would play nice ? I did just order a pair so if you know Mr. Barnett feel free to chime in.
https://www.ebay.com/itm/DC-DC-CC-C...e=STRK:MEBIDX:IT&_trksid=p2060353.m2749.l2649

https://www.ebay.com/itm/FC-6S-Prec...e=STRK:MEBIDX:IT&_trksid=p2060353.m2749.l2649

https://www.ebay.com/itm/Pen-Type-O...e=STRK:MEBIDX:IT&_trksid=p2060353.m2749.l2649

https://www.ebay.com/itm/LOT-OF-6-K...e=STRK:MEBIDX:IT&_trksid=p2060353.m2749.l2649

https://www.ebay.com/itm/Fiber-Opti...697526?hash=item1a0bc65736:g:UnEAAOSwa-dWi5Ml

https://www.ebay.com/itm/Laser-Modu...997113?hash=item1eaf2d3fb9:g:qFEAAOSw3mpXGEHU

Note: When polishing your fiber end it's best to use a puck that holds your termination with a thick mirror or sheet of glass under your 3 micron then 1/3 micron pads so they lay flat, this will be my 1st time doing this so I will see how it comes out, but I would not power up the module with the fiber in the condition received as shown in the pics above.

I bought this connector just so I would have a way to polish the end, my glass is 105um and buffer is 125um, I believe you order by the buffer but could be wrong. I will make my own lens arrangement and a mount for the terminated end that will adjust for X and Y so my lens will be parallel to the fiber end's polished face. Dust and smoke will need to be kept away from the fiber end so I am thinking of mounting my lens at the end of a tube with the fiber connector inserted into the end, a proper female connector is an option, 2 lengths of PVC ( one slipped over the other ) could be used to allow lens adjustment, it will take some hand tuning.
https://www.ebay.com/itm/322621690032
 

Attachments

  • SANY2471.JPG
    SANY2471.JPG
    175.6 KB · Views: 165
  • SANY2478.JPG
    SANY2478.JPG
    202.9 KB · Views: 165
Last edited:
Joined
Jan 29, 2014
Messages
12,031
Points
113
Thanks for giving these links, I needed to buy some of the same things for my I.P.G. fiber laser too.

Chris
 
Joined
Jul 10, 2015
Messages
9,903
Points
113
There are many different connectors and polishing pucks, luckily they are inexpensive so if we end up needing something different it's not a big deal, also this is my 1st time working with fiber but I expect to work with more of it so I will save anything not used as it may come in handy later.

This cleaner could be useful, I have seen people using them in videos to clean the terminated end, if nothing else I will add it to my watched items.

>>>> https://www.ebay.com/itm/One-Click-...itm=111647009483&_trksid=p2047675.c100623.m-1


Oh, something else, I received my new safety glasses and tested them against my 5w 808nm IR flashlight on my security cam and they stop all the light as far as what I see on my monitor, but they make a faint 2nd image when looking at something bright, like the LED streetlights, probably because of the reflective surface of the lenses, I checked my orange glasses and they also have the same effect but it's much less noticeable, do you see this with yours ?


---edit---

Also I have some crimping tools, I have one with several size holes that range from small to tiny but I have to find them, I have collected so much stuff, there are some for sale here but I may inspect the connector 1st and see that it looks correct. The teeth on a pair of long nose vise grips may substitute as well, again I will look at the connector, a build up of length of heat shrink wouldn't hurt to insure a secure attachment, but I don't mind buying the right crimp tool, if I don't already have one, the one I'm thinking of has a bunch of 6 sided and round holes ranging in size.

>>> https://www.ebay.com/itm/Pro-Ratche...815733?hash=item1c39eb71f5:g:BHAAAOxyTjNSolr9

>>> https://www.ebay.com/sch/i.html?_from=R40&_sacat=0&_nkw=st+fiber+crimping+tool&_sop=15

>>> https://www.computercablestore.com/crimp-tool-for-fiber-151-178-134-139-190-inch


I am not sure what the impact tool is doing, maybe knock in the front end ring that has a taper? I think I can use a vice and an automotive socket and a hammer LOL but seriously I bet I can get away without buying that tool.

 
Last edited:
Joined
Jan 14, 2009
Messages
1,452
Points
83
That fiber end looks like it had a bad day .

I used the large lens seen on the red projector LEDs and it gives a small spot and dose cut .

The Card was 2mm - 3mm thick , Fan was to keep lens clean .

 
Last edited:
Joined
Jan 29, 2014
Messages
12,031
Points
113
Red, agreed, as small as the IPG units are, they would fit well inside that module, I bought one of those a couple of years ago for a C-Mount.

Here's a screenshot of the video at a point where the beam can be seen focused on that piece of cardboard, although the focus of the camera isn't very sharp on the 915 nm, but you can see it:

 
Last edited:
Joined
Jul 10, 2015
Messages
9,903
Points
113
I was thinking to mount the terminated fiber into the lensed c-mount module from the back, the IPG module will need an active heat sink, I am going to use a TEC pad and a copper/aluminum fin and fan cooled sandwich with temp controller or just give the TEC 3 cells and let it run, I have 60w, 92w, and 140w TEC pads, so I could probably just pick 1 to run full tilt while the laser is on to save the space of the temp controller although a small fan should be used.

So batteries for the laser/driver 3 x 26650 and a 2nd battery pack 3 x 26650 for the TEC and fan, or 9 x 18650's is series parallel 3x3.....or 2 sets of 3 x 18650 for a small as possible short duration unit, so my handmade enclosure will include that lensed module but it can't fit everything because of the cooling needed and the batteries, as I understand it the IPG module needs to be kept around 70F while running, I was thinking about starting with a blackbuck 8 giving it's all and see what I get, but 1st I will fix the fiber end and mount in the lensed IR module and build the active heat sink for the laser then bench test with a mains supported PS and see what kind of beam I get before building it into a portable, it may need a beam expander to burn the way I want at 5 meters, so my 1st test will be for beam quality.

Playing in my fire pit at 5 meters and my wood burning art is what I enjoy the most, and I always want to play longer that I think, so I should spend the effort and size to give a decent duty cycle of several minutes, I'm not making a pocket burner but a hobby wood burner, so reasonably portable is the goal, but not pocket concealable, this is a 1st run anyway, just to see what I am working with.
 
Last edited:
Joined
Jan 29, 2014
Messages
12,031
Points
113
I didn’t plan on using a TEC for mine, was going to risk a few centigrade temp above recommended, but I did go ahead and buy a five pac of those coolers you ordered, just in case.

Looking at the close-in photo’s you took of the fiber, I think what I’m seeing is the fiber broken off inside a short mangled end of outer cladding.
 
Last edited:
Joined
Jul 10, 2015
Messages
9,903
Points
113
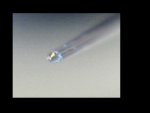
The end of the fiber is jagged, my cleaver should be here soon and I will get some pics after cleaving it and see how it looks.

Yea, I may just use a 60w TEC with a finned sink on the hot side, then a copper plate on the cold side between it and the laser module and power it on to buy some additional runtime between cooling down periods, a bit of pre chill may help but I wouldn't get it cold, maybe just 60F or so and see how fast it warms up, I will no doubt do some testing before the finish build, heck I hope the beam quality is decent, if so I may build something interesting with several of these. :D

That said the active fiber I found is really expensive, but I know they put several pumps onto a single fiber before the active fiber, so just combining three or six 25w pumps could be fun, I have seen fiber jumpers that combine 2 into 1 that are affordable, as in under 200 dollars IIRC.

I saw Dash apple had some other cool videos, seems like most of us brothers of the light also enjoy high voltage, LOL

Dash do you use any active cooling or just a heat sink on your 974 ?

----------------------------------------------------------------------------------------------------------

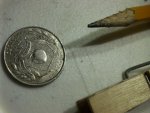
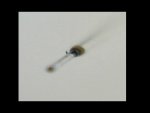
Ok I received my 18 dollar fiber cleaver and here is what the cleaved fiber end looks like, much better but still rough.

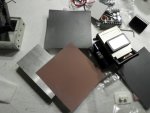
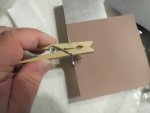
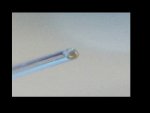
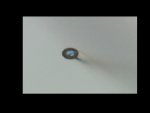
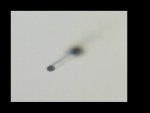
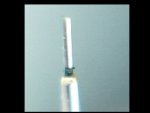
Then I picked out a clothes pin with a good looking flat edge and placed the fiber end just barley protruding from the clothespin edge and with the sand paper on top of a flat aluminum block I gave it a 10 second polish with the 600 grit then 10 seconds with super fine paper and wow did it clean up the face of the fiber, next a quick power up video clamped to a block of copper to see what it will do without a lens, safety glasses will be worn.

Also I cleaned the fiber before and after with an alcohol microfiber pad, the kind that come 100 to a box in foil packs.

60014d1525478739-pld-40-fiber-coupled-laser-diode-cnc-cutting-engraving-sany2487.jpg


60015d1525478739-pld-40-fiber-coupled-laser-diode-cnc-cutting-engraving-sany2489.jpg


60016d1525478739-pld-40-fiber-coupled-laser-diode-cnc-cutting-engraving-fibercleave1.jpg


60017d1525478739-pld-40-fiber-coupled-laser-diode-cnc-cutting-engraving-fibercleave2.jpg


AFTER POLISHING

60018d1525478739-pld-40-fiber-coupled-laser-diode-cnc-cutting-engraving-polish1.jpg


60019d1525479275-pld-40-fiber-coupled-laser-diode-cnc-cutting-engraving-polish2.jpg
 

Attachments

  • SANY2487.JPG
    SANY2487.JPG
    189.7 KB · Views: 129
  • SANY2489.JPG
    SANY2489.JPG
    169.8 KB · Views: 135
  • fibercleave1.JPG
    fibercleave1.JPG
    62.5 KB · Views: 132
  • fibercleave2.JPG
    fibercleave2.JPG
    66.1 KB · Views: 127
  • polish1.JPG
    polish1.JPG
    55.2 KB · Views: 127
  • polish2.JPG
    polish2.JPG
    63 KB · Views: 241
Last edited:
Joined
Sep 20, 2013
Messages
17,425
Points
113
My only concern is the cut it isn't normal the fiber. It is cut at an acute angle. How this might affect your beam is unknown. If you had one of those platens for polishing it, you could get a better looking cut.
 
Joined
Jul 10, 2015
Messages
9,903
Points
113
Yes I am learning as I go here and either my end was not polished clear and flat or there was a fault just behind the end, I suspect my end was not properly prepared, my connector is not here yet, so I may try again, I could almost see some opaque in the center in my last post but was not sure if that was at the tip or if I was seeing the fiber walls.......anyway I used some silicon pads to temporarily mount the module to a copper plate and set my PS at 4.5v, connected it and started turning up current, at about 4.5a the fiber began to smoke so I turned it down, then turned it up again and at 4-5a saw smoke at the fiber end and turned it down, each test was of short duration, here is what the fiber end looks like.

It is possible there was a fault behind my end as I was struggling with my fiber cleaver, I may have scored the fiber behind where I pulled it to break, my cleaver did not make the cut, I had to tug on the fiber to get it to cleave after making the score, and I did fumble with it....since I may have weeks waiting for my connector I will likely try again, it is odd where the burnt part is located.

The instructions that came with the cleaver only say to use their brand of replacement cutting wheel, and points at the screw to remove it......


60020d1525482816-pld-40-fiber-coupled-laser-diode-cnc-cutting-engraving-burnout1c.jpg


60021d1525482816-pld-40-fiber-coupled-laser-diode-cnc-cutting-engraving-burnout1b.jpg


60022d1525482816-pld-40-fiber-coupled-laser-diode-cnc-cutting-engraving-burnout1a.jpg


----edit----

Well I found a set screw to adjust my cleaver, I think I will try this again.
 

Attachments

  • burnout1c.JPG
    burnout1c.JPG
    55.8 KB · Views: 146
  • burnout1b.JPG
    burnout1b.JPG
    57.8 KB · Views: 125
  • burnout1a.JPG
    burnout1a.JPG
    69 KB · Views: 227
Last edited:
Joined
Jan 29, 2014
Messages
12,031
Points
113
Did you power it on and it burned at the end where the cladding stops? I had that happen here due to a loss of CC regulation with my power supply which is not supposed to happen, it allowed too much current to flow when I had a short interruption to my AC power here, the end of the fiber caught on fire and burned back the cladding when the current limit I set to 900 mA was lost and probably went to a few amps of current. Good news is the diode appears to be fine, just some of the cladding burned back an inch or so, I don't believe the diode went above rated drive current, but instead a problem with the fiber caused the cladding to catch fire.

My guess is the cladding must be present inside a tight ferrule (to help wick away heat too) OR perhaps the end needs to have that angle on it or reflections heat up the end of the fiber and will burn it. Maybe these high power fiber lasers need a proper termination connector on the fiber or this can happen when run at normal output. Nice pictures, thank you, this is all very helpful to me for when my stuff comes in the mail.
 
Last edited:
Joined
Jul 10, 2015
Messages
9,903
Points
113
I set my voltage limit at 4.5v and turned the current up slowly from 1a to about 4.5a and that's when the end of the fiber developed a glow and a little smoke, so I turned it down, I did have my safety glasses on.

I also noticed a smell, it appears the end was not letting the light out very well, I still have a lot to learn, but my current was in regulation, no spikes or anything, also my target that was about 1 inch away was not burning, it must be the end was not letting out the light, it's difficult to get a perfect polish without the termination to place in the puck, I will try again later as I have not slept in a while. :beer:

p.s. We appear to have the same module and they take up to 4.8v @ 12a so I doubt you hurt it with just a few amps.
 
Last edited:


Top