Welcome to Laser Pointer Forums - discuss green laser pointers, blue laser pointers, and all types of lasers

Buy Site Supporter Role (remove some ads) | LPF Donations

Links below open in new window

FrozenGate by Avery

My custom host!

Joined
Jan 14, 2021
Messages
60
Points
8
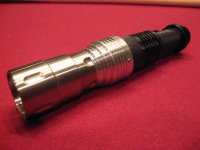
Hey guys! I finished my first custom host attempt! I pretty pleased for a first time job! I m waiting for a driver to arrive and i will fit a green 1W diode inside!
 

Attachments

  • received_880673045997970.jpeg
    received_880673045997970.jpeg
    453.7 KB · Views: 33
  • received_303284504726088.jpeg
    received_303284504726088.jpeg
    356.5 KB · Views: 31
  • received_467104618043032.jpeg
    received_467104618043032.jpeg
    213 KB · Views: 30
  • received_2954359564853447.jpeg
    received_2954359564853447.jpeg
    206.4 KB · Views: 32


Very nice. (y) Thanks for sharing your pics.
Something I like is a shrouded switch, that is an end cap with a raised rim so you reach in with a finger to turn in on, it helps prevent accidents., most flashlight housings have a tail cap with at least a semi shrouded switch....actually a rear enable with an on indicator and a side activate switch would be a great way to go for future builds. :)
 
The switch is stolen 😂 from a led flashlight and i hope it will be ok with the current.... I hope at least🤞!!! The choice of this switch was a must for the use the laser is meant to be used... It will sit on a tripod for height measurement on distance... So i just hope it will manage a 1A current!
 
@skijohn actually i did the machining on my buddy's lathe! It took almost 3 days because of mistakes we did, but now it 's finished, i can say that we can do it in 3-4 hours! Our biggest concern was the threads and our first attempts was a destruction because we had chosen wrong gears for the pitch 😂 but now i m pretty confident that it relatively easy!
 
One more mistake of mine is that i chose a Φ40 and Φ50 aluminium diameter and it was too much. With a Φ30 rod we could have run away from a lot of machining!
 
Hi,
Nice host done well machine on a manual lathe takes time , rushing is a recipe for disaster . As Red Cowboy said a latching switch thats set deeper prevents accidents . But good job for what you had on hand. I set switches deeper for safety reasons or deep enough to stand the host upright.
Rich:)
 

Attachments

  • 7C7DAA1B-0F6C-4951-BE17-9A2A2CF2D06A.jpeg
    7C7DAA1B-0F6C-4951-BE17-9A2A2CF2D06A.jpeg
    218.3 KB · Views: 4
  • 66339471-DAD6-442B-886F-5AE1933AE8CA.jpeg
    66339471-DAD6-442B-886F-5AE1933AE8CA.jpeg
    200.7 KB · Views: 3
  • 06257215-4CCB-4783-AD4B-39001A320006.jpeg
    06257215-4CCB-4783-AD4B-39001A320006.jpeg
    176 KB · Views: 3
Hi,
Thank You , I powder coat some of my hosts. Powder coating is much more durable than anodizing. And you dont need an electrical current or caustic dangerous liquid to achieve a finish . Powders come in a large range of colors and finishes .
A 16mm or a 19mm latching switch will cover the load for the NUBM44-V2 diode. Mamazon or Flebay carries them, Then all you will need is the correct drill and bottoming or tapering tap.
You can check out my builds by clicking on the number 86 and scroll through for some ideas.
Good luck with you machining , always take your time and step back if in doubt. Mistakes cost al lot of wasted time I learned through the years. Then you will know what tooling and machinery you will need.Enjoy and be safe always.
You can also machine adapters for Beam expanders to fit over the front of the host secured by nylon tip set screws .
Rich:)AF150730-397C-4BFA-87FE-B07518746FFA_1_105_c.jpeg
 
That's nice to hear about latching switches... I have bought a couple 19mm Lanboo switches from AliExpress with up to 6A DC current rated and i thought it s impossible... But now i believe that their datasheet is legit!
 
Sharing some high power handling switch build ideas.

I make my switches using a PCB from convoy, a 10A fwd clicky sw, a bronze phosphr spring with a brass contact button, and solder wick inside the spring from the button to the PCB to handle current so the spring doesn't over heat. All parts from aliexpress.

I make the switch housing from scratch, which would work great on your host. The button is recessed and I make a cap that can be attached for additional safety when not in use.

The hosts I use dont have a tail sw so I bore out and thread the stock host tail cap to fit the custom sw module. The sw module is removable without removing the tail cap, which can be an additional safety measure to keep kids from using the laser.

I retain the hosts forward sw to change modes and the OEM battery monitor works.
 

Attachments

  • IMG_3055.jpeg
    IMG_3055.jpeg
    1.6 MB · Views: 3
  • IMG_3056.jpeg
    IMG_3056.jpeg
    1.1 MB · Views: 3
  • IMG_3057.jpeg
    IMG_3057.jpeg
    1.2 MB · Views: 3
  • IMG_3058.jpeg
    IMG_3058.jpeg
    1.1 MB · Views: 3
  • IMG_3059.jpeg
    IMG_3059.jpeg
    1.2 MB · Views: 3
  • IMG_3060.jpeg
    IMG_3060.jpeg
    1.8 MB · Views: 3
  • IMG_3061.jpeg
    IMG_3061.jpeg
    428.9 KB · Views: 3
Since you've obviously mastered cutting threads, you could easily reproduce something like the switch module I make.

The host you made is awesome! Just need to work on the switch.
 
Lol derrr no I didn't notice this was a dead 2021 post! Got me again 🤣
 
Last edited:
I deleted the first two necro posts because they didn't add anything. Necro posting should be fine as long as new information is added.


Back
Top