Welcome to Laser Pointer Forums - discuss green laser pointers, blue laser pointers, and all types of lasers

LPF Donation via Stripe | LPF Donation - Other Methods

Links below open in new window

ArcticMyst Security by Avery

Kenbarrel open can 270+mW laser build photos

drlava

0
Joined
Mar 7, 2007
Messages
1,152
Points
0
Hi guys, I'm happy to post some photos of my completed kenbarrel kryton tube build. This is with a long die open can diode and custom switchmode PSU, glass lens. Total cost: over $100 counting broken diodes leading up to it, etching materials, and parts!

driver.jpg

barrel1.jpg

barrel2.jpg

kenbarrelbeam.jpg

My camera just doesn't do the beam justice! In real life it looks much brighter for some reason.
metering.jpg


The PSU is a custom switchmode PSU designed to completely drain the batteries before output power decreases at all. Once the batteries are totally drained, the laser turns off. Versions of it may be available in the future as 'lavadrive2'


Joined
Oct 27, 2007
Messages
320
Points
0
Hi drlava, please post here your schematic diagram of your work of art laser, please include the parts and the input voltage needed. is this driver can run BRLD read or write? please i need your help :-/ specially on building the BR laser burner, using LG 4x BR burner drive, actually i have a thread on experiments and modification category, thanks.
 

drlava

0
Joined
Mar 7, 2007
Messages
1,152
Points
0
the driver can run BRLD, it is a current mode driver, and the schematics aren't available as
1) It is too complex of the typial DIYer
2) I have put considerable time into it and plan on making assembled versions available in the future.
3) don't want some other person or company taking off with it and profiting on my work
 
Joined
Aug 15, 2007
Messages
1,880
Points
0
adgmeijin said:
Hi drlava, please post here your schematic diagram of your work of art laser, please include the parts and the input voltage needed. is this driver can run BRLD read or write? please i need your help :-/ specially on building the BR laser burner, using LG 4x BR burner drive, actually i have a thread on experiments and modification category, thanks.

My drivers that come with the kenom barrels are capable of running read or write 405nm diodes. I have a limited quantity available at the price of $6 each. I'm also working on that boost circuit schematic to send you.
 

chido

0
Joined
Dec 4, 2007
Messages
1,918
Points
0
That's nice, I just wish I had gotten in on the barrels GB, and how come you got yours before everyone else? :-? ::)
 

drlava

0
Joined
Mar 7, 2007
Messages
1,152
Points
0
Big thanks to Kenom for making the barrels possible and working with the machine shop. I got mine already because I told him not to wait for bluefusion to send him drivers and just send the barrel.
 
Joined
Feb 22, 2008
Messages
20
Points
0
you say you are planning of making fully built one's available in the future? Because i want one now, Paypal ready, pm me
 

Kenom

0
Joined
May 4, 2007
Messages
5,629
Points
63
Very impressive lava. Any secrets to share pertaining to the barrels you've found. Ie. press fit secrets, lens is glass does it sit below the recess, how hot does it get at that high a output power. I know the threads were an issue for you with this one (my fault for not chasing the threads with my tap before sending it to you) Was there enough room in the driver chamber for you to use it, Did you have to do anything special in order to prevent the spring from shorting to the battery stop at the top of the battery chamber. You know basic stuff like that.
 

drlava

0
Joined
Mar 7, 2007
Messages
1,152
Points
0
Kenom said:
Very impressive lava. Any secrets to share pertaining to the barrels you've found. Ie. press fit secrets, lens is glass does it sit below the recess, how hot does it get at that high a output power. I know the threads were an issue for you with this one (my fault for not chasing the threads with my tap before sending it to you) Was there enough room in the driver chamber for you to use it, Did you have to do anything special in order to prevent the spring from shorting to the battery stop at the top of the battery chamber. You know basic stuff like that.

great questions.
The press fit is VERY tight, pressing the diode was a hair-raising experience, even with the proper sized pressing tool. tips: get a tool that is just smaller than 5.6mm and has a wall thickness of about 1mm to press the diode in.

The glass lens does sit just below the lip, it would be nice to have a rubber dust cap to put on when not in use.

There was plenty of room in the driver chamber to fit most any driver, it's downright roomy in there.

I taped a ring of electrical tape around the positive contact spring to make sure it doesn't touch the walls, also the spring was cut down to have only 1-2mm of compression when assembled so that minimal force would be transferred to the board.

The clicky is loose at the bottom, if I press too hard it pops up, also if you don't center the clicky spring on the batteries when you put the tailcap on, it rolls to the side and can short to the case, turning the laser on even if the clicky isn't on. Cutting the spring shorter will solve this one, but the clicky would really have to be secured in place then because there would be even less spring force holding it down.

The barrel is coated, and not buffed.
 
Joined
Oct 28, 2007
Messages
2,631
Points
48
very nice!

how much did the laser itself cost, not including the materials used to make the PCB, or any killed diodes? just the diode + lens + driver components (not including the board itself and etching materials ETC.) + barrel + coating, etc.


gratz,

amk
 

drlava

0
Joined
Mar 7, 2007
Messages
1,152
Points
0
amkdeath said:
very nice!

how much did the laser itself cost, not including the materials used to make the PCB, or any killed diodes? just the diode + lens + driver components (not including the board itself and etching materials ETC.) + barrel + coating, etc.


gratz,

amk

Ok, here's an estimate of what the part cost is:

barrel: 45
coating: 5
barrel shipping: 5
dvd burner+ship: 30
circuit components: 10
lens: 6

total: $101
 
Joined
Dec 13, 2007
Messages
264
Points
0
.

  Nice!
           :cool:

Can't wait for mine, glad I got in.
                  :eek:

$100 isn't bad for a 250mw+ red laser.
              (Plus Batteries)
                       ;D

I think I am going to buff mine out shiny.
Then use tinted red clear powder-coating for a nice shiny/red/chrome look.  ;)

But all the GB waits are killing me!
                       ::)

Keep up the good work Dr.L...
                   [smiley=thumbsup.gif]

Best Regards,
Joenobody
     Joe

     :)

.
 

Kenom

0
Joined
May 4, 2007
Messages
5,629
Points
63
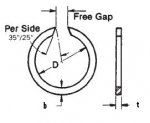
OK here's what I'd recommend as a solution for holding the clicky in place.  there is a recess inside the barrel where the clicky fits above it for a snap ring, or a constant section retaining ring I've posted a picture below of a constant section retaining ring below to illustrate what they are for those that don't know.

You can find these at most hardware stores. Just find one that is slightly larger than the inside diameter and compress it, push it down into the recess (groove) and it will hold the clicky in place without having tension from the spring. If you get too large a ring though it will make contact with the side of the barrel and the spring shorting out the barrel and making it constantly on. This problem is going to get resolved in the next run as were going to make a button hole up top instead of on the bottom. I'll be posting this in the GB thread as well.
 

Attachments

  • product_spec_xan.jpg
    product_spec_xan.jpg
    9.1 KB · Views: 115


Top