Welcome to Laser Pointer Forums - discuss green laser pointers, blue laser pointers, and all types of lasers

Buy Site Supporter Role (remove some ads) | LPF Donations

Links below open in new window

FrozenGate by Avery

How do I tear apart a

Joined
Jan 23, 2009
Messages
2,113
Points
0
How do I tear apart a KD 50mW version 1. I know that at least one of u guys know how! :)
Thanks for the help.


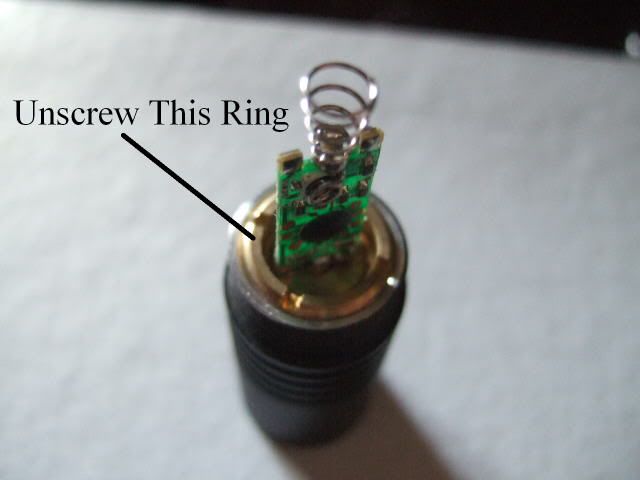
Do you want to remove the module? If so, unscrew the top head from the middle body, then unscrew the brass ring holding the module in place, and there ya go :D
 
not to sound like an itiot, but what brass ring are u talking about?
Also can this module be replaced with an O-Like module?
 
Last edited:
This should help - the ring with the 4 grooves needs to come out (counterclockwise) and the module will then slide straight out the rear

kd50_ring.jpg
 
I took out the foam and Looked at it. It doesn't have a brass ring on it like yours. It almost looks like it was pressed into the host and then glued in place.
 
Looks like they might have changed the design or are getting these from another vendor - sometimes (and don't quote me here as I haven't seen the actual setup you have) you can use an Xacto (or something with a sharp stiff blade) to chip off the epoxy and then carefully wiggle the module out the rear, but thats entirely to be attempted with discretion as you risk danaging the module and/or driver if you aren't extremely careful...

Just goes to show that there are always compromises involved with keeping prices down, you wouldn't think another minute of milling and a 4 cent brass retaining ring would be eliminated to keep costs down, but it looks like they have...

Sorry I couldn't help more, Amigo - on the upside though you seem pretty happy with the laser, so there's always that!
 
Sorry I couldn't help more, Amigo - on the upside though you seem pretty happy with the laser, so there's always that!

To be honest, I am getting rather frustrated with this laser. When I turn it on, it may or may not turn on to full power. If it doesn't, then I have found that I have to tap the host on to something just to get the laser to work. It now seems that the switch isn't my problem and that there might be a bad soldering joint or a short somewhere in the driver.

This just makes me want to tear it apart even more!

That same thing happened to me it might be that the batt. is shorter by mm than others of the same type...

That is Chinese quality control on these cheaper models...

As far as the ring on the pics above that model has the same ring just it's aluminum and has to be taken off w/pliers... No grooves. :)
 
Another thing that helps with these hosts is to clean up the threads on the barrel, head, and tailcap with some 000 steel wool (carefully - no dust or shrapnel in the aperature) then using alcohol and Q-tip make sure you completely clean the threads before reassembly - I haven't used any conductive substances on the threads (but I have read of it being done) - usually cleaning them up and making sure everything is nice and tight will help the conductivity problem.
 
That same thing happened to me it might be that the batt. is shorter by mm than others of the same type...

That is Chinese quality control on these cheaper models...

As far as the ring on the pics above that model has the same ring just it's aluminum and has to be taken off w/pliers... No grooves. :)

I tried a diferent battery and the same thing still happens. :(

I will look for the ring again
 
Another thing that helps with these hosts is to clean up the threads on the barrel, head, and tailcap with some 000 steel wool (carefully - no dust or shrapnel in the aperature) then using alcohol and Q-tip make sure you completely clean the threads before reassembly - I haven't used any conductive substances on the threads (but I have read of it being done) - usually cleaning them up and making sure everything is nice and tight will help the conductivity problem.

One of the things that I have noticed with this host is that the threads do look amazingly clean for it being so cheap. I will give your advice a try though. I have all of the tools necessary for me to do this here where I work.


Back
Top