Welcome to Laser Pointer Forums - discuss green laser pointers, blue laser pointers, and all types of lasers

LPF Donation via Stripe | LPF Donation - Other Methods

Links below open in new window

ArcticMyst Security by Avery

help with a host

Joined
Jul 10, 2015
Messages
9,799
Points
113
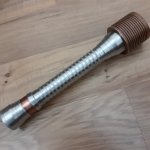
You could send in the copper ring and have a new tail cap made that will slip over the battery tube end like the copper ring did ( In place of the copper ring ) and fasten with a set screw, you would lose the copper ring though but you would not have to mail back and forth the entire host, just ring.
Actually you could measure the dia. of that shank that the copper ring goes around and simply have a tail cap made to fit around it and secure via set screw.

Hopefully someone with a lathe can help whatever you decide to do, good luck.


GSS

0
Joined
Apr 28, 2015
Messages
5,053
Points
113
Cut down the threads in the host tube and outside of the tailcap and press into the ID. of the host tube and on the OD. of the tailcap threaded sleeves.
Provided you can chuck them??
 
Last edited:
Joined
Mar 11, 2013
Messages
1,541
Points
83
Well I'm not keen on the idea of attachment via set screws, Rich already offered that solution.20190825_114031.jpg
 
Joined
Jul 10, 2015
Messages
9,799
Points
113
Well at least it's nice to know he and I think alike. :D

You could have made a new tail cap that screws into a slip over seat that attaches to that shank where the copper dress ring went, the set screws would be to permanently hold the new threaded portion that the new tail cap screws into. It may not match the aesthetics perfectly but would work.
Note: The new tail would extend into the seat to compensate for the small extra distance to keep the spring tight.
Also the new seat that replaces your brass ring could be glued permanently in place if the set screw is undesirable.


newtail.jpg
 
Last edited:
Joined
Mar 11, 2013
Messages
1,541
Points
83
I like that idea better. I'm open to many solutions I suppose. Even a set screw if it comes to that. Mainly I just want to preserve the huge ass heat sink because that thing was fairly expensive.
 
Joined
Dec 15, 2014
Messages
6,775
Points
113
Hi,
I can possibly machine an adapter to fit on the tail cap with a set screw or better do something permanent. But a new tail cap will have to be machined and the new threads of the tail cap will mate with the new adapter. And then a new spring to take up the reach to the battery.
If you agree send it over ..
Rich:)
 

Laserbran

Member
Joined
Aug 28, 2019
Messages
49
Points
8
hey folks, it's been a while since I've been active. i take a peek every now and then.

anyway, some of you may remember a host I had Ehgemus make for me. it's still my favorite. a while back, the threads for the tail cap got messed up. not sure if I misaligned them or what but it's certainly messed up now. it still works, but is held together more from the friction of the ridges than actually being screwed on. every time I take out the batteries, it gets worse and there are more metal shavings.

is there anyone here i could send it to for repair? I'm guessing it might need to have a new tailcap made, I can send the existing one for any useful parts and to serve as a template.

Any help would be greatly appreciated, it's such a nice host, would be a shame to be unable to restore it

also, just noticed the photobucket B.S. what a rip off

Lame

I've been warned not to reply to old posts but did you fix this problem? A quick search online or in your local yellow pages should provide you with a machine shop to replicate the parts. With stripped threads of a laser host diameter you probably can't use a rethreading option but have to have it remanufactured or remade. In the future a little lube on the threads like petroleum jelly will work in a host without effecting the ground.
 
Joined
Dec 15, 2014
Messages
6,775
Points
113
Hi Laserbran,
Aluminum threads can be grabby if not done right or if they were a little cross threaded. When I ship a host I apply a small amount of heat resistant grease not much . Makes the threads butter smooth. And I tell customer to take their time when threading on the threads. So folks get excited when they receive a build and go too fast and screw things up. No pun intended !! Been there plenty of times with customer issues. I also polish the threads on my builds and it helps out a lot.
Rich:)
 
Joined
Dec 15, 2014
Messages
6,775
Points
113
Hi,
Glad to be of service , just be very carful with threads . Need to see it all together and all lit up buddy.
Rich:)
 
Joined
Mar 11, 2013
Messages
1,541
Points
83
Ok then. Here it is. Might be time for a new diode soon. IIRC the current is set at 4.5A, and after it stabilizes it's "only" doing about 5.3W, looks like on DTR's pics it should be doing about 6.5W at that current. I tried that g8 you sent me rich, on all the lasers which currently have g7 lenses. I couldn't notice any difference in divergence, and power seemed to be a bit worse on every laser I tried so I guess I'm glad I only got one. It is nice that it screws in a bit further into the module, but I think I'll stick with the g7s. These lenses on the multi mode 405 make it seem almost single mode
 

Attachments

  • 20190914_173050.jpg
    20190914_173050.jpg
    549.6 KB · Views: 8
  • 20190914_173033.jpg
    20190914_173033.jpg
    480.3 KB · Views: 8
Last edited:
Joined
Dec 15, 2014
Messages
6,775
Points
113
Hi Shake,
Glad to see it up and running though, I usually send my builds with the G2 , but if a customer wants a G8 well that's their prerogative .
I have the V2's also ..
Rich:)


Top