Welcome to Laser Pointer Forums - discuss green laser pointers, blue laser pointers, and all types of lasers

LPF Donation via Stripe | LPF Donation - Other Methods

Links below open in new window

ArcticMyst Security by Avery

help with a host

Joined
Jul 10, 2015
Messages
9,880
Points
113
Thanhtung and Trin also make hosts and do machining but are in Vietnam so shipping both ways could be expensive.

You say your heat sink screws in, so you could unscrew your head/heat sink in order to access the batteries from the top and permanently attach your tailcap?


Joined
Mar 11, 2013
Messages
1,541
Points
83
No because the driver and battery contact are in the handle part. A new handle would need a spot for the driver
 
Joined
Jul 10, 2015
Messages
9,880
Points
113
You might want to post some pics so people can see what's involved in chucking it up to do a rework.
 
Joined
Mar 11, 2013
Messages
1,541
Points
83
It's been a while since I have uploaded pics. I used to use photobucket but now that's a paid service. What's the easiest way that's also free to do that?

Oh, looks like we can just directly upload them. I will do so when I get a chance. Working out of town right now and the laser is at home
 

BowtieGuy

0
LPF Site Supporter
Joined
Oct 14, 2012
Messages
6,090
Points
113
Shakenawake, are you looking for something similar to this here, "Silver Bullet", this is a heatsink that I made for one of my builds a while back; the heatsink is at about pic #12.

I'm sure one our builders could do something like that.
 
Joined
Mar 11, 2013
Messages
1,541
Points
83
Not quite, the handle on mine screws into the heatsink rather than the other way around. Will post picks when I can
 
Joined
Sep 20, 2013
Messages
17,386
Points
113
Have you tried imgur? That is where I went after photobucket. It is still a free service.
 
Joined
Mar 11, 2013
Messages
1,541
Points
83
I will look into it if I ever need such a service. Really, uploading pics here was the only thing i ever used it for so if lpf allows direct upload now, i dont really need a picture hosting site. Thanks though
 
Joined
Mar 11, 2013
Messages
1,541
Points
83
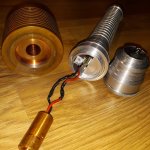
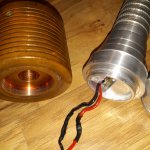
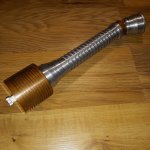
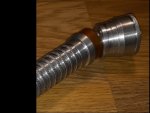
Ok here it is. As you can see, it's just a huge copper heat sink that the host screws into. The heatsink just houses the module, and has a set screw for it. The handle houses the driver20190824_171939.jpg20190824_171948.jpg20190824_173055.jpg
 
Last edited:
Joined
Jul 10, 2015
Messages
9,880
Points
113
How did you install your spring board ? Did it go in from the top where your driver is and use a retaining ring ?

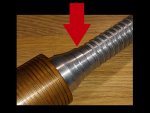
If not it should unscrew at the arrow but I assume if it won't unscrew that the board went in from the top and then you glued in the driver heat sink/bed and installed the driver, correct ?

Because usually the battery tube would screw into the driver junction from the bottom so you could install your battery spring board opposite of the driver then screw in your battery tube, the battery tube being turned from a smaller dia. length of bar stock.

herea.JPG
 
Last edited:
Joined
Mar 11, 2013
Messages
1,541
Points
83
Well I didnt make it. The handle seems to be solid metal so it must be a retaining ring. The half cylinder of aluminum the driver is mounted on seems to be thermal pasted in. So I assume it went in after the retainer for the spring board
 
Joined
Jul 10, 2015
Messages
9,880
Points
113
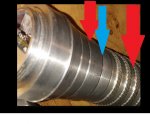
I would try grasping at the two red arrows and see if it will unscrew at the blue arrow, if so you can change your batteries like this and glue your tail cap on permanently.

The reason is if he chucked up a blank he would have to have turned down on his lathe a lot of material from a large dia. blank, usually a smaller diameter blank is used for the battery tube then another shorter but wider length of bar stock for the driver junction and another length of wider copper bar for the head, if he had used just one length of bar stock and turned out the battery tube and driver knuckle it would mean starting with a longer length wide enough for the knuckle and cutting down a lot to the battery tube dia.

Chances are the battery tube and driver knuckle are 2 separate pieces that screw together, you can grip both wearing dish washing gloves to get some torque without scratching it.

Of course it is possible that the driver portion and battery tube were all turned down from just one length of bar stock and the battery spring board was installed into a lip from the top then driver half moon glued in, but I would twist the hell out of the two ends and see.

Also you can look into the battery tube from the bottom with a flashlight and see if there is a retaining ring or not, if there is then you should be able to unscrew there parts, if you can see only a retaining ring looking past your driver from the top then it went in from the top, also you could have a retainer on both sides which indicates two sections as well.
here.jpg
 
Last edited:
Joined
Sep 20, 2013
Messages
17,386
Points
113
Interesting that the top of the battery compartment/driver section and the tail cap seem to be the same diameter. That makes me thing it could have been cut from a single bar stock. Strange that the driver wasn't turned around so the IC could be attached to the larger piece inside the handle. I guess everyone has a different idea of how these should be built.
 
Joined
Jul 10, 2015
Messages
9,880
Points
113
It looks like your tail cap screws into a copper piece, will that copper piece unscrew or was it glued on ?
If the copper piece will unscrew then you can send it and the tail cap to Rich to be reworked or rebuilt, but even if it's glued on you can still rebuild and replace it, or is it just an embellishment ? That is does your tail cap thread into that copper or aluminum of the tube with the copper band simply around it ?

The point is not having to chuck up the battery tube and driver knuckle to open it up and re thread for a replacement tail cap that would need to be made.........actually looking at how your tail cap threads are on a smaller dia. I suspect that copper is just a dress up ring but I have to ask.
tailc.JPG
 
Last edited:
Joined
Mar 11, 2013
Messages
1,541
Points
83
Yes the copper is just a band around the aluminum. It slides right off and is purely cosmetic


Top