

- Joined
- Sep 16, 2007
- Messages
- 3,667
- Points
- 113
Here's my latest project: a 561 nm laser installed in a hand-made aluminum-bronze host.
When I say hand-made, I mean I formed the host from stock using hand saws, files, abrasive paper, and tapped the threads by hand. The only power tools involved: drill press and belt sander.
Here are some details about the finished laser:
The host is made from 4 pieces. I don't have a machine shop, so I designed this to be made with simple operations that can be done by hand - cutting, drilling, threading, and filing. Additionally, only one screw type was used, to simplify the design and reduce tool costs.
One plate has threaded holes to accept all the components that are to be fastened securely: the module and aluminum heatsink, the charging circuit, and a small bracket that holds the switch in place. The driver and battery are secured using double-sided thermal tape.
The middle section of the "sandwich" is simply opened up to fit all the "meat." I filed out a rectangular aperture for a unique and harmonious look.

The simple design allows very precise alignment of the beam for centering and leveling. Rotating the laser module inside the heatsink allows for vertical adjustment, which can be fixed via a set-screw in the heatsink. Horizontal alignment can then be adjusted by pivoting the heatsink about the screw that fastens it to the base plate. These two axes of adjustment are all that is needed for very good beam centering.
About the modularity: because the entire laser assembly is contained on one plate, additional plates can be made with alternate laser modules. The middle section and cover plate can then be installed on any laser assembly, making the design modular. Additionally, the laser assembly is operable without the middle section or the cover plate, so even when the rest of the host is occupied with another laser assembly, any laser assembly made for this host is still useable as a fully "open" laser module.
The host and hardware:

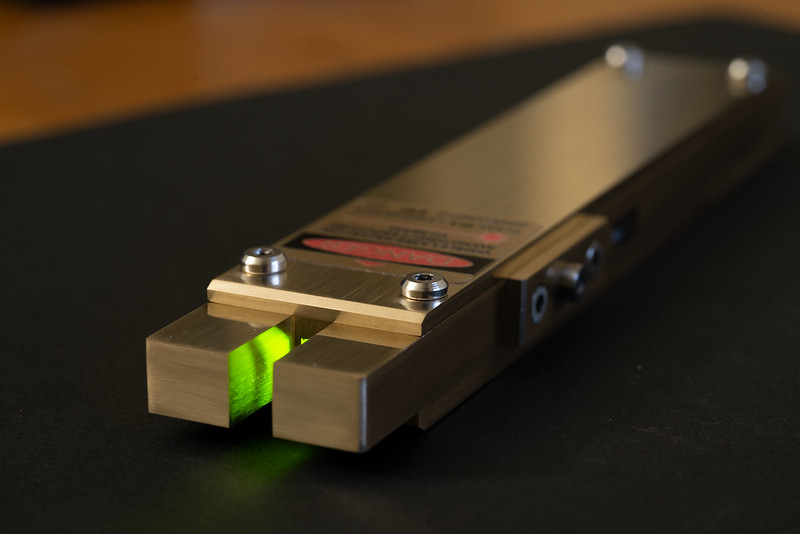
Laser assembly installed and aligned:


All wrapped up:

I later decided to put the sticker on the plate that contains the laser assembly. Oh, the red laser? That's just 100 mW of 633 nm - nothing interesting...

Here it is next to some other DPSS wavelengths: 532, 561, 570, 689. The crappy generic pen is the only 532 I had that was ~5 mW.

The 570 doesn't have a home yet:

When I say hand-made, I mean I formed the host from stock using hand saws, files, abrasive paper, and tapped the threads by hand. The only power tools involved: drill press and belt sander.
Here are some details about the finished laser:
- 561 nm ~5 mW solid state laser module, pulsed operation
- USB-rechargeable via Adafruit mini-USB charging circuit
- 500 mAh LiPo battery
- Stainless steel hardware
The host is made from 4 pieces. I don't have a machine shop, so I designed this to be made with simple operations that can be done by hand - cutting, drilling, threading, and filing. Additionally, only one screw type was used, to simplify the design and reduce tool costs.
One plate has threaded holes to accept all the components that are to be fastened securely: the module and aluminum heatsink, the charging circuit, and a small bracket that holds the switch in place. The driver and battery are secured using double-sided thermal tape.
The middle section of the "sandwich" is simply opened up to fit all the "meat." I filed out a rectangular aperture for a unique and harmonious look.
The simple design allows very precise alignment of the beam for centering and leveling. Rotating the laser module inside the heatsink allows for vertical adjustment, which can be fixed via a set-screw in the heatsink. Horizontal alignment can then be adjusted by pivoting the heatsink about the screw that fastens it to the base plate. These two axes of adjustment are all that is needed for very good beam centering.
About the modularity: because the entire laser assembly is contained on one plate, additional plates can be made with alternate laser modules. The middle section and cover plate can then be installed on any laser assembly, making the design modular. Additionally, the laser assembly is operable without the middle section or the cover plate, so even when the rest of the host is occupied with another laser assembly, any laser assembly made for this host is still useable as a fully "open" laser module.
The host and hardware:
Laser assembly installed and aligned:
All wrapped up:
I later decided to put the sticker on the plate that contains the laser assembly. Oh, the red laser? That's just 100 mW of 633 nm - nothing interesting...
Here it is next to some other DPSS wavelengths: 532, 561, 570, 689. The crappy generic pen is the only 532 I had that was ~5 mW.
The 570 doesn't have a home yet:
Last edited:


")