Welcome to Laser Pointer Forums - discuss green laser pointers, blue laser pointers, and all types of lasers

Buy Site Supporter Role (remove some ads) | LPF Donations

Links below open in new window

FrozenGate by Avery

Catdog's bluray pointer

Re: My bluray pointer

catdog said:
[quote author=Timelord link=1188969419/0#12 date=1189149091]The penny has just dropped guys Catdog is the man who made my blu-ray laser ;)
This is the first and only bluray pointer I have built, so your one wasn't made by me!

I will definately take some photos during construction showing how to put it together if I make another one.

[/quote]
It's ok my mistake it was plasmatron Leslie Wright that built my laser. I got my wires crossed because you posted his website so I drew a conclusion that it was you ;)


Re: My bluray pointer

No problem!

That is a great website - lots of detail and practical advice on using the bluray diode from a PS3 assembly. Anyone thinking of building their own bluray laser should definately check it out!
 
Re: My bluray pointer

Been there...done that...waiting for parts.. ;D
 
Re: My bluray pointer

Gazoo said:
Been there...done that...waiting for parts.. ;D
Where are you ordering the parts from? For the PS3 optical block, I would recommend divineo/supreme factory.  They are cheaper than most ebay sellers and ship within 24 hours!
Here is a link to the part I ordered: www .divineo.cn/cgi-bin/div-cn/ps3-kes440  
 
Re: My bluray pointer

I am getting mine from the group buy, in the Buy section of this forum ;)
 
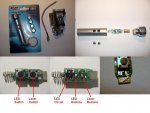
As promised, internal photos.  This version keeps the LEDs intact.

Ingredients:
- Aluminium LED keychain (5 LED and Laser)
- Mini Aixiz module (6mm)
- PS3 Laser assembly
- Resistor

Disassemble the LED keychain and make a cut as shown
 

Attachments

  • Step1.JPG
    Step1.JPG
    66.3 KB · Views: 801
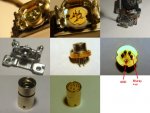
Remove the PCB from the PS3 laser, then remove the laser from the assembly.

Remove the laser diode from the Aixiz housing and insert the bluray laser in its place.
 

Attachments

  • Step2.JPG
    Step2.JPG
    67.4 KB · Views: 1,517
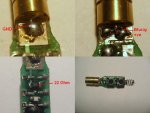
Solder the GND pin (and the one next to it which is the Red laser) to the underside of the PCB.

Solder the Bluray +ve to the top of the PCB as shown. The other pins should not touch the solder around it. I soldered the other (photodiode) pin to the small area of copper which is no longer connected to anything due to our cut earlier, adding extra strength. The 5th pin (infrared laser) is up from the PCB and not soldered to anything.

Remove the laser resistor and replace with a lower value (I used 22 Ohm, but it will depend on your laser diode and batteries - start with a high value and work down when testing).
 

Attachments

  • Step3.JPG
    Step3.JPG
    62.7 KB · Views: 241
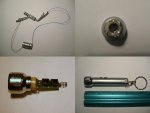
To focus the laser, tape the batteries together and connect them to the PCB (make sure they are around the correct way!). Once focused I put a small piece of tape on the aixiz module to stop it from moving.

Drill out the plastic head to 6.5mm

Insert the laser into the head, and solder the LED connections back on.

Reassemble the keychain
 

Attachments

  • Step4.JPG
    Step4.JPG
    50.4 KB · Views: 219
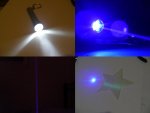
Some shots of it in action:
LEDs running
Bluray laser running
Beam shot in clean air
Drawing a line across a "glow in the dark" star
 

Attachments

  • Step5.JPG
    Step5.JPG
    36.3 KB · Views: 204
Nice "how to" catdog, yours was about the first Blue ray I had seen and I had to have one :)...I went the larger battery and full circuit route and am pleased with the result. Yours still stands out as a nice neat build.

Regards rog8811
 
Before you put the diode into the aixiz module, what was the shape of the BR light?
 
Great post catdog!, that thing sure is small! it is too bad that they cannot focus into one dot


Back
Top