

awlego
0
- Joined
- Oct 9, 2009
- Messages
- 160
- Points
- 0
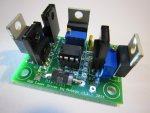
UPDATE: The pinout on the voltage regulator in the upper right hand corner is has a mistake in the silkscreen and thus many of the shipped regulators have failing voltage regulators.
Note that this only can hurt the IC/voltage regulator itself and will not be the cause of any laser diode damage.
Here is the 7085 data sheet so you can see the correct pinout of the regulator itself.
http://61.222.192.61/mccsemi/up_pdf/MC78L05BP(TO-92).pdf
Here is the fix:
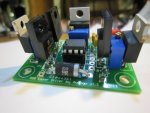
Desolder the 7805 voltage regulator and re-solder it with the pins in the following holes (shown as the appear if the driver is facing like the pictures below:
----3-----
--2---1--
New user manual: https://docs.google.com/viewer?a=v&...TEtYzlhZi00Mzg1LTllZDQtYjg4NjIwNjY4NDBl&hl=en
I have been working on a full color PWM driver that is very similar to the one FML was selling a while ago. At the time I was building my RGB setup, I was unable to buy one of his drivers, and so I designed my own. These past few months I have been designing an official version of the driver I built to sell on LPF and here is what I have come up with:

This driver has the following features:
-3x DDL drivers, each custom set to the desired maximum current
-Multi-turn potentiometers to adjust color balance
-32 different programs (ranging from psychedelic color strobe through smooth colour morphing)
-2 buttons to change programs
-Memory saves the last program
-16 million+ possible colors
-Reverse polarity protection
-Input voltage of 9-12V
-Works with both 405nm and 445nm
-Outputs of up to 1.5 Amps! (See note at bottom)
-Dimensions of 39mm x 53mm (1.25” x 1.925”) -- insanely small to fit in portable units!
-High quality professional PCB design
I have several max currents available. Below I've posted the current ranges that are available (the multi-turn pots are used to adjust the current). Instead of opting for a narrow range of color adjustment, I decided to leave a large range to allow for the user to swap out diodes in the future or greatly decrease/increase the brightness of their entire setup. With 25 turns on each pot, you should still have excellent control on each laser's current!
56mA - 101mA
63mA - 125mA
68mA - 152mA
77mA - 202mA
83mA - 251mA
89mA - 303mA
92mA - 350mA
95mA - 405mA
98mA - 446mA
100mA - 502mA
103mA - 595mA
106mA - 702mA
108mA - 791mA
110mA - 893mA
111mA - 1008mA
113mA - 1190mA
116mA - 1524mA

They cost $70 US each plus $5 for shipping to the US (one shipping charge per order). For international shipping contact me.
I have created a google form to handle my orders:
http://tinyurl.com/3q6ahqp
Feel free to ask any questions you may have")
Looking forward to making these,
-Alex
Note: for high outputs (>500mA) I have found that the LM338's (higher current versions of the LM317) get hot and need some heat sinking. I recommend heat sinking them if you plan on running them at such currents. On my RGB setup I have my 445nm diode set for the range that allows the max current, and when properly heat sinked it works flawlessly. It is also important to know that each LM338 must be heat sinked individually - you CANNOT put them all on one big heat sink. They need to be electrically isolated! There is a workaround using non-conductive thermal paste and then mounting all on the same heat sink, but use at your own risk. Also - if someone has a need for an output greater than 1.5 amps, this can be arranged. The circuit can handle up to 5 amps, but I just don’t stock the resistors needed for such outputs.
Note that this only can hurt the IC/voltage regulator itself and will not be the cause of any laser diode damage.
Here is the 7085 data sheet so you can see the correct pinout of the regulator itself.
http://61.222.192.61/mccsemi/up_pdf/MC78L05BP(TO-92).pdf
Here is the fix:
Desolder the 7805 voltage regulator and re-solder it with the pins in the following holes (shown as the appear if the driver is facing like the pictures below:
----3-----
--2---1--
New user manual: https://docs.google.com/viewer?a=v&...TEtYzlhZi00Mzg1LTllZDQtYjg4NjIwNjY4NDBl&hl=en
I have been working on a full color PWM driver that is very similar to the one FML was selling a while ago. At the time I was building my RGB setup, I was unable to buy one of his drivers, and so I designed my own. These past few months I have been designing an official version of the driver I built to sell on LPF and here is what I have come up with:
This driver has the following features:
-3x DDL drivers, each custom set to the desired maximum current
-Multi-turn potentiometers to adjust color balance
-32 different programs (ranging from psychedelic color strobe through smooth colour morphing)
-2 buttons to change programs
-Memory saves the last program
-16 million+ possible colors
-Reverse polarity protection
-Input voltage of 9-12V
-Works with both 405nm and 445nm
-Outputs of up to 1.5 Amps! (See note at bottom)
-Dimensions of 39mm x 53mm (1.25” x 1.925”) -- insanely small to fit in portable units!
-High quality professional PCB design
I have several max currents available. Below I've posted the current ranges that are available (the multi-turn pots are used to adjust the current). Instead of opting for a narrow range of color adjustment, I decided to leave a large range to allow for the user to swap out diodes in the future or greatly decrease/increase the brightness of their entire setup. With 25 turns on each pot, you should still have excellent control on each laser's current!
56mA - 101mA
63mA - 125mA
68mA - 152mA
77mA - 202mA
83mA - 251mA
89mA - 303mA
92mA - 350mA
95mA - 405mA
98mA - 446mA
100mA - 502mA
103mA - 595mA
106mA - 702mA
108mA - 791mA
110mA - 893mA
111mA - 1008mA
113mA - 1190mA
116mA - 1524mA
They cost $70 US each plus $5 for shipping to the US (one shipping charge per order). For international shipping contact me.
I have created a google form to handle my orders:
http://tinyurl.com/3q6ahqp
Feel free to ask any questions you may have
Looking forward to making these,
-Alex
Note: for high outputs (>500mA) I have found that the LM338's (higher current versions of the LM317) get hot and need some heat sinking. I recommend heat sinking them if you plan on running them at such currents. On my RGB setup I have my 445nm diode set for the range that allows the max current, and when properly heat sinked it works flawlessly. It is also important to know that each LM338 must be heat sinked individually - you CANNOT put them all on one big heat sink. They need to be electrically isolated! There is a workaround using non-conductive thermal paste and then mounting all on the same heat sink, but use at your own risk. Also - if someone has a need for an output greater than 1.5 amps, this can be arranged. The circuit can handle up to 5 amps, but I just don’t stock the resistors needed for such outputs.
Attachments
Last edited:


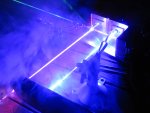
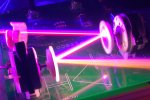
 As such, alignment is not perfect and it's not super pretty. It shows that it works though.
")