Welcome to Laser Pointer Forums - discuss green laser pointers, blue laser pointers, and all types of lasers

Buy Site Supporter Role (remove some ads) | LPF Donations

Links below open in new window

FrozenGate by Avery

Are there any portable C-mount 808nm home builds here?

Joined
Aug 13, 2008
Messages
361
Points
0
I've searched for an hour and I can't find a portable home built 808nm C-mount tutorial anywhere. All I found are commercially made portable lasers or bench type lasers.

Anyone have a link to a home built portable C-mount?


BillG519 has built a few. He posted in this section and some are in Tutorials as well.
I am working on one, but at the moment I am stuck because I need to get a heatsink made after I get back from vacation.
It's a 2W 808 powered by an 18650 and regulated by 2 stacked AMC7135 1400mA regulators for 2.8A output current and >2W output power!

There are no hosts/kits for C-mount diodes like the krytons or others so there are no tutorials.
After I get mine finished I may build a few to sell depending on interest and cost.
 
RA-
The AMC is regulated on the + side. If this is in a portable, how do you insulate the C-mount from the host ?? I'm having this problem with a rebuild.

Mike
 
RA-
The AMC is regulated on the + side. If this is in a portable, how do you insulate the C-mount from the host ?? I'm having this problem with a rebuild.

Mike

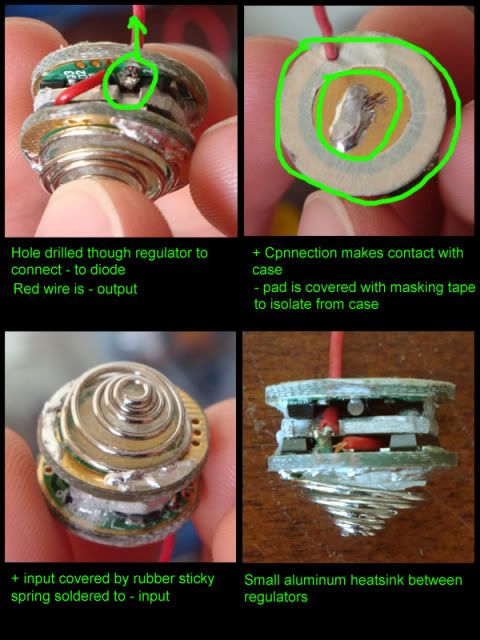
I did not insulate the diode. I made it so the + output of the regulators contact the case and the - connects to battery. The - connections of the driver are insulated from the case. I will take a picture of the setup and post it here.

Edit: here are pictures.

regulator-setup.jpg
 
Last edited:
Thanks -- I think I see what you are doing on this.
Now to think about my application........

Mike
 
Last edited:
just a suggestion.

Regulators placed in that way, seem have very little place for dissipate heat.

You already put a thick aluminium part between them for dissipate, but mainly in this position, it equalize the heat on all the chips.

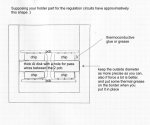
You can improve the dissipation making the aluminium that you use as dissipator in a disk of the exact diameter of the inside regulators boards enclosure, and in the mounting, putting some thermal grease or thermoconductive glue (for a permanent mount), on the chips, assembling them with the aluminium disk, then putting a little thermal grease also on the border of it, when you push it in place, so it can dissipate some temperature on the holder, improving the life of your regulators :)

As in the draw, i mean, cause with the english i'm not too good :)
 

Attachments

  • thermo01.jpg
    thermo01.jpg
    154.2 KB · Views: 240
just a suggestion.

Regulators placed in that way, seem have very little place for dissipate heat.

You already put a thick aluminium part between them for dissipate, but mainly in this position, it equalize the heat on all the chips.

You can improve the dissipation making the aluminium that you use as dissipator in a disk of the exact diameter of the inside regulators boards enclosure, and in the mounting, putting some thermal grease or thermoconductive glue (for a permanent mount), on the chips, assembling them with the aluminium disk, then putting a little thermal grease also on the border of it, when you push it in place, so it can dissipate some temperature on the holder, improving the life of your regulators :)

As in the draw, i mean, cause with the english i'm not too good :)


I understand what you are saying and I did think about this. I needed to keep it small so I set it up that way. The border of the regulators make contact with the body of the laser and that is the primary heatsink for them. The sink between is just to add a little extra mass and fill up space to make everything fit correctly. When everything is finalized I will secure it with some thermal adhesive.
:)


Back
Top