Welcome to Laser Pointer Forums - discuss green laser pointers, blue laser pointers, and all types of lasers

LPF Donation via Stripe | LPF Donation - Other Methods

Links below open in new window

ArcticMyst Security by Avery

17mm buck-boost driver (TPS63020 and LT6106)

Joined
Mar 18, 2012
Messages
173
Points
0
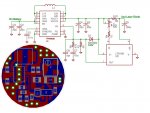
Open source laser driver. Final version
happy testing :)

attachment.php


gerber files FINAL VERSION

eagle v6 files FINAL VERSION

TINA-TI simulation file


TINA-TI is a free Texas Instruments Spice-based analog simulation program

Inductor XFL4020-152ME

DigiKey parts:
D1 - 568-6287-1-ND
C2, C3, C4, C5 - 445-8028-1-ND
R3 (Shunt, package 0805) - WSLA-.01CT-ND
R2 (current set trimmer) - 3214W-201ETR-ND

R1 (5 Kohm), R4 (10 ohm) - package 0603, use components with a good temperature coefficient (<100ppm/C)
C6 (100uF) - package 1206
C1 (0.1uF) - package 0603, any good decoupling capacitor
R5 (470 ohm) - package 0603
C7 (10 nF) - package 0603

R5-C7 form the loop frequency compensation network.
C8 is optional (secondary pole for testing purposes).
The values of R5 and C7 can be experimentally adjusted.
With the given trimmer R2 the output current range is 0.1 to 2.1 A

.
 

Attachments

  • driver.jpg
    driver.jpg
    137.4 KB · Views: 3,292
  • eagle_files_final.zip
    45.4 KB · Views: 275
  • gerber_final.zip
    13.6 KB · Views: 137
  • driver_tsc.zip
    26.9 KB · Views: 171
Last edited:


AnthoT

0
Joined
Jan 14, 2012
Messages
2,133
Points
48
Cool but do you have any test results??? How well does it work, parts list, it seems you want to make it open source which is great :beer:
 
Joined
Mar 18, 2012
Messages
173
Points
0
Cool but do you have any test results??? How well does it work, parts list, it seems you want to make it open source which is great :beer:

I want to make it open source. Everyone can try it and, if possible, improve it...
This is the right spirit for this project.
I think that many people of this forum know the capabilities and limits of the TPS63020. I hope this circuit becomes the right way to use it for lasers
 

AnthoT

0
Joined
Jan 14, 2012
Messages
2,133
Points
48
I want to make it open source. Everyone can try it and, if possible, improve it...
This is the right spirit for this project.
I think that many people of this forum know the capabilities and limits of the TPS63020. I hope this circuit becomes the right way to use it for lasers

I'll order a few and let you know how they work :beer: that's why I was asking a parts list :p
 
Joined
Mar 18, 2012
Messages
173
Points
0
I'll order a few and let you know how they work :beer: that's why I was asking a parts list :p

Ok... DigiKey parts:
D1 - 568-6287-1-ND
C2, C3, C4, C5, C6 - 445-8028-1-ND
R3 (Shunt, package 0805) - WSLA-.01CT-ND
R2 (current set trimmer) - 3214W-201ETR-ND

R1 (5 Kohm), R4 (10 ohm) - package 0603, use components with a good temperature coefficient (<100ppm/C)
C1 (0.1uF) - package 0603, any good decoupling capacitor
C7 (1 nF) - package 0603, optional to reduce the feedback path noise

L1 - Coilcraft XFL4020-152ME (you can obtain free samples from Coilcraft here)
 
Joined
Mar 29, 2011
Messages
1,056
Points
48

That looks great but shoudn't the V+ of the LT6106 be connected to the input (to the battery) instead of the output of the driver? :thinking:

and why is the zener used at all? I don't see why it's needed.. please explain.

and I think those 6.3V caps are better to be replaced with 10V caps.

can you test the output with oscilloscope? tps63020 it's known to show ripple currents when using high-side current sense monitoring.
 
Last edited:
Joined
Mar 18, 2012
Messages
173
Points
0
That looks great but shoudn't the V+ of the LT6106 be connected to the input (to the battery) instead of the output of the driver? :thinking:

and why is the zener used at all? I don't see why it's needed.. please explain.

and I think those 6.3V caps are better to be replaced with 10V caps.

can you test the output with oscilloscope? tps63020 it's known to show ripple currents when using high-side current sense monitoring.

1) In the high side current sensing circuit, the V+ is connected to the current source because the +IN of the opamp must not exceed V+.
2) If you leave the driver's output without a load (the laser diode), the driver has a zero voltage feedback and increases the output voltage until output capacitor make a loud boom!!! The zener diode solves this problem: when the sum of output voltage+0.5Volt nominal feedback is more than Vz, in the zener diode starts to flow current, the feedback becomes again effective and the output voltage is limited.
3) You can replace the 6.3V capacitors with 10V if you can find 22uF with 0603 package. :)
4) Why tps63020 should shows ripple currents when using high side current sensing? It seems a not established generic statement.
5) At last... you can try yourself to test the output with an oscilloscope. It's an open source project :)
 
Joined
Mar 29, 2011
Messages
1,056
Points
48
I asked because the TPS63020 has already build in OVP that's why I think the zener is not needed. It's actually 6.7-6.9V = the OVP. Already tested :)

1) In the high side current sensing circuit, the V+ is connected to the current source because the +IN of the opamp must not exceed V+.
2) If you leave the driver's output without a load (the laser diode), the driver has a zero voltage feedback and increases the output voltage until output capacitor make a loud boom!!! The zener diode solves this problem: when the sum of output voltage+0.5Volt nominal feedback is more than Vz, in the zener diode starts to flow current, the feedback becomes again effective and the output voltage is limited.
3) You can replace the 6.3V capacitors with 10V if you can find 22uF with 0603 package. :)
4) Why tps63020 should shows ripple currents when using high side current sensing? It seems a not established generic statement.
5) At last... you can try yourself to test the output with an oscilloscope. It's an open source project :)
 
Last edited:

AnthoT

0
Joined
Jan 14, 2012
Messages
2,133
Points
48
Nice!
I'll try it out soon and let you know :beer:

Ok... DigiKey parts:
D1 - 568-6287-1-ND
C2, C3, C4, C5, C6 - 445-8028-1-ND
R3 (Shunt, package 0805) - WSLA-.01CT-ND
R2 (current set trimmer) - 3214W-201ETR-ND

R1 (5 Kohm), R4 (10 ohm) - package 0603, use components with a good temperature coefficient (<100ppm/C)
C1 (0.1uF) - package 0603, any good decoupling capacitor
C7 (1 nF) - package 0603, optional to reduce the feedback path noise

L1 - Coilcraft XFL4020-152ME (you can obtain free samples from Coilcraft here)

So that's looking at 14.92$ per board (no shipping or PCB) with the TPS63020 and all the components you listed
 
Last edited:
Joined
Mar 29, 2011
Messages
1,056
Points
48
Nice!
I'll try it out soon and let you know :beer:


So that's looking at 14.92$ per board (no shipping or PCB) with the TPS63020 and all the components you listed

my driver is a similar one and components are pretty much the same price per board. you add the pcb, work and stuff and you are looking at ~$20 per board
 
Last edited:

AnthoT

0
Joined
Jan 14, 2012
Messages
2,133
Points
48
my driver is a similar one and components are pretty much the same price per board. you add the pcb, work and stuff and you are looking at ~$20 per board without any profit :D.

I don't think I'm going to sell them actually, I only wanted to make one or two for a future builds I had planned :D I have a reflow oven so depending how much or how little work I'll see wether i end up deciding to sell them... I don't think I will though
 
Joined
Mar 29, 2011
Messages
1,056
Points
48
I don't think I'm going to sell them actually, I only wanted to make one or two for a future builds I had planned :D I have a reflow oven so depending how much or how little work I'll see wether i end up deciding to sell them... I don't think I will though


be sure to test them on scope first with a test load. And sharing the results would be nice :)
 
Last edited:

AnthoT

0
Joined
Jan 14, 2012
Messages
2,133
Points
48
be sure to test them on scope first with a test load. And sharing the results would be nice :)

I don't have a scope :(
I can share any other results though :D I'll be ordering them sometime this week, I'll have time then
 
Joined
Jan 14, 2012
Messages
423
Points
0
Great Wall of China
The Great Wall of China is one of the magnificent man-made wonders in the history of mankind, built about 2000 years ago. Though many sections of the Great Wall of China has ruined, it is still one of the structure that has a glorious history and an appealing architecture. The Great Wall stretches across mountains, deserts, grasslands for about 5,500.3 miles (8,851.8 kilometers) from east to west in the northern part of China. The Great Wall of China was built to protect the northern Chinese empire from foreign invasions.

LMAO. Most. Random. Ever.
 
Last edited by a moderator:
Joined
Jan 14, 2012
Messages
423
Points
0
laserluke I wasn't making any mention to your driver, which does deserve a :beer: for being open sourced!

You should edit your last message instead of posting twice in a short amount of time if nobody has replied... double posting is often frowned upon.


Top