Firstly, I just want to say THANK YOU to this entire forum!!! I would not have been able to learn the specific information that enabled me to build something that I've always wanted to build! Thank you LPF, and all it's members, just for being there! 
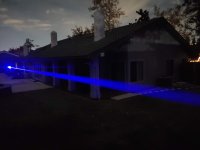
For a very, very long time, I had always wanted to build a laser from scratch. Press the diode into the module, and all that jazz....
Being that I was already very skilled in working with electronics and electricity in general (From my other hobby, building Tesla coils. Oh, and drones too...), it didn't take me very long to understand all that was required to build a laser.
I wanted to build a high-powered laser as cheaply as possible, and so, I was trying to find a solution which avoided buying a "nice" laser host, since it seemed to be the single-most-expensive part I would need! It turns out that it still wasn't very cheap to build! (but probably cheaper than if I had gone with a "nice" laser host!)
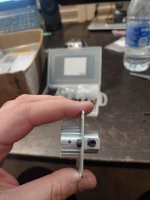
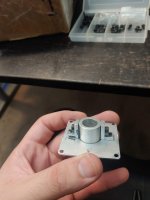
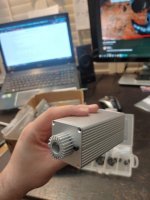
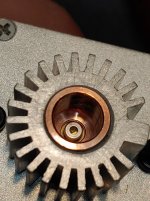
I thought, since I'm good at fabricating things without fancy machine-tools (the best thing I own is a drill-press!) I may as well see what I can do with just a bare-bones aluminum electronics-enclosure, and a heatsink for 12mm modules.
Making-sure all the dimensions worked together before buying anything, I found an enclosure that would fit a double 18650-holder perfectly, and have just enough room left over to fit a driver and the portion of heatsink that sticks into the box.
Be sure to check out my dummy load thread (details on making a dummy-load and testing the driver):
laserpointerforums.com/threads/please-help-with-my-dummy-load-design-solved-pics-and-write-up.107681/
OKAY... that's enough back-story. BUILD TIME.
(FYI, Literally EVERYTHING is from eBay!)
LASER PARTS (and supplier):
DIODE: M140, 445nm 2W (Barnett)
DRIVER: Astral SuperDrive V (Barnett)
MODULE: Copper, solid, full-length (DTR)
LENSES: G-2, AND 3-Element Glass (Barnett)
Here's PICS (I was only able to attach a max of 10 files):
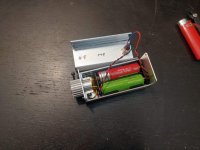
I'll admit it... recharging those batteries is a pain in the ass!
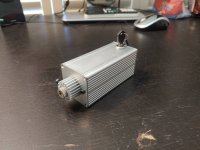
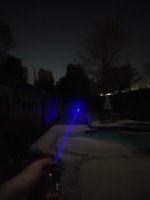
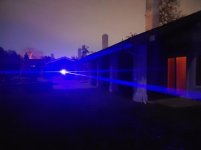
Anyways.... I F*CKING LOVE IT SO MUCH.
Yep.
So Here's a price-breakdown for all the parts:
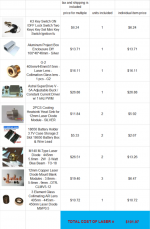
So, the lesson I learned: Lasers are expensive.
But, I'd still say, its one of my less-expensive hobbies!
FUTURE MODS I WILL DEFINITLEY ADD:
My original idea was to have the key-lock switch just enable the other buttons (I have yet to add) including a push-button momentary switch, AND some kind of toggle switch, which I'll wire in parallel with the momentary switch, thereby allowing me to choose which switch I want to use to turn it on and off. There's definitely times where I want to turn it on and leave it on without the need of holding down a button, but I also know that I'd prefer to use a momentary button switch for general pointing around (safely!) and showing-off (safely!), because it's much safer to be able to turn it off super fast by just letting go of the button.
DESIRED FUTURE-UPGRADES (will require a little more research):
1. I want to add an UVLO (under-voltage lockout) to prevent myself from over-discharging the batteries.
2. I want to add some way to make charging much easier, like a built-in USB charger. I was also considering having a power cable and balance plug that hangs outside the box (to charge it using an RC LiPo charger). However, that would look really CHEESEY... So I would like to avoid that. An internal USB charger is my #1 choice!
3. I want to add a 1/4-20 threaded hole on the bottom, for mounting to camera tripods. Just-because...
I hope you all liked my post, and I sure hope it's a worthy-contribution to this great community!
By the power of coherent light, may the photons be with you!

For a very, very long time, I had always wanted to build a laser from scratch. Press the diode into the module, and all that jazz....
Being that I was already very skilled in working with electronics and electricity in general (From my other hobby, building Tesla coils. Oh, and drones too...), it didn't take me very long to understand all that was required to build a laser.
I wanted to build a high-powered laser as cheaply as possible, and so, I was trying to find a solution which avoided buying a "nice" laser host, since it seemed to be the single-most-expensive part I would need! It turns out that it still wasn't very cheap to build! (but probably cheaper than if I had gone with a "nice" laser host!)
I thought, since I'm good at fabricating things without fancy machine-tools (the best thing I own is a drill-press!) I may as well see what I can do with just a bare-bones aluminum electronics-enclosure, and a heatsink for 12mm modules.
Making-sure all the dimensions worked together before buying anything, I found an enclosure that would fit a double 18650-holder perfectly, and have just enough room left over to fit a driver and the portion of heatsink that sticks into the box.
Be sure to check out my dummy load thread (details on making a dummy-load and testing the driver):
laserpointerforums.com/threads/please-help-with-my-dummy-load-design-solved-pics-and-write-up.107681/
OKAY... that's enough back-story. BUILD TIME.
(FYI, Literally EVERYTHING is from eBay!)
LASER PARTS (and supplier):
DIODE: M140, 445nm 2W (Barnett)
DRIVER: Astral SuperDrive V (Barnett)
MODULE: Copper, solid, full-length (DTR)
LENSES: G-2, AND 3-Element Glass (Barnett)
Here's PICS (I was only able to attach a max of 10 files):


I'll admit it... recharging those batteries is a pain in the ass!


Anyways.... I F*CKING LOVE IT SO MUCH.
Yep.
So Here's a price-breakdown for all the parts:

So, the lesson I learned: Lasers are expensive.
But, I'd still say, its one of my less-expensive hobbies!
FUTURE MODS I WILL DEFINITLEY ADD:
My original idea was to have the key-lock switch just enable the other buttons (I have yet to add) including a push-button momentary switch, AND some kind of toggle switch, which I'll wire in parallel with the momentary switch, thereby allowing me to choose which switch I want to use to turn it on and off. There's definitely times where I want to turn it on and leave it on without the need of holding down a button, but I also know that I'd prefer to use a momentary button switch for general pointing around (safely!) and showing-off (safely!), because it's much safer to be able to turn it off super fast by just letting go of the button.
DESIRED FUTURE-UPGRADES (will require a little more research):
1. I want to add an UVLO (under-voltage lockout) to prevent myself from over-discharging the batteries.
2. I want to add some way to make charging much easier, like a built-in USB charger. I was also considering having a power cable and balance plug that hangs outside the box (to charge it using an RC LiPo charger). However, that would look really CHEESEY... So I would like to avoid that. An internal USB charger is my #1 choice!
3. I want to add a 1/4-20 threaded hole on the bottom, for mounting to camera tripods. Just-because...
I hope you all liked my post, and I sure hope it's a worthy-contribution to this great community!
By the power of coherent light, may the photons be with you!


